Showing posts with label i {heart} papers. Show all posts

Saturday, February 14, 2015

I Heart You

Here's my card for this week's sketch at Freshly Made Sketches.  I went with a mostly white design for a clean look.

I added a strip of heart patterned paper to the left side of a white panel, edging it with a narrow strip of rose cardstock to set it off just a bit from the panel.  I put an angled white panel on top of that, again using rose cardstock to set it off.  The "I heart you" sentiment from the Avery Elle Aim High set was stamped on a rose fishtail flag panel and adhered to the angled panel using foam tape.  After matting the panel on more rose cardstock, I adhered it to a white card base.

The Avery Elle set I used is still available at i {heart} papers.  The IHP liquidation sale is continuing and the remaining stock has been marked down to 65% off with the coupon code BYEIHP

Materials Used:
from i {heart} papers: Avery Elle Aim High stamp set; Tsukineko Memento Tuxedo Black ink; Glitz Designs Felicity 6x6 paper pad; Sticky Thumb dimensional dots

other:  Regal Rose cardstock (Stampin' Up!); DieNamics Fishtail Flag Stax die (My Favorite Things)

Monday, February 9, 2015

Teacher Style Thanks

Thanks card-designed by Lori Tecler/Inking Aloud-stamps from Lawn FawnThe current Lawnscaping challenge is to create a clean and simple card.  I used the challenge to create a simple thank you card with Lawn Fawn's A Good Apple stamp set.  The card's teacher theme makes it perfect for me to tuck away in my desk at work for when I need to write a quick thank you to a colleague or to the parent of a student.

I stamped the set's "thanks" image in black pigment ink on a kraft panel, then heat embossed the word with black embossing powder.  To dress it up a bit, I stamped the set's apple and ruler images in black ink on a scrap of white cardstock.  After coloring the images with Copic markers, I cut them out and arranged them at the end of the word.  The apple was adhered with foam tape for a little pop.   The finished panel was layered on to an easy to write on white card base.

This set is among the items still available at i {heart} papers.  IHP's liquidation sale is continuing and as of today, your order will be discounted 65% with the code BYEIHP at checkout.  In addition, Kate has packed up some huge Priority Mail boxes of assorted ribbon (worth over $200) that are selling for $80.  With the coupon, the boxes will sell for $28 (plus shipping).  That's a great deal for all of you ribbon lovers out there.  You can find the boxes here while supplies last.

Materials Used:
from i {heart} papersLawn Fawn A Good Apple stamp set; Tsukineko Memento Tuxedo Black ink and Memento Luxe Tuxedo Black ink


other:  Kraft cardstock (WPlus9); black embossing powder (Stampin' Up!); markers (Copic)

Thursday, February 5, 2015

Birthday Fishes

This week's Paper Smooches SPARKS challenge is anything goes.  I made a clean and simple birthday card using a classic Paper Smooches set, Birthday Buddies.

Birthday Fishes card-designed by Lori Tecler/Inking Aloud-stamps from Paper Smooches
I stamped the set's fish image on a matching die cut piece, then used Copic markers to color the image.  I used foam tape to adhere it to a strip of blue ombre patterned paper.  The paper has a pretty watery look in real life.  

I adhered the patterned paper panel to a dark blue card base.  The set's "birthday fishes" sentiment was stamped in black ink on an orange circle and adhered near the bottom of the patterned paper panel.  I added a few sparkly silver sequin "bubbles' above the fish for a whimsical touch.

Materials Used:
from i {heart} papersPaper Smooches Birthday Buddies stamp set and Buddies dies; Tsukineko Memento Tuxedo Black ink; Glitz Designs Felicity 6x6 paper pad; spotlight silver sequins

other:  Pacific Point and Pumpkin Pie cardstock  (Stampin' Up!); circle punch (EK Success)

Monday, January 26, 2015

Ombre Love

This simple love themed design was inspired by the current challenge at the Card Concept.  The ombre letters caught my eye, so I made them the focal point of this clean and simple design.

Love You card-designed by Lori Tecler/Inking Aloud-dies from Avery Elle
My version of ombre letters was made by gluing narrow strips of pink, dark pink, and red cardstock to a piece of scrap cardstock.  I used the "love" and "you" dies from Avery Elle's Fill in the Blank die set to cut out the letters.  They were arranged at the bottom of a narrow kraft cardstock strip.  To bring in the woodgrain element from the inspiration photo, I die cut a heart from woodgrain patterned paper using the Icon Fill in the Blank dies.  I replaced the "o" in you with the die cut heart, using foam tape to give it a little pop.  After wrapping the top of the kraft strip with rose twine and securing it with a bow, I adhered it to a pale pink card base.

On another note, the big liquidation sale is still in progress at i{heart} papers. As of today, the discount code BYEIHP has increased to 50% off. There are still some great items in stock, including the Fill in the Blank dies I used on this card.  Be sure to head over to IHP to take advantage of this super deal.

Materials Used:
from i {heart} papers: Avery Elle Fill in the Blank and Icon Fill in the Blank dies; Fancy Pants Everyday Circus 6x6 paper pad; Hemptique Spring Bloom 2 twine

other:  Melon Mambo, Real Red, and Pink Pirouette cardstock (Stampin' Up!); foam tape

Friday, January 23, 2015

You Anchor Me

This week's blogger challenge theme is "by the sea."  I used the Paper Smooches Wicked Nauticool set and this week's Mojo Monday sketch for this nautical themed design.

You Anchor Me card-designed by Lori Tecler/Inking Aloud-stamps from Paper SmoochesI die cut the sailboat from white cardstock using the Nauticool die, then stamped the matching image on the die cut in black ink.  It was colored with Copic markers, then adhered to the round background panel using dimensional dots.  To get the wavy "water," I used the scallop die from the Borders 2 die set.  I filled in the empty space at the top of the panel with a cloud die cut from shimmery white cardstock.

I covered a red card base with a blue cardstock panel that matched the color of the water on the image panel.  The blue panel was topped with a harlequin After matting the round panel on red cardstock, I adhered ti to a blue cardstock panel topped with a red harlequin patterned paper panel.  After running an ivory twill strip across the top of the panel, I added the image panel on top.  The set's "you anchor me" sentiment was stamped beneath the image panel directly on the patterned paper panel in black pigment ink.

Materials Used:
from i {heart} papersPaper Smooches Wicked Nauticool stamp set, Nauticool, Spectrum Icons and Borders 2 dies; Tsukineko Memento Tuxedo Black ink and Memento Luxe Tuxedo Black ink; Fancy Pants Everyday Circus 6x6 paper pad; May Arts ivory twill; Sticky Thumb dimensional dots

other:  Soft Sky, Real Red, Shimmery White, and Pacific Point cardstock (Stampin' Up!)

Thursday, January 22, 2015

Quill You Be My Valentine


Here's my card for this week's Paper Smooches SPARKS anything goes challenge.  I went with a Valentine's Day theme using the adorable Love Struck stamp set and coordinating Love Struck Icons dies.

Quill You Be My Valentine card-designed by Lori Tecler/Inking Aloud-stamps and dies from Paper SmoochesI stamped the sweet cupid image on white cardstock, then colored him with Copic markers and used the matching die to cut him out.  It's hard to see in the photo, but I paper pieced his outfit with a scrap of patterned paper.

I used dimensional dots to adhere the cupid image to a piece of ombre heart patterned paper.  A shimmery white cloud, die cut with one of the Spectrum Icons dies, was tucked underneath the cupid.  I stamped the set's "quill you be my Valentine" sentiment above the image in navy pigment ink.   A few white sequins scattered around the cupid add a little sparkle to the design.  I adhered the finished panel to a navy card base to match the sentiment.

There are still a number of Paper Smooches sets available at i {heart} papers, including this one.  Use the code BYEIHP at checkout to take advantage of the liquidation sale and receive a 40% discount on your purchase.


Materials Used:
from i {heart} papers:  Paper Smooches Love Struck stamp set and Love Struck Icons and Spectrum Icons dies; Tsukineko Memento Tuxedo Black ink and Memento Luxe Nautical Blue ink; Glitz Design Felicity 6x6 paper pad; white sequins; Sticky Thumb dimensional dots

other:  markers (Copic); Shimmery White cardstock (Stampin' Up!)

Friday, January 16, 2015

Let's Talk

This week's blogger challenge theme is girlfriends. I used the current Mojo Monday sketch along with some supplies from i {heart} papers to put this cheery card together.

Let's Talk card-designed by Lori Tecler/Inking Aloud-stamps from Hero Arts
The old-fashioned phone is from an older Hero Arts stamp set, Just Saying Hi.  I stamped the phone in gray pigment ink on white cardstock, then heat embossed it with clear embossing powder to give it a shiny look.  The "cord" was made from a piece of twine, twisted around the end of my paper piecing tool to make it curly.  I used dimensional dots to adhere the phone to an orange cardstock strip stamped with the "let's talk" sentiment.

The sentiment panel was adhered to a pale gray cardstock panel over a strip of solid orange cardstock and a floral paper panel.  The orange panels were edged with narrow strips of pale lemon yellow cardstock.  I added a little sparkle with a trio of yellow sequins.

Be sure to stop by i {heart} papers to check out the big liquidation sale.  Use the coupon code BYEIHP at checkout to get the current discount on your order.  As of today, the discount will be increasing to 40%.  Because of the steep discount being offered, free shipping is no longer available.  Shop now while supplies last!

Materials Used:
from i {heart} papersHero Arts Just Saying Hi stamp set; Tsukineko Memento Luxe Gray Flannel ink; Chickaniddy Crafts Date Night 6x6 paper pad; yellow sequins

other:  Grout Gray, Lemon Chiffon, and Orange Fizz cardstock (My Favorite Things); Summer Sunrise cardstock (Papertrey Ink); clear embossing powder (Michaels)

Tuesday, January 13, 2015

Wintery Hello


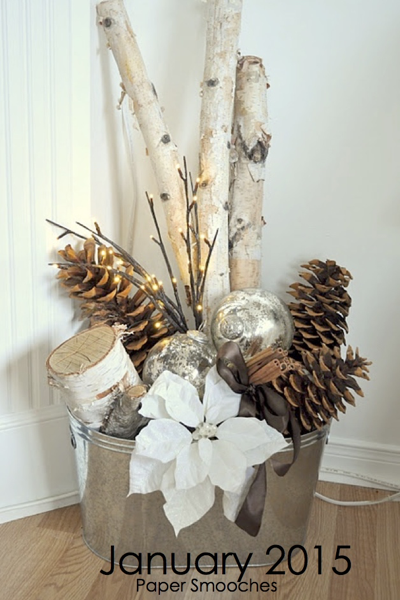
Here's my card for this week's Paper Smooches SPARKS Picture Perfect challenge.  I was inspired by the photo's soft, earthy color palette and the branches in the tin bucket.

Wintery Hello card-designed by Lori Tecler/Inking Aloud-stamps and dies from Paper Smooches
I made a simple snowy scene, combining images from the Hooties and My Peeps sets.  I stamped one of the branches from the Hooties set in brown ink on white cardstock, then colored the branch in with Copic markers.  After cutting it out, I adhered it to a pale gray cardstock panel.  I added a pop of color to the scene with a bird from the My Peeps set, colored red with Copic markers and adhered to the branch using dimensional dots.  Once the bird was in place, I stamped the "hello" sentiment from the Word Salad set next to it in brown ink.

To give the scene a wintery look, I used one of the dies from the Backdrop Builders set to fashion a snowbank from a piece of shimmery white cardstock.  I adhered the die cut cardstock to the bottom of the panel, then added a trio of white sequin "snowflakes" around the panel.  The finished panel was adhered to a white card base.

Materials Used:
from i {heart} papers:  Paper Smooches Hooties, My Peeps, and Word Salad stamp sets and Backdrop Builders dies; Tsukineko Memento Rich Cocoa ink; white sequins; Sticky Thumb dimensional dots

other:  Grout Gray cardstock (My Favorite Things); Shimmery White cardstock (Stampin' Up!); markers (Copic)

Friday, January 9, 2015

Turtle-ly Awesome

Here's another Valentine's Day card to add to the collection I'm sending to a card drive for kids.  I used an older WPlus9 stamp set along with this week's Mojo Monday sketch for this one.

Turtle-ly Awesome card-designed by Lori Tecler/Inking Aloud-stamps and dies from WPlus9

My focal image is the turtle from the Bitty Buddy Valentines set.  I stamped it in green pigment ink, cut it out with the matching die, then used dimensional dots to adhere it to a cream panel.  The "you're turtle-ly awesome" sentiment was stamped beneath the turtle in brown pigment ink.  I adhered the turtle to a kraft panel along with coordinating brown cardstock and green star patterned paper panels.  After wrapping the panel with ivory twill, I layered it on to an easy to write on cream card base.

Along with this card, I have some sad news to share. After 6 fabulous years, Kate has made the  decision to close i {heart} papers.  You can read all the details on the IHP blog.  I've been with IHP and Kate since the very beginning and I've loved every minute and can't thank her enough for having me along for the ride!  I'm sad to see IHP close, but so very grateful for the lasting friendships I've made as part of the IHP team.

Here's what you need to know about the store closing.  Starting today the store inventory will be cleared out.  Use coupon code BYEIHP at checkout. Everything is 30% off using this code. As inventory dwindles, the amount of the coupon may change to help move things along. You receive the discount that is in place at the time of your order, even if the discount amount increases later on in the sale. You will get the best selection early on, so don't wait. If you wait, items will sell out!

Due to the steep discounts, free shipping is not being offered any longer. Shipping will be calculated at checkout.

Gift certificates must be redeemed by Jan 31, 2015. New gift certificates are no longer for sale.

And obviously, all sales are final.

Materials Used:
from i {heart} papers:  WPlus9 Bitty Buddy Valentines stamp set and Bitty Buddies dies; Avery Elle Celery ink; Tsukineko Memento Luxe Rich Cocoa ink; Fancy Pants Designs Everyday Circus 6x6 paper pad; May Arts ivory twill; Sticky Thumb dimensional dots

other:  Chocolate Chip and Very Vanilla cardstock (Stampin' Up!); Kraft cardstock (WPlus9)

Monday, January 5, 2015

The Challenge 22-Ruff You


The Challenge is back with a new sketch and color combination!  You can choose to use either just the colors, just the sketch, or to combine them both.  I combined the colors and the sketch, flipped on its side, for this sweet dog themed design.

Ruff You card-designed by Lori Tecler/Inking Aloud-stamps from Paper Smooches
I used a pair of dog images from the Paper Smooches Paws for a Cause set.  They were stamped in brown pigment ink on a white panel with a green cardstock strip along the bottom.  I stamped a tiny heart from the set in red pigment ink between the two dogs.  The "ruff you" sentiment in the top left corner of the panel is a combination of sentiments from the Paws for a Cause set and the Sweet Hearts set.

I adhered the panel to a chocolate cardstock panel over a piece of star patterned paper.  The left side of the chocolate panel was dressed up with a bit of white paper doily and a strip of red grosgrain ribbon.  The elements added some texture to the simple design.

Don't miss what the rest of the amazing challenge team has created to inspire you!  Here's where to find them:

Lesley Croghan, challenge owner/creator
Kim Heggins
Kimberly Wiener 
Lori Tecler --you're here!
Lynn Put
Maura/Beesmom
Nancy Salkeld
Veronica Zalis

Materials Used:
from i {heart} papers:  Paper Smooches Paws for a Cause and Sweet Hearts stamp sets; Tsukineko Memento Luxe Love Letter and Rich Cocoa inks; Carta Bella Boy Oh Boy 6x6 paper pad

other:  Chocolate Chip and Old Olive cardstock (Stampin' Up!); red grosgrain ribbon (Michaels); white paper doily

Saturday, January 3, 2015

Shoot

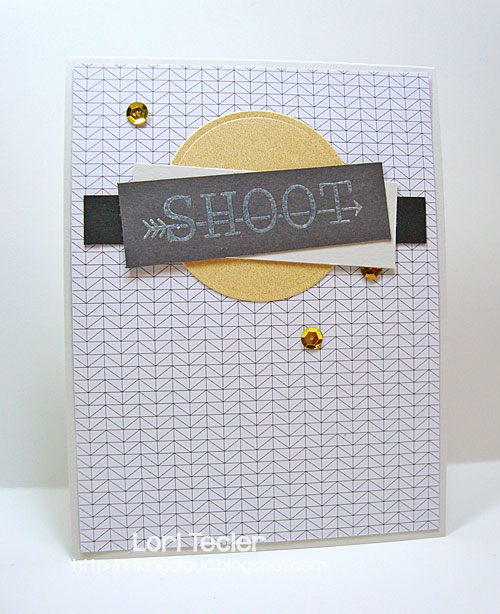
Here's a simple, graphic design based on the current Deconstructed Sketch. I used the Aim High set from Avery Elle along with some cardstock scraps to put this one together.

Shoot card-designed by Lori Tecler/Inking Aloud-stamps from Avery Elle
I started out with a black and white graphic patterned panel to cover my pale gray card base.  I die cut a circle from shiny gold cardstock and attached that to the top of the panel.  Then I mixed and matched some black, gray, and light gray scraps until I came up with an arrangement I liked.  The "shoot" sentiment was stamped in white pigment ink on the dark gray strip, then heat embossed with a pearly white embossing powder.  It looks great IRL!  The final touch was a trio of yellow sequins arranged around the round panel.  I love the little bits of sparkle against the rest of the card's neutral color palette.

Materials Used:
from i {heart} papersAvery Elle Aim High stamp set; Tsukineko Memento Luxe Wedding Dress ink; Chickaniddy Crafts Date Night 6x6 paper pad; Wow White Pearl embossing powder; yellow sequins

other:  Grout Gray and Steel Grey cardstock (My Favorite Things); Basic Black cardstock (Stampin' Up!); gold paper (Target); circle die (Spellbinders)

Friday, January 2, 2015

You Belong Together

My mom and dad celebrated their 46th (yes, 46th!) wedding anniversary earlier this week.  That event definitely called for a card, so I put this sweet one together based on the current Mojo Monday sketch.

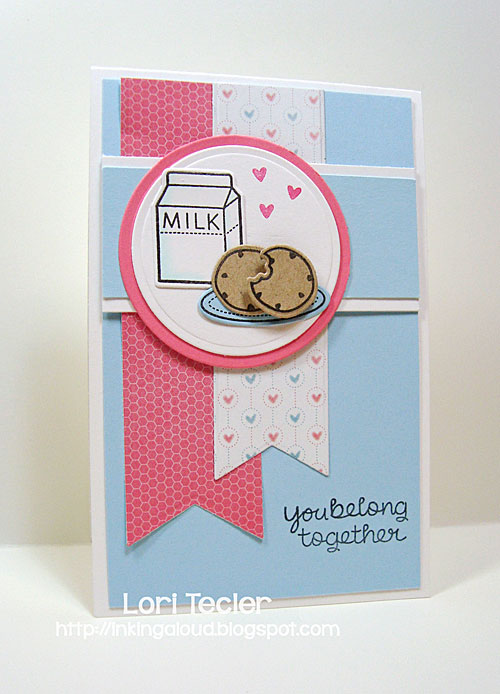
You Belong Together card-designed by Lori Tecler/Inking Aloud-stamps from Lawn Fawn
I used Lawn Fawn's Milk and Cookies set for the image panel.  Cookies and milk are perfect together, just like my parents!  The set's matching dies made it easy to get the pieces together quickly.  To go with the card's love theme, I stamped a trio of tiny hearts on the panel in pink pigment ink.

I cut two fishtail flag strips from coordinating patterns from a Glitz paper pad to go behind the image.  The panels were arranged on a long light blue panel.  I combined the "you" from the Here's the Scoop set with the "belong together" from the Milk and Cookies set to get my custom sentiment for the bottom of the card.  The finished panel was adhered to a white card base. My mom and dad are currently away on a trip, but this will be waiting for them when they return.

Materials Used:
from i {heart} papers:  Lawn Fawn Milk and Cookies and Here's the Scoop stamp sets, Milk and Cookies dies; Tsukineko Memento Tuxedo Black ink and Memento Luxe Rose Bud ink; Glitz Designs Felicity 6x6 paper pad; Sticky Thumb dimensional dots

other:  Bashful Blue and Regal Rose cardstock (Stampin' Up!); Desert Storm cardstock (Neenah); markers (Copic); Fishtail Flag Stax and Fishtail Flag Layers Stax dies (My Favorite Things)

Tuesday, December 30, 2014

Who Loves You?

This week's Paper Smooches SPARKS challenge is a designer draft challenge.  I used the sketch for this sweet love themed design.

Who Loves You? card-designed by Lori Tecler/Inking Aloud-stamps and dies from Paper Smooches
I used the medium sized owl from the Hooties set along with one of the trees from the Trees 1 dies to make a simple scene. The die cut pieces were arranged on a piece of star patterned paper. Turned on its side, the tree works perfectly as a branch here!  I  added a few yellow sequin "stars" for some sparkle, too.

After matting the patterned paper panel on blue cardstock, I adhered it to a light blue card base. The "who loves you?" sentiment was stamped on an angle beneath the image panel in aquamarine pigment ink.

Materials Used:
from i {heart} papers:  Paper Smooches Hooties stamp set, Owl Icons and Trees 1 dies; Avery Elle Aquamarine ink; Tsukineko Memento Tuxedo Black ink; Doodlebug Design  Happy Camper 6x6 paper pad; yellow sequins; Sticky Thumb dimensional dots

other:  Aquamarine and Sea Glass cardstock (Avery Elle); Close to Cocoa cardstock (Stampin' Up!)

Sunday, December 28, 2014

Deconstructed Love

Here's my card for the current Deconstructed Sketch.  I went with love themed card using stamps from Avery Elle.

Love You card-designed by Lori Tecler/Inking Aloud-stamps from Avery Elle
My card features a soft pink color scheme with gold accents and pops of coral, too.  I tend to really favor silver as a metallic, but I have to admit that gold is growing on me!  The focal image is a stamped heart from the Simply Tags set.  I stamped the heart in pale pink pigment ink, then heat embossed the image with a pearly embossing powder to get a raised look like the heart would have if it were really cross stitched.

I adhered the heart to a pale pink panel over a coral fishtail flag strip.  The stamped panel was topped with a delicate white bow.  The layered sentiment panel was adhered to a pink ombre dotted patterned paper panel over a gold paper strip.  I stamped "love you" in shimmery gold ink at the bottom of the dotted panel, using a combination of two sentiments from the set.  The finished panel was adhered to a pale pink card base.

Materials Used:
from i {heart} papers:  Avery Elle Simply Tags stamp set and Pixie ink; Fancy Pants Burlap and Bouquets 6x6 paper pad; May Arts white ribbon; Wow White Pearl embossing powder

other:  Insulation Pink cardstock, Die-namics Fishtail Flag Stax dies (My Favorite Things); Berry Sorbet cardstock (Papertrey Ink); gold paper (Target); Delicata Golden Glitz ink (IMAGINE Crafts/Tsukineko); oval die (Spellbinders); corner rounder

Tuesday, December 23, 2014

Good Times Are Ahead

Today is (finally) the last day of school before winter break.  My class of 18 kindergarteners will be making and decorating gingerbread houses (or "models of houses" so that we can say there is a link to our curriculum . . .) this afternoon, so I'm hoping that I am able to survive the day.  After that, I will definitely have earned my break if I haven't already done so.  I'm giving serious thought to spending my 12 day break in my pajamas, curled up in bed . . .

Good Times Are Ahead card-designed by Lori Tecler/Inking Aloud-stamps and dies from Avery ElleGiven that, the message on my card today is most appropriate.  The last year has brought many unexpected changes that were way out of my control and turned my life upside down.  I've spent a lot of time adjusting to those changes and it's definitely taken a toll on me.  I'm hopeful that I've made it through the worst and that good times are finally ahead.

To go with the current AEI♥U challenge, I used an inlaid die cutting technique on my card, first cutting the row of circles using a die from Avery Elle's Aim High set, then went back and filled in each round opening with a bold black circle and a neon-like arrow.  I oriented the arrows in different directions to add interest.  The "good times are ahead" sentiment from the coordinating Aim High stamp set was stamped just beneath the arrows in black pigment ink.  I matted the panel on contrasting black cardstock, then adhered it to a pink card base.


Materials Used:
from i {heart} papers: Avery Elle Aim High stamp set and Aim High dies; Tsukineko Memento Luxe Tuxedo Black ink

other:  Pixie Pink, Green Galore, Yoyo Yellow, and Basic Black cardstock (Stampin' Up!)

Monday, December 22, 2014

Happy Hanukkah

Hanukkah's not quite over yet, so I thought I should get at least one Hanukkah design up on my blog this year.  This one was designed with the current Lawnscaping holiday challenge and the current "silent night neutrals" color challenge at The Card Concept in mind.

Happy Hanukkah card-designed by Lori Tecler/Inking Aloud-stamps from Lawn Fawn
I used a neutral color palette based on the Card Concept challenge graphic on my clean and layered design.  The card base is a dark gray piece that I topped with a strip of lighter gray striped patterned paper.  The patterned paper is edged with a narrow white strip and just a bit of a kraft scalloped edge strip to break up the gray.

To bring in some sparkle, I heat embossed the dreidel from Lawn Fawn's Happy Hanukkah stamp set in silver ink.  I cut the dreidel out and used dimensional dots to adhere it to the cardfront.  I was worried the sentiment might be lost in the stripes if I didn't stamp it on a separate panel, so I also heat embossed it in silver, then adhered it to the striped panel.  The dreidel was surrounded by a trio of yellow sequin "gelt" pieces for a final festive touch.

Materials Used:
from i {heart} papersLawn Fawn Happy Hanukkah stamp set; Pink Paislee Hello Sunshine 6x6 paper pad; yellow sequins; Sticky Thumb dimensional dots

other:  Smokey Shadow cardstock (Papertrey Ink); Desert Storm cardstock (Neenah); Delicata Silvery Shimmer ink (Tsukineko); silver embossing powder (American Crafts)

Tuesday, December 16, 2014

Season's Greetings

Here's my card for the current Deconstructed Sketch.  I put together this simple holiday design using a seasonal sentiment from Paper Smooches and a piece of pretty tone on tone patterned paper.

Season's Greetings card-designed by Lori Tecler/Inking Aloud-stamps from Paper Smooches
The red striped tone on tone paper is from a Simple Stories paper pad.  I added a kraft strip to the top of the panel, then hid the seam between the two panels with a solid red scalloped strip edged with a narrow piece of gold paper.  The "season's greetings" sentiment from the Christmas Sampler set was stamped in red pigment ink on a cream panel, then matted on kraft cardstock.  After adhering two tiny handcut fishtail flag strips to the bottom of the sentiment panel, I set it on the patterned paper panel.  The finished panel was matted on gold paper, then adhered to a kraft card base using dimensional dots.

Materials Used:
from i {heart} papersPaper Smooches Christmas Sampler stamp set; Tsukineko Memento Luxe Rhubarb Stalk ink; Simple Stories Say Cheese 6x6 paper pad; Sticky Thumb dimensional dots

other:  Riding Hood Red cardstock (Stampin' Up!); Kraft cardstock (WPlus9); gold paper (Target); scallop die (Papertrey Ink)

Saturday, December 13, 2014

I Thank My Lucky Stars

Here's a super simple design for this week's sketch at Freshly Made Sketches.  A big sentiment stamp and some pretty ombre paper helped this one to come together quickly.

I Thank My Lucky Stars card-designed by Lori Tecler/Inking Aloud-stamps from WPlus9I stamped the friendship sentiment from the WPlus9 Lucky Stars stamp set in navy blue pigment ink on a white panel.  After edging the panel with a blue scalloped strip, I adhered it to the edge of the ombre patterned paper.  To go with the sentiment's star theme, I added a shimmery gold die cut star, using dimensional dots to highlight the star.  The finished panel was adhered to a coordinating navy card base.

Materials Used:
from i {heart} papersWPlus9 Lucky Stars stamp set; Tsukineko Memento Luxe Nautical Blue ink; Glitz Design Felicity 6x6 paper pad; Sticky Thumb dimensional dots

other:  Night of Navy cardstock (Stampin' Up!); gold paper (Target); star die (Lil' Inker Designs); scallop die (Papertrey Ink)

Thursday, December 11, 2014

Happy Bird-day


Here's my card for this week's Paper Smooches SPARKS anything goes challenge.  I used the current sketch from Retro Sketches to make a punny birthday card with the Birthday Buddies stamp set.

Happy Bird-day card-designed by Lori Tecler/Inking Aloud-stamps and dies from Paper Smooches
I covered a white card base with a pink striped paper panel.  The busy stripes were broken up with solid cardstock strips--a wide rose strip topped with a narrower yellow strip and a narrow pale pink strip.  I stamped the bird image on white cardstock and colored it with Copic markers to match the card's color scheme, then used dimensional dots to adhere it to the cardfront.  The set's "happy bird-day" sentiment was stamped just beneath the bird in black ink.  A trio of white sequins framing the birdie added a final festive touch to the card.

Materials Used:
from i {heart} papersPaper Smooches Birthday Buddies stamp set; Tsukineko Memento Tuxedo Black ink; My Mind's Eye Now and Then-Dorothy 6x6 paper pad; white sequins; Sticky Thumb dimensional dots

other:  Blushing Bride, Regal Rose, and Barely Banana cardstock (Stampin' Up!)

Wednesday, December 10, 2014

Color Throwdown 322-Thank You


It's time for another Color Throwdown!  Our hostess this week is Tammy and she's picked a fun color combo inspired by an adorable fabric swatch.

Floral Thank You card-designed by Lori Tecler/Inking Aloud-stamps from Avery Elle
The layout for my card is based on the current sketch at CAS(e) this Sketch.  I made a cheery floral design using stamps from Avery Elle.  To get the continuous look of the stamped images, I used repositionable adhesive to hold the white panel in place on the pale pink panel while I stamped the images.  It's hard to see in the photo, but I heat embossed the dots at the centers of the solid red flowers using a pearly white embossing powder.

Once I was done stamping, I lifted the white panel, then matted it on red cardstock before adhering it with permanent adhesive.  The "thank you" sentiment was stamped in the lower left corner of the white panel in red pigment ink

To play along, just create a paper crafted project using these colors as a starting point and add a direct link to your finished project using the linky tool found at the end of this week's CTD post. As always, if you don’t have exact color matches, something close works just fine. Just be sure that the challenge colors are the dominant ones in your project. And, if you upload your project to an online gallery, use the keyword CTD322. Before you get started, here’s some inspiration from the talented Color Throwdown team, our December guestie, Sue Lelli, and this week’s guest star stamper, Birgit.

** Barbara ** Broni ** Joan ** Jodi **
** Monika ** Tammy ** Vickie ** Wanda **
** December guestie Sue Lelli **
** Guest Star Stamper Birgit**

Materials Used:
from i {heart} papers: Avery Elle Fabulous Florals stamp set and Aquamarine, Cherry, Celery, and Pixie inks; Tsukineko Memento Luxe Wedding Dress ink; Wow White Pearl embossing powder

other:  Blushing Bride and Real Red cardstock (Stampin' Up!)
 
Blogging tips