Friday, December 13, 2013
Season's Greetings Ornament Gift Set
This week’s blogger challenge theme is ornaments. I created a simple woodland themed ornament along with a coordinating box for gift giving using stamps and dies from Clear and Simple Stamps.
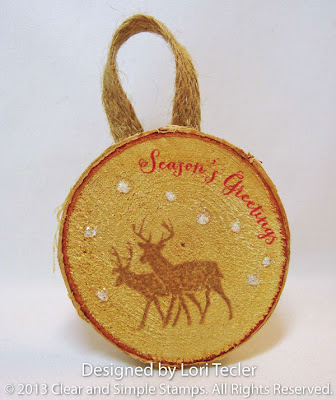
I picked up a bag of birch tags at the craft store recently, thinking that I’d come up with something to do with them and realized that they were just perfect for making an ornament. Chloe the cutie puppy also discovered they make fabulous chew toys—she stole my test run ornament off of the table pretty much every time I had my back turned . . . Anyway, I discovered that CSS’s inks stamp beautifully on the tags. Here, I stamped one of the deer images from the Party Elements: Winter Woodlands set on the tag in Brown Leather Satchel ink, then added the “season’s greetings” sentiment along the tag’s edge in Dare to Be a Diva Red ink. The snowflakes are made with some Ice Stickles. I sprinkled a little bit of dry glitter over the Stickles for even more sparkle (and mess on my table, too).
The ornament hanger is made from a piece of CSS’s burlap ribbon. After some consideration about the best way to adhere the ribbon to the back of the tag, I used a staple gun to attach the ribbon. It holds it nice and secure and the staple points don’t show through the front of the tag. Covering the back with some felt or cardstock would have given this a more finished look, but I didn’t think about that until I was taking the photo . . .
I made a box to hold the ornament using CSS’s Party Favor 8 die. The box was die cut from red textured cardstock. Before assembling it, I used the largest die from the Shapes: Circles set to cut an opening in the box. When assembled, the ornament is visible from the opening when the top flap of the box is lifted. I added a pair of layered circles mirroring the colors of the ornament on the front of the box, then used foam tape to attach a die cut banner, stamped with the “season’s greetings” sentiment, on top.
Materials Used:
Party Elements: Winter Woodlands, New Year Cheer, Background Basics 1 stamp sets, Dare to Be a Diva Red and Brown Leather Satchel inks, Kraft Like a Rockstar cardstock, Party Favor 8, Shapes: Circles, and Petite Banner dies, burlap ribbon, Simple Adhesive (Clear and Simple Stamps); red textured cardstock, birch tag (Michaels); Crystal Ice Ice Stickles and Diamond dry Stickles (Ranger); staple gun; foam tape
Subscribe to:
Post Comments (Atom)


No comments:
Post a Comment