 Even though I'm not a coffee drinker, I really like this set a "latte." The Like It a Latte set is featured in Stampin' Up!'s current Winter mini catalog. I thought that one of the sentiments in this set --"Nothing's better than a good friend with chocolate."-- would work perfectly with this double slider card layout. At first glance, it seems like this is a complicated card to make, but it really wasn't--I promise! The card has extra texture and embellishment from the Cuttlebug D'vine Swirl A2 embossing folder and some Liquid Applique on the marshmallows--yum! Here's how I made the card.
 1. Cut cardstock to 4 1/4" by 11". This is half of a regular piece of cardstock. Score in the middle of the long side of the paper at 5 1/2".
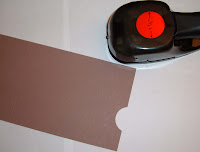
 2. Using the 1 1/4" circle punch, punch a divot at the top of the cardstock. This will be the part that's pulled to reveal the hidden message. Be sure to punch it a little way in from the edge of the cardstock (1" to 1 1/4" inch from the edge or so).
 5. Put the piece that will be the front slider over the dimensionals. The Pretty in Pink panel in this sample is 2 1/4" wide by 3 1/4" long.
 6. Put dimensionals along the edges of your stamped cover panel. Place the panel over the slider images/slot. The Pretty in Pink cover panel here is 3 3/4" by 4".
7. To complete the card, adhere the inside edges of the card together with adhesive to secure the slider mechanism. I added a ribbon pull to the top of the rear slider as a hint to the surprise inside.
Materials Used:
Stampin' Up!: Close to Cocoa, Chocolate Chip, Pretty in Pink Classic inks; Chocolate Chip and Pixie Pink markers; Very Vanilla, Close to Cocoa, Pixie Pink, and Pretty in Pink cardstock; sponge; stampin' dimensionals; 1 1/4" circle punch; word window punch; light pink organdy ribbon
Other: Liquid Applique; Cuttlebug A2 D'vine Swirl embossing folder; pink polka dotted organdy ribbon


looks awesome :)
ReplyDeleteI love your card and that is a very nice tutorial!
ReplyDeleteTFS!
mastamper