Showing posts with label AECP. Show all posts

Thursday, February 4, 2021

AECP-Let It Shine

I finished Altenew's Let It Shine course as part of the Altenew Educator Certification Program.  I got so many great ideas for adding sparkle and shine to my projects from the course!

Welcome to the World card-designed by Lori Tecler/Inking Aloud-stamps, dies, and stencil from Altenew

This card uses a glitter element for sparkle.  I have to admit that I'm not a big glitter fan.  That probably comes from being a kindergarten teacher and seeing firsthand the damage that can be done with kids and glitter...To keep the glitter under control, I used a piece of ready-made glittered cardstock on this design.  I cut the word "world" from the Big World die set from the blue glitter cardstock and from coordinating turquoise cardstock.  After layering the two pieces slightly offset for interest, I set them aside to build my background for the glitter element. I stenciled the Sphere Stencil on a white panel using Minty Mint ink.  The globe from the Big World set was stamped and cut out with the matching die, then adhered to the center of the stenciled sphere using foam tape for dimension.  I added the die cut word on top.  To finish the sentiment I stamped "welcome to the" from the Sentiment Strips 2 set on a narrow turquoise cardstock strip.  The strip was added to the left side of the panel, overlapping the stamped globe and just above the first letters of the die cut word.  A few silver sequins arranged around the globe added a little more sparkle and shine.  The finished panel was adhered to a coordinating light green card base to make a fun and gender-neutral card to welcome a new baby.

Here's a closer look at all of the pretty sparkle! The offset layers are a fun look and help to set the glittered piece off from the background.

Materials Used:
Big World stamp and die set, Sentiment Strips 2 stamp set, Dew Drops, Minty Mint, Sweet Leaf, and Tide Blue Crisp Dye inks, Sphere Stencil (Altenew); Gable Green and Tempting Turquoise cardstock (Stampin' Up!); blue glitter cardstock (Recollections); silver sequins; foam tape

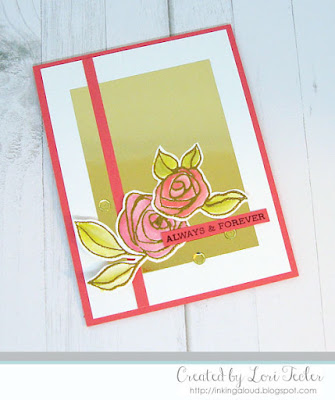
Always & Forever card-designed by Lori Tecler/Inking Aloud-stamps from Altenew

This card pairs gold foil cardstock and a glitter brush pen for lots of shine.  I stamped the roses from the Bamboo Rose set in Enchanted Gold pigment ink and heat embossed the images.  To color them, I used distress inks and a glitter brush pen.  This is the first time I've tried watercoloring with my glitter brush--so pretty and easy, too!  Once I finished filling in the flowers, I cut the images out by hand and arranged them on a gold foil rectangle using foam tape for dimension.  I centered the foil piece on a white panel and added a long, narrow strip of rosy pink cardstock along the left side of the panel, tucking it beneath the raised roses.  The "always and forever" sentiment from the Sentiment Strips stamp set was stamped on another narrow pink cardstock strip.  It was placed on the panel overlapping the gold panel and the larger rose.  A trio of gold sequins arranged around the flowers and sentiment give the design even more shine.  I placed the panel on a matching rosy pink card base to tie all the elements together.

And here's a closeup view of the flower cluster. The gold foil background made it hard to capture the pretty sparkle in the photo, but I promise it's there IRL!.

Materials Used:
Bamboo Rose and Sentiment Strips stamp sets, Enchanted Gold Pigment ink (Altenew); clear Sparkle glitter brush pen (Spectrum Noir); Berry Sorbet cardstock (Papertrey Ink); Gold Foil cardstock (Recollections); Zing Gold embossing powder (American Crafts); gold sequins; foam tape

Tuesday, January 26, 2021

AECP-For the Guys

I finished up another class in the Altenew Educator Certification Program.  This one was called For the Guys and had so much great inspiration for masculine designs!

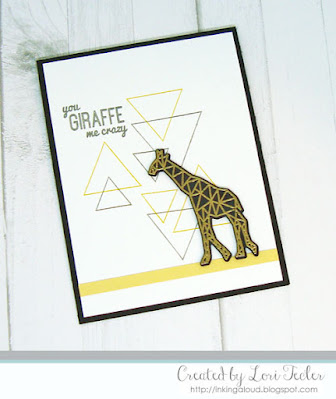
You Giraffe Me Crazy card-designed by Lori Tecler/Inking Aloud-stamps and dies from Altenew

For this card I used geometric elements to give my design a masculine feel.  I stamped a background on a white panel using a mix of open triangles from the Sohcahtoa stamp set with gray and yellow inks.  To go with the background, I stamped the giraffe image from the Geometric Menagerie set in Antique Gold pigment ink on black cardstock and heat embossed the image, then cut it out with the matching die. I used foam tape to position the giraffe image on the stamped panel.  The triangles on the background tie in nicely with the triangles on the giraffe image.  To ground the image, I positioned a narrow strip of golden yellow cardstock across the panel, tucking it beneath the feet of the raised giraffe image.  The set's "you giraffe me crazy" sentiment was stamped on the upper left side of the stamped background panel, framed by the triangles.  The finished panel was adhered to a black card base.

Materials Used:
Sohcahtoa stamp set, Geometric Menagerie stamp and die set, Antique Gold Pigment ink, Honey Drizzle and Cloudy Night Crisp inks (Altenew); So Saffron and Basic Black cardstock (Stampin' Up!); Zing Gold embossing powder (American Crafts); foam tape

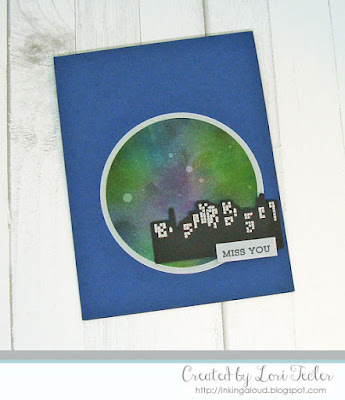
Miss You card-designed by Lori Tecler/Inking Aloud

This card features a fun galaxy style background panel behind a bold cityscape. To create the galaxy background, I randomly inked a panel with Honey Drizzle, Rubellite, and Parrot Crisp inks, then covered the inked panel with the dark blue Starlight ink.  The stars were added in by dribbling water on top of the panel.  I used a circle die to cut out a portion of the panel.  It was matted with silver cardstock before I adhered it to a dark blue card base. 

I stamped the window image from the Pretty City stamp set on to a piece of black cardstock and heat embossed the teeny, tiny windows in silver.  The stamped piece was cut with the coordinating Pretty City die to get a silhouette-like skyline piece. This piece was positioned over the bottom of the galaxy panel using foam tape for dimension.  The "miss you" sentiment from the Sentiment Strips 2 set was stamped in black ink on a small strip of silver cardstock. I positioned the sentiment at the bottom of the cityscape to finish the design.

Materials Used:
Mini Delight: Pretty City stamp and die set, Sentiment Strips 2 stamp set, Honey Drizzle, Rubellite, Parrot, and Starlight Crisp inks (Altenew); Enchanted Evening cardstock (Papertrey Ink); Basic Black cardstock (Stampin' Up!); Silver cardstock (Recollections); circle dies (Spellbinders); silver embossing powder (Hero Arts); foam tape

Friday, January 22, 2021

Boutique Cards

I'm working my way through the Level 1 classes for Altenew's Educator Certification Program.  My most recent class was Clean and Simple Boutique Cards. Clean and simple cards are my favorite, so I knew that I'd love this class!  

Leafy Thank You card-designed by Lori Tecler/Inking Aloud-stamps from Altenew
I made a few cards using stamps and inks from Altenew that incorporate some of the elements of "boutique" cards.  This one uses two different kinds of trendy metallic details.  I tried and tried to do foiling, but my laminator wasn't cooperating, so I had to move to Plan B for my images--heat embossing.  The outline leaf images from the Leaf Canopy stamp set were stamped in gold ink at the top and bottom of a mossy green cardstock panel, then heat embossed in gold. The embossing on the colored panel looks so elegant!  For interest, I subtly inked inside the leaves with Olive ink to add some depth.  I stamped the set's "thank you" sentiment on a darker green cardstock strip.  After adding a narrow strip of gold foil cardstock to the bottom edge of the sentiment strip, I used foam tape to position the strip across the panel.  The panel was matted on more gold foil cardstock then adhered to a card base that matches the sentiment strip.

Materials Used:
Leaf Canopy stamp set, Antique Gold Pigment and Olive Crisp Dye inks (Altenew); Spring Moss and Simply Chartreuse cardstock (Stampin' Up!); Zing Gold embossing powder (American Crafts); Gold Foil cardstock (Recollections); foam tape

You Are Appreciated card-designed by Lori Tecler/Inking Aloud-stamps from Altenew

This card features a stamped background using one of my favorite Altenew stamp sets, Sohcahtoa.  I arranged a mix of the set's different equilateral triangular images on a white panel, varying the orientation, sizes, and patterns for interest.  Once I settled on an arrangement that I liked, I selected a coordinating trio of inks and stamped the solid triangles in Dew Drops Crisp ink, the lightest shade, the striped ones in Aqualicious, the middle shade of ink, and the outlines in Galactic Stream, the darkest blue ink.  

The set's "you are appreciated" sentiment was stamped in Galactic Stream ink, the darkest ink, on a small aqua cardstock panel.  I used foam tape to adhere the sentiment to the panel over the bottom of one of the large triangles.  The finished panel was adhered to a card base that is the same color as the sentiment panel. I could see making a bunch of cards in this same design in different color schemes and with different sentiments...

Materials Used:
Sohcahtoa stamp set, Dew Drops, Aqualicious, and Galactic Stream Crisp inks (Altenew); Ocean cardstock (Recollections); (Recollections); foam tape

Triangle Thank You card-designed by Lori Tecler/Inking Aloud-stamps from Altenew

And, while I had the Sohcahtoa set out, I played around a little more with the triangles in the same color scheme.  On this card, I used the open triangles to create a second stamped background.  This one uses more space than the first one.  It looks simple, but it took me a few tries to get the arrangement right!  I trimmed my stamped panel down a little and placed it at the bottom of a coordinating blue card base.  I stamped the "thank you" sentiment in Galactic Stream ink on a coordinating strip of aqua cardstock.  The strip was edged along the bottom with shiny silver paper, then placed at the top of the stamped panel.  Clean, simple, and easy to mail, too!  I have a few more ideas for clean and simple designs inspired by this course, so I'm sure you'll be seeing more to come.

Materials Used:
Sohcahtoa stamp set, Dew Drops, Aqualicious, and Galactic Stream Crisp inks (Altenew); Ocean and Silver cardstock (Recollections)


Friday, January 15, 2021

AECP-Easy Ink Blending Designs

I'm continuing with the courses in the Altenew Educator Certfication Program and just finished the Easy Ink Blending Techniques course.  The course gave me some great ideas for how to use inks to create eye-catching elements for my designs.

Take Care card-designed by Lori Tecler/Inking Aloud-stamps and dies from Altenew
I started out with practicing a simple ink blended background.  This is such an easy technique and it's a great way to add interest to a design.  Here, I blended some of Altenew's Citrus Burst ink on a white panel to make a background to draw attention to the cluster of flowers from the Watercolor Blooms stamp set.  I stamped an array of flowers and buds in yellow and coral inks and added a few leaves in shades of green.  After die cutting the stamped pieces, I arranged them over the inked portion of the cardstock panel.  For dimension, I used foam tape to put the flowers in place and tucked the leaves, branches, and buds beneath the raised images.  The "take care" sentiment from the Bamboo Rose stamp set was stamped on the upper left side of the panel in Rouge ink.  I adhered the finished panel to a yellow card base to coordinate with the inked background.

Materials Used:
Watercolor Blooms and Bamboo Rose stamp sets, Rouge, Crimson, Citrus Burst, Honey Drizzle, Parrot, and Just Green Crisp inks, Watercolor Blooms dies (Altenew); Barely Banana cardstock (Stampin' Up!); foam tape

To the Moon and Back card-designed by Lori Tecler/Inking Aloud-stamps and dies from Altenew
On this card, I used a piece of ink blended cardstock to make a space-inspired background panel for a shaker element.  I knew that the Mini Moon set would work perfectly with a starry background, so I created one from a panel that I made with blended blue and purple inks.  For interest, I used a paint brush to flick some water droplets onto the inked panel, then blotted the water with a clean paper towel to add in the stars.  The moon was stamped in Silver Lake and Cloudy Night Crisp inks, then cut out with the matching Mini Moon die.  I adhered it to the panel, then framed it with a silver rectangle frame filled in with an acetate panel.  A few white and silver sequin "stars" were added to the pocket to create the shaker element. The shaker was adhered to a rich purple cardstock panel.   The set's "I love you to the moon and back" sentiment was stamped in white pigment ink at the bottom of the purple cardstock and heat embossed in white for a bold pop against the dark purple.  The panel was layered onto a dark blue card base to coordinate with the dominant color in my inked background panel.

Materials Used:
Mini Moon stamp set, Silver Lake and Cloudy Night Crisp inks, Mini Moon die (Altenew); Dusty Concord, Broken China, Stormy Sky, and Tumbled Glass distress inks (Ranger); Memento Luxe Wedding Dress ink (Tsukineko/IMAGINE Crafts); Royal Velvet cardstock (Stampin' Up!); Not Quite Navy cardstock (Stampin' Up!); Silver cardstock, Snow embossing powder (Recollections); sequins; acetate; foam tape


Friday, January 8, 2021

All About Layering 2 with Cartoon Roses

You Are Amazing card-designed by Lori Tecler/Inking Aloud-stamps and dies from Altenew

As I said last week, I've been hard at work practicing with Altenew's pretty layered images as part of the Altenew Educator Certification Program.  Today I'm sharing a clean and simple floral project inspired by the All About Layering 2 class.  

For this card, I used the layered Cartoon Rose stamp set, but stamped the roses without the outline images, just using all of the solid layering images for a softer look.  The tips from the course on lining the images up made it easy for me to align the layers even without the help of the outline!  The rosebud image was stamped in shades of yellow and the fully opened rose was stamped in shades of pink and berry.  So pretty!  For contrast, I stamped the leaf images in olive ink on green cardstock.  All of the stamped images were cut out with the matching dies and arranged on a white panel.  For dimension I adhered the flowers with foam tape.  I ran a narrow strip of gold foil cardstock across the panel, tucking it beneath the floral arrangement.  The "you are amazing" sentiment from the Penned Rose stamp set was stamped just above the gold strip in black ink.  I arranged a trio of pink sequins around the flowers for an additional touch of sparkle and shine while still keeping the focus on the florals. The finished panel was adhered to a coordinating cheery lemony yellow card base. 

Materials Used:
Cartoon Rose and Penned Rose stamp sets, Citrus Burst, Fresh Lemon, Maple Yellow, Honey Drizzle, Pink Diamond, Pinkalicious, Rubellite, Razzleberry, Moss, and Permanent Black inks, Cartoon Rose dies (Altenew); Lemon Tart and Simply Chartreuse cardstock (Papertrey Ink); Gold Foil cardstock (Recollections); pink sequins; foam tape

Thursday, December 31, 2020

Let's Get Started--All About Layering I

Sunlit Flowers Thank You card-designed by Lori Tecler/Inking Aloud-stamps from Altenew
To stretch myself creatively, I've joined Altenew's Educator Certification Program.  My day job is in education and I taught kindergarten for years, so combining stamping and teaching seems like a good match to me! 

I started off by taking the All About Layering 1 course and practicing the skills from the course with some of Altenew's beautiful and detailed layered floral stamp sets.  The class gave so many helpful tips for how to work with the multilayered stamp sets and made it easy to use them successfully.  This card uses the Sunlit Flowers stamp set with Altenew's Crisp inks.  Here I tried out stamping the images all in one color family instead of using black for the image outline.  The darkest shade of coral-y red, Velvet, was the one I used for the image outlines.  The layers were filled in with lighter shades and a contrasting golden yellow for the centers of the flowers.  So pretty!  The leaves were stamped in Olive ink on a moss green cardstock.  All of the images were cut out by hand then placed on a white panel over a simple inked coral background and a nest of gold thread.  I used foam tape to give the flowers dimension and tucked the leaves beneath the raised flowers.  The set's "thank you" sentiment was stamped in Velvet ink on a piece of coral cardstock.  After trimming down the sentiment, I used more foam tape to place it on the panel.  I adhered the finished panel to a mossy green card base.

Materials Used:
Sunlit Flowers stamp set, Rouge, Crimson, Velvet, Honey Drizzle, and Moss Crisp inks (Altenew); Abandoned Coral distress ink (Ranger); Cameo Coral and Mellow Moss cardstock (Stampin' Up); gold thread (Recollections); foam tape

Thanks a Whole Bunch card-designed by Lori Tecler/Inking Aloud-stamps and dies from Altenew
This clean and simple card uses an assortment of images from the Bold Bunch stamp set.  I stamped up the multilayered images, again using tips from the All About Layering 1 course and the guide sheet that came with the stamp set to line up the images.  Here, I used tone on tone stamping, building a darker shade on top of a lighter one for interest.  After cutting out my assortment of stamped flowers and leaves, I played around with the arrangement until I came up with one I liked.  I used foam tape on the flowers for dimension and tucked the leaves and branches beneath.  The set's "thanks a whole bunch" sentiment was stamped in the upper left corner of the panel in black ink.  I sprinkled a few pink sequins around the floral spray for a little sparkle and shine.  I placed the panel on a coordinating cheery yellow card base to finish the design.  I'm still practicing, so more layered stamping designs from the All About Layering II class are coming soon...

Materials Used:
Bold Bunch stamp set, Citrus Burst, Honey Drizzle, Dew Drop, Aqualicious, Blush, Pinkalicious, Parrot, Moss, and Permanent Black inks, Bold Bunch dies (Altenew); foam tape


Blogging tips