Showing posts with label Hero Arts. Show all posts

Wednesday, September 16, 2020

Color Throwdown 611-Wishing You a Cozy Holiday


It's time for another Color Throwdown!  Amy Rysavy is our hostess this week with a combination featuring classic neutrals and a pop of color--gray, kraft, green, and white.

Wishing You a Cozy Holiday card-designed by Lori Tecler/Inking Aloud-stamps and dies from Hero Arts
I paired the colors with the current Mojo Monday sketch and some holiday themed stamps and dies from Hero Arts.  These aren't traditional holiday colors, but they work perfectly with the set's to go cup image.  I stamped the to go cup image in green ink, then used the matching die to cut it out.  The image was adhered to a gray cardstock panel with a kraft strip along the right side, using foam tape for dimension.  For the sentiment, I die cut a circle from white cardstock. After matting it on green cardstock to match the to go cup, I positioned it on the panel over the kraft strip and tucked beneath the raised to go cup and lid.  The set's "wishing you a cozy holiday" sentiment was stamped on the circle in the same green ink I used for the to go cup.  A narrow gray fishtail flag strip was layered on to the panel before I adhered it to a coordinating green card base.

To play along, just create a paper crafted project using these colors as a starting point and add a direct link to your finished project using the linky tool found at the end of this week's CTD post.  As always, if you don’t have exact color matches, something close works just fine.  Just be sure that the challenge colors are the dominant ones in your project.  And, if you upload your project to an online gallery, use the keyword CTD611If you upload your projects on social media, go ahead and use the hashtag #ctd611 and #colorthrowdown.  You can find us on Instagram and on Facebook with the username colorthrowdown.  Before you get started, here’s some inspiration from the talented Color Throwdown team and this week's Guest Star Stamper Amanda Dellamano.

** Amy Rohl **  Amy Rysavy ** Barbara ** Broni ** 
 ** Jodi ** Lisa ** Lynn ** Vickie ** Wanda **
** Guest Star Stamper Amanda Dellamano  **

Materials Used:
Coffee Cup Tags stamp set, Coffee Cup Tags dies (Hero Arts); Lime Green ink (Reverse Confetti); Kraft, Weathervane, and Simply Chartreuse cardstock (Papertrey Ink); Fishtail Flag STAX dies (My Favorite Things); circle dies (Spellbinders); foam tape

Tuesday, December 24, 2019

Wishing You a Cozy Holiday

I gave each of my teammates at work a small holiday gift and knew I needed to dress up the packaging with cute gift tags.  The Coffee Cup Tags stamp set from Hero Arts was a perfect fit for what I had in mind. 

Cozy Holiday tag-designed by Lori Tecler/Inking Aloud-stamps from Hero Arts
I stamped the to go cup image in festive red ink and stamped the sleeve on kraft cardstock.  After cutting the pieces out with the matching dies and assembling them, I used red ink to stamp the "wishing you a cozy holiday" sentiment on the sleeve.  The holly and berry accent image was stamped with the help of my MISTI.  I inked the leaves in an olive green ink and stamped them, then used a black marker to color the berry outlines.  Once they were stamped, I colored in the outlines with a red marker before cutting out the image and adhering it to the cup with foam tape.  The cups were arranged on kraft stitched tag die cuts with a rounded top.  The rounded top contrasted nicely with all the sharp edges on the cup.  I cut a hole in the tag and topped each one with a festive red satin bow done up with the help of my Bow Easy.  After wrapping each gift (a small adult coloring book) in dotted kraft paper, I positioned the tags on the packages with more foam tape.  They got lots of oohs and aahs from my coworkers!

Materials Used:
Coffee Cup Tags stamp set, Coffee Cup Tags dies (Hero Arts); Memento Lady Bug, and Olive Grove inks, Memento Rhubarb Stalk marker (Tsukineko/IMAGINE Crafts); Kraft cardstock (Papertrey Ink); Anytime Tags dies (Lil' Inker Designs); red satin ribbon; Bow Easy; foam tape

Monday, December 25, 2017

Wishing You a Cozy Holiday

Wishing You a Cozy Holiday card-designed by Lori Tecler/Inking Aloud-stamps from Hero Arts
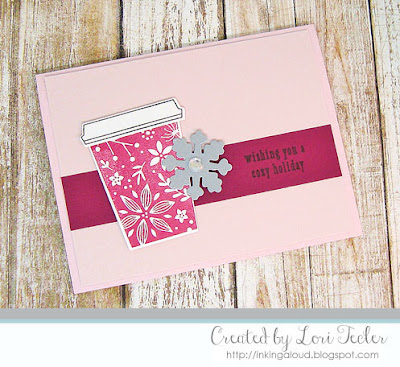
Today I'm sharing the holiday card that I mass produced to send to family and friends.  I have to admit that the card almost didn't happen.  It's been a busy and stressful fall.  I went back to school in September to start work on my certificate in school administration and supervision, taking two accelerated schedule masters level classes during the semester in addition to working my regular full time job, and there have recently been some changes at work that have left some things up in the air and created lots of stress and uncertainty beyond the usual level of stress that the job brings.  With all of that, I just wasn't feeling like getting cards done, but I pushed myself to do it.  Not my favorite holiday design of all time, but it worked! 

I used the Coffee Cup Tags stamp set and dies from Hero Arts along with a pretty snowflake die from Clear and Simple Stamps to create the card.  I added a clear crystal to the center of each silver snowflake for a bit of sparkle. I was a little worried that the crystals would be an issue with mailing, but it seems that my cards got to their destinations just fine!

If you are celebrating Christmas today, I hope that you have a wonderful day filled with family, friends, and love!

Materials Used:
Coffee Cup Tags stamp set, Coffee Cup Tags dies (Hero Arts); ink (My Favorite Things); textured cardstock (Bazzill); Recollections cardstock, clear crystals (Michaels); Flurries dies (Clear and Simple Stamps); foam tape

Friday, January 16, 2015

Let's Talk

This week's blogger challenge theme is girlfriends. I used the current Mojo Monday sketch along with some supplies from i {heart} papers to put this cheery card together.

Let's Talk card-designed by Lori Tecler/Inking Aloud-stamps from Hero Arts
The old-fashioned phone is from an older Hero Arts stamp set, Just Saying Hi.  I stamped the phone in gray pigment ink on white cardstock, then heat embossed it with clear embossing powder to give it a shiny look.  The "cord" was made from a piece of twine, twisted around the end of my paper piecing tool to make it curly.  I used dimensional dots to adhere the phone to an orange cardstock strip stamped with the "let's talk" sentiment.

The sentiment panel was adhered to a pale gray cardstock panel over a strip of solid orange cardstock and a floral paper panel.  The orange panels were edged with narrow strips of pale lemon yellow cardstock.  I added a little sparkle with a trio of yellow sequins.

Be sure to stop by i {heart} papers to check out the big liquidation sale.  Use the coupon code BYEIHP at checkout to get the current discount on your order.  As of today, the discount will be increasing to 40%.  Because of the steep discount being offered, free shipping is no longer available.  Shop now while supplies last!

Materials Used:
from i {heart} papersHero Arts Just Saying Hi stamp set; Tsukineko Memento Luxe Gray Flannel ink; Chickaniddy Crafts Date Night 6x6 paper pad; yellow sequins

other:  Grout Gray, Lemon Chiffon, and Orange Fizz cardstock (My Favorite Things); Summer Sunrise cardstock (Papertrey Ink); clear embossing powder (Michaels)

Sunday, March 3, 2013

Sweet Sunday Sketch Challenge 179-You Glow Girl

It’s time for another Sweet Sunday Sketch Challenge! Just a warning in advance—you’re going to want to put on your sunglasses before you look at my card for this week’s sketch.

Okay,  don't say I didn't warn you!  I’m jumping in to the neon trend with this one—I never thought it would make a comeback after the 80’s but it has! I picked up some small Hero Arts neon ink pads and a coordinating stamp set from i {heart} papers and put both to use on my card. The “you glow girl” sentiment from the Glow Girl set is stamped in neon pink ink, then set on a pink on pink dotted paper panel. The colors in the Bo Bunny Bold and Bright Double Dot paper pad aren’t quite neon, but they are bright enough to work with the ink.

I found a solid cardstock in my stash to use for the lower portion of the cardfront. I used scraps from the same BoBunny paper pad to make the little banner pieces that are clustered at the left side of the cardfront. A piece of yellow cardstock covers up the seam between the solid and patterned papers—and the messy, uneven tops of my little banner strips, too. I wrapped the yellow cardstock with some neon twine and added a white button tied with more of the twine. I’m loving this neon twine—it’s perfect for adding a bright shot of color to a design.

To play along, just create a card based on the sketch and link it up on Karen’s blog. For lots of inspiration be sure to check out what the other Sweet Sunday Sketch stampers and our special guest stamper have created for you this week. Here’s where to find them:

Dana White
Dawn Easton
Jackie Pedro--taking the week off
Karen Giron
Karen Motz
Lynn Put
Melissa Hubert
Sarah-Jane Kalé
Tracy Clemente
Vicki Burdick
Heather Dennis, special guest stamper

Materials Used:
from i {heart} papers: Hero Arts Glow Girl stamp set and pink neon ink pad, Bo Bunny Bold and Bright Double Dot 6x6 paper pad, Hemptique neon cord

Other: Pixie Pink, Yoyo Yellow, and Whisper White cardstock (Stampin’ Up!); white button (Michaels)

Friday, September 21, 2012

Blogger Challenge: Week 274

This week’s blogger challenge theme is elements of time. I used a sketch from Clean and Simple Stamping along with a Hero Arts clock themed stamp set called All the Time for my card. The stamp set’s one of HA’s sets designed to support Operation Write Home, an organization that supports our nation’s heroes by providing them with greeting cards to send to family and friends at home and by sending them cards of thanks and encouragement, too.  For the past few months, I've been making an effort to send a bunch of cards to OWH and I hope to continue that, including this one in the next batch to go out in the mail.

I stamped the set’s smaller clock face image repeatedly in red ink on a white panel, then went back and added the clock hands at random times. To make the panel a little less bright, I applied a little distress ink to the panel's edges. The panel is layered on a black mat, then on a red card base.

I stamped the set's "miss you all the time" sentiment on a white strip and layered it on the same black and red mat combination before attaching it to the clock stamped panel. It seemed a little plain, so I added a tiny felt heart with a twine-threaded black button as an accent.

For more time themed card and project ideas, check out the projects linked below. And, feel free to create a new project of your own and link it up for the challenge.

Materials Used:
from i {heart} papers: Hero Arts All the Time stamp set, Tsukineko Memento Love Letter ink, Pollika red felt 

other: Real Red, Basic Black, and Whisper White cardstock (Stampin’ Up!); hemp twine (Hemptique); black button (Michaels)

Monday, May 9, 2011

Just Saying Hi

Here's my card for the new clean and simple challenge blog CAS-ual Friday's first weekly challenge. This week's theme is "texting skills." I used a little text patterned paper along with a fun vintage style telephone image for my clean and simple card.

The Hero Arts phone image is stamped on white cardstock and carefully cut out. I attached it to a circle of text patterned paper from Echo Park's For the Record line, using dimensional dots to raise it just a little. It's hard to see in the photo, but I (painstakingly) machine stitched around the edge of the circle to add some texture and interest before setting the image in place.

The circle is set on a kraft card base. I ran a strip of dotted paper along the bottom of the cardfront before putting the circle in place. A strip of red velvet ric rac stretches across the top of the patterned paper panel, ending a little before the end of the card and held in place with a single staple. The "just saying hi" sentiment is stamped in black ink so it curves around the image panel. A black button, tied, with some black baker's twine, finishes things off.

Materials Used:

other: Crumb Cake cardstock (Stampin' Up!); black button (Michaels); sewing machine; stapler

Sunday, March 13, 2011

Let's Talk

Before I head out to the dog park with Chloe the cutie puppy, I have a quick card to share for today's SCS featured stamper challenge. It's based on this clean and simple card.

I kept the layout and colors the same, but used patterns instead of texture to add interest. One of the vintage phone images from the Hero Arts Just Saying Hi set is stamped in black ink on a text patterned paper from Echo Park's For the Record Collection Kit. It's matted on a black panel for a nice pop, then set on a cardfront that's covered with two dotted patterned papers from the same line. A strip of cream cardstock separates the two patterns and provides a place for the set's "let's talk" sentiment. Instead of the brad accents in the original card, I used a button, tied with black and white baker's twine, at the bottom of the image panel as my only embellishment.
Materials Used:
other: Basic Black and Very Vanilla cardstock (Stampin' Up!); Fine Linen button (Papertrey Ink)

Sunday, December 19, 2010

Happy Holidays

Here's my card for today's SCS featured stamper challenge. The big felt snowflake and blue and brown color scheme on this card caught my eye. I kept those elements in my own version, but made some changes to fit the supplies I had on hand.

Instead of a felt snowflake, I used a big, sparkly one made from a piece of blue glitter paper. I used a large snowflake punch to cut out my shape. I added a pearl to the center, but it seemed a little lost on the big flake, so I added a white snowflake-shaped button, then the pearl. Much better!

I kept with the original card's blue and brown color scheme, but switched up the patterned papers. For my version, I used two different patterns from Echo Park's Wintertime Collection Kit on the cardfront. The snowflake is attached to the upper left corner of a brown, blue, and white patterned piece. A dotted piece covers most of the cardfront. I stamped the "happy holidays" sentiment from the Hero Arts Get Merry! set in brown ink on an oval panel. The edges are inked with a little blue for some contrast.

Materials Used:

other: Baja Breeze and Early Espresso cardstock (Stampin' Up!); snowflake punch (Marvy Uchida); snowflake button (Blumenthal Lansing); Tumbled Glass distress ink (Ranger)

Tuesday, November 16, 2010

IHP DT Challenge: Lights All Aglow

The theme for this month’s i {heart} papers design team challenge theme is "lights all aglow." I went with a pretty literal interpretation of the theme and created a pretty set of stamped tealights, packaged in a handmade box. The box is dressed up with some sparkly supplies from IHP.

I started off by decorating the tealights. I stamped one of the snowflakes from the Hero Arts Get Merry! stamp set on white tissue paper in blue ink, then punched out the stamped images with a circle punch and used my heat tool to melt the tissue into the top of each of the four tealights.

The box is made from a 5” x 8” piece of cardstock with a few cuts and scores, done with the ScorBuddy, and assembled with redline tape. It’s a variation of the slidetop box I shared in this post. This box is all one piece and the top flips up. I posted a template here if you'd like to try to make one of your own.

I used a sheet of silver foil (it's actually the back side of one of the pack's green sheets) to make a decorative strip for the top of the box. It’s embossed with a snowflake embossing folder to coordinate with the candles. I made a simple round tag using the same snowflake stamp as I used on the candles plus a sentiment. The tag's attached to the box with some sparkly metallic white string.

Be sure to visit the rest of the IHP DT for more bright inspiration. Here’s where to find them:

Materials Used:
from
i {heart} papers: Hero Arts Get Merry! stamp set, QuicKutz Snowflake embossing folder, Spellbinders foil sheets and Nestabilities circle dies, ScorBuddy, i {stick} papers redline tape, May Arts metallic white string

other: Blueberry Sky and Enchanted Evening cardstock (Papertrey Ink); Silver ink (Encore); corner rounder (Stampin’ Up!); circle punch (EK Success); handheld punch

Wednesday, October 20, 2010

IHP Birthday Bash--Day 2

Welcome to Day 2 of the i {heart} papers 2nd Birthday Bash! If you missed yesterday’s post, be sure to scroll down to participate in the scavenger hunt/blog hop to earn your 20% off coupon (and see some really amazing projects from 25 incredible designers!). The celebration continues today with a sketch challenge. Be sure to post your direct link on the Birthday Bash sketch challenge post on Kate's blog, either as a comment or in Mr. Linky and tag your uploads with IHPBB10S. Deadline to enter is Friday morning 3AM EST.

Tomorrow Deb will be hosting another challenge for you.

Winners for each day will be randomly drawn from the day's challenge entries, and everyone who plays along, either with the challenges and/or the scavenger hunt will be eligible for the grand prize drawing that will close the festivities on Friday.

Additionally, ALL orders placed during the Bash (Oct 19-21) will receive a free goodie bag of surprise merchandise. The more you spend, the bigger your goodie bag!

Also, there will be random drawings for additional prizes from our PaperCraft Planet group members, our mailing list (sign up on the right side of the homepage) and our fans on Facebook. If you are on all three, then you’ve got triple the chances to win!

Here’s my take on the sketch. I kept the card pretty simple--I took a little spill down my front steps earlier this week, resulting in assorted bumps and bruises that are making sitting in one place for a long time a little uncomfortable, so I had to keep it quick. I made a cute Thanksgiving card using images from the Hero Arts So Thankful set. The turkey is colored with Copic markers in warm fall colors. I layered the colored image on a scalloped mat and dotted each scallop with some Gold Pearl Liquid Pearls for a little sparkle.

I used a piece of Jillibean Soup's orange Soup Staples designer paper for the card’s top panel. Kate’s got this great paper (plaid on one side, polka dotted on the other) packaged so you get the full assortment of colors available all in one package—be sure to check it out! I used a solid cardstock at the bottom of the card and added a strip of cork paper across the card, hiding the seam between the two different papers. The cork was an easy way to add a little texture to my card. Stitching around the edges and the “Gobble! Gobble” sentiment completed the design.

Materials Used:
from i {heart} papers: Hero Arts So Thankful stamp set, Memento Tuxedo Black ink, Couture Cardstock white Copic blending cardstock, Copic markers (E08, E31, E33, E34, E35, E37, Y000, Y21, Y23, Y26, YR14, YR16, YR24, W00, W-1), Spellbinders oval and scalloped oval dies, Ranger Gold Pearl Liquid Pearls, Jillibean Soup Soup Staples Collection assortment pack, Creative Impressions cork paper

other: So Saffron, Pumpkin Pie, and Crumb Cake cardstock (Stampin’ Up!); sewing machine

 
Blogging tips