Showing posts with label Waltzingmouse Stamps. Show all posts

Thursday, March 25, 2021

Keep Your Sunny Side Up


Here's my card for the Fusion current challenge. I paired the sketch with elements from the inspiration photo (color scheme, egg theme, striped pattern) to create this encouraging card.

Keep Your Sunny Side Up card-designed by Lori Tecler/Inking Aloud-stamps from Waltzingmouse Stamps
I used images from the Waltzingmouse Stamps A Good Egg set for my focal panel. The patterned egg image was stamped in a peachy pink ink. I added the silhouette chick image at the center in a kraft colored ink, then cut the egg out with the matching die. The egg was adhered to a kraft pierced rectangle panel using foam tape for dimension. I positioned the kraft panel near the top of a striped aqua patterned paper panel. The set's "keep your sunny side up" sentiment was stamped in black ink on a narrow strip of peach-y cardstock. I used foam tape to place the sentiment on the panel over the bottom of the egg image. The finished panel was adhered to a coordinating aqua card base.

Materials Used:
A Good Egg stamp set, A Good Egg dies (Waltzingmouse Stamps); Memento Desert Sand and Tuxedo Black inks (Tsukineko/IMAGINE Crafts); Pink Pearl crisp ink (Altenew); Melon Berry and Kraft cardstock, Aqua Mist patterned paper (Papertrey Ink); Iced Aqua cardstock (Reverse Confetti); Pierced Square STAX dies (My Favorite Things); foam tape

Friday, April 12, 2019

Easter Egg Inspired

Here's my card for the current Fusion challenge.  I combined the sketch with elements from the inspiration photo (egg theme) to create an Easter themed design.

Happy Easter card-designed by Lori Tecler/Inking Aloud-stamps and dies from Waltzingmouse Stamps
My card uses stamps and coordinating dies from Waltzingmouse Stamps.  I stamped the egg outline in blue pigment ink, then added the separate chick image inside using yellow pigment ink.  After cutting the egg out with the matching die, I adhered it to a pale blue circle using foam tape.  The set's "happy Easter" sentiment banner was stamped in pink pigment ink and cut out with the matching die, then added to the image panel just below the chick image with more foam tape.  I covered most of a pink card base with a yellow cardstock panel, then added a yellow plaid strip edged with narrow pink strips on the right side.  The image panel was added on top of the plaid strip to finish the design.

Materials Used:
A Good Egg stamp set, A Good Egg dies (Waltzingmouse Stamps); Memento Luxe Dandelion and Angel Pink inks (Tsukineko/IMAGINE Crafts); Winter pigment ink (Mama Elephant); Barely Banana, Bashful Blue, and Pretty in Pink cardstock (Stampin' Up!); Perfectly Plaid-Spring 6x6 paper pad (Lawn Fawn); foam tape

Wednesday, February 13, 2019

Color Throwdown 530-I Love You Bunches


It's time for another Color Throwdown!  Wanda is our hostess with a pretty color palette--fuchsia, light gray, and black.  I paired the colors with the current TGIF Challenge and some elements from the inspiration photo for this love themed design.

I Love You Bunches card-designed by Lori Tecler/Inking Aloud
The woodgrain pattern behind the string art heart caught my eye and was the starting point for my design.  I used a woodgrain background stamp and silver ink to make a similar pattern on my light gray cardstock panel.  The panel was topped with a pair of hot pink hearts cut with the Shapes:  Hearts dies from Clear and Simple Stamps--love the fun shapes of these hearts!  The smaller heart was adhered with a bit of foam tape so that I could tuck one end of the black sentiment strip beneath it.  The "I love you bunches" sentiment is from CSS's Cart Pals:  Occasions set.  I stamped the text in white, then heat embossed it so it would pop against the black background.  A tiny gray baker's twine bow was added where the heart and sentiment meet as an accent.  I added a little sparkle with a trio of silver sequins, then adhered the finished panel to a coordinating pink card base.  I thought about using black, but the pink is much easier to write a message on!

To play along, just create a paper crafted project using these colors as a starting point and add a direct link to your finished project using the linky tool found at the end of this week's CTD post.  As always, if you don’t have exact color matches, something close works just fine.  Just be sure that the challenge colors are the dominant ones in your project.  And, if you upload your project to an online gallery, use the keyword CTD530.  If you upload your projects on social media, go ahead and use the hashtag #ctd530 and #colorthrowdown.  You can find us on Instagram and on Facebook with the username colorthrowdown.  Before you get started, here’s some inspiration from the talented Color Throwdown team, February's Guest Designer, Leigh O'Brien, and our guest star stampers Frances McGreevy and Jennifer Weide.

** Amy Rohl **  Amy Rysavy ** Barbara ** Broni ** 
 ** Jodi ** Lisa ** Lynn ** Vickie ** Wanda **
** February Guestie Leigh O'Brien **
** Guest Star Stamper  Frances McGreevy **
** Guest Star Stamper Jennifer Weide **

Materials Used:
Cart Pals:  Occasions stamp set, Paint the Town Pink and Perfect Little Black Dress cardstock, Shapes:  Hearts dies (Clear and Simple Stamps); Memento Luxe Wedding Dress and Delicata Silvery Shimmer inks (Tsukineko/IMAGINE Crafts); Woodgrain stamp set (Waltzingmouse Stamps); Grout Gray cardstock (My Favorite Things); Snow embossing powder (Recollections); gray baker's twine; silver sequins; foam tape

Thursday, December 27, 2018

Doughnut Know What I'd Do Without You and Coffee

Doughnut Know What I'd Do card-designed by Lori Tecler/Inking Aloud-stamps and dies from Waltzingmouse Stamps
I'm sharing another thank you themed design today.  This one is inspired by a sketch from Coffee Loving Papercrafters that was shared earlier this month.  I mixed and matched text from the We Go Together stamp set, an oldie from Waltzingmouse Stamps (it may be one of the WMS sets available at Gina K Designs...), to come up with my thank you sentiment. After playing with the placement of the words a bit, I stamped the text on a white circle that I matted on kraft cardstock.  To accent the words, I colored up a to go cup and a donut and cut them out with the matching dies. The donut was coated with a snow marker, then heated to get a textured look.  I used foam tape to adhere the pieces to the round panel.  The sentiment panel was adhered to a striped patterned paper panel with a a pair of ribbon strips wrapped around it and a pair of pink cardstock strips running down the length of the card.  The soft pink seam binding that I layered over the rose grosgrain ribbon was easy to knot and will still be easy to mail.  The finished panel was adhered to a neutral kraft card base.

Materials Used:
We Go Together stamp set, We Go Together dies (Waltzingmouse Stamps); Memento Tuxedo Black ink (Tsukineko/IMAGINE Crafts); markers (Copic); Regal Rose and Pretty in Pink cardstock, Regal Rose grosgrain ribbon (Stampin' Up!); Kraft cardstock (Papertrey Ink); Sweet Pea patterned paper pad (The Paper Studio); circle dies (Spellbinders); snow marker (Marvy Uchida); pink seam binding; foam tape

Wednesday, November 22, 2017

Color Throwdown 470-Many Thanks


It's time for another Color Throwdown!  Wanda is our hostess with a color combination inspired by tomorrow's Thanksgiving holiday in the United States--yellow, orange, red, and brown.

Many Thanks card-designed by Lori Tecler/Inking Aloud-stamps and dies from Waltzingmouse Stamps
I stayed away from the turkey theme (I'll have a turkey themed design to share tomorrow though!) and went with a seasonal, general thank you design using a stamp set from Waltzingmouse Stamps. I used some pigment inks that matched the challenge colors to stamp up some feathers from the Funky Feathers set.  After cutting them out with the matching dies, I arranged the feathers on a kraft panel, using foam tape beneath some of the feathers for dimension.   The "many thanks" sentiment from another WMS set, Frame It, was stamped in brown pigment ink on an orange cardstock strip.  I positioned the strip on the kraft panel, tucking one end underneath the cluster of feathers.  A few brown enamel dots scattered around the panel completed the design.  The finished panel was adhered to an orange card base to match the sentiment strip.

To play along, just create a paper crafted project using these colors as a starting point and add a direct link to your finished project using the linky tool found at the end of this week's CTD post.  As always, if you don’t have exact color matches, something close works just fine.  Just be sure that the challenge colors are the dominant ones in your project.  And, if you upload your project to an online gallery, use the keyword CTD470.  If you upload your projects on social media, go ahead and use the hashtag #ctd470 and #colorthrowdown.  You can find us on Instagram (and on Facebook!) with the username colorthrowdown.

Before you get started, here’s some inspiration from the talented Color Throwdown team and our November guestie Kelly Lunceford.

** Amy Rohl **  Amy Rysavy ** Barbara ** Broni ** 
 ** Jodi ** Lisa ** Lynn ** Vickie ** Wanda **
** November guestie Kelly Lunceford  **

Materials Used:
Funky Feathers and Frame It stamp sets, Funky Feathers dies (Waltzingmouse Stamps); Memento Luxe Lady Bug, Morocco, Dandelion, and Rich Cocoa inks (Tsukineko/IMAGINE Crafts); Kraft cardstock (Papertrey Ink); Orange Fizz cardstock (My Favorite Things); brown enamel dots (Eyelet Outlet); foam tape

Friday, September 1, 2017

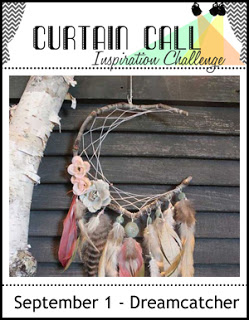
Curtain Call Inspiration Challenge-Dreamcatcher


 photo source:  weloveboho.com

We hope you'll play along!  The LEAD of this challenge will be invited as a Guest Designer in a future challenge!  Please visit the Curtain Call Challenge blog for all the challenge info and deadline.  

Ruffle Your Feathers card-designed by Lori Tecler/Inking Aloud-stamps and dies from Waltzingmouse StampsHere's my take on the inspiration photo.  The beautiful dreamcatcher is front and center in the photo, but for my design, instead of a dreamcatcher image, I focused on the dreamcatcher's feathers.  My feathers are from the Waltzingmouse Stamps Funky Feathers set.  I stamped them in pigment inks on thick vellum, then cut out the stamped images with the matching die.  I arranged them in the upper left corner of a pale gray panel stamped with the large background stamp from WMS's Woodgrain set.  To anchor the feather trio, I placed a twine bow at the top of the stack. The bow's a bit larger than I'd usually use on a cardfront, but I wanted to bring in the thread element from the dreamcatcher.  The "I'm sorry, I didn't mean to ruffle your feathers" sentiment was stamped on the lower right side of the panel in brown ink.  I wanted to bring in some pops of blue to the design, so I added a trio of enamel dots around the feathers.  They bring a bead-like element in to the design.  The finished panel was adhered to a darker gray card base.

Make sure you visit each of the designers' blogs for more inspiration:

Follow us:
Curtain Call Pinterest Boards

Stop by the Curtain Call Inspiration Challenge: Dreamcatcher for the challenge details and to play along with us! 
Materials Used:
Funky Feathers and Woodgrain stamp sets, Funky Feathers dies (Waltzingmouse Stamps); Memento Luxe Rhubarb Stalk, Toffee Crunch, Gray Flannel, and Rich Cocoa inks (Tsukineko/IMAGINE Crafts); Grout Gray cardstock (My Favorite Things); Stormy cardstock (Reverse Confetti); vellum cardstock (Stampin' Up!); twine (Lawn Fawn); Swimming Pool Sprinkles enamel dots (Doodlebug Design)

Tuesday, June 13, 2017

I Just Wanna Dunk You in My Coffee

It's been a while since I used any of my Waltzingmouse Stamps--or put together a coffee themed card--so I decided to change that with this design based on last Sunday's Sip and Share Sketch at the Coffee Loving Cardmakers blog.  I started off with a fun pink patterned paper, cut at an angle and lined with cute pom pom trim along the straight edge.  The panel was adhered to a kraft card base along with another angled panel in solid pink. 

I colored up the to go cup and a donut from the We Go Together set using Copic markers, then cut the colored images out with the matching dies.   To add dimension to the donut, I coated it with a dimensional medium that "puffs" up when heated.  Such a fun detail!  The images were arranged on the cardfront using foam tape.  Once everything was in place, I stamped the sweet sentiment beneath the patterned paper panel in brown pigment ink.

Materials Used:
We Go Together stamp set, We Go Together dies (Waltzingmouse Stamps); Memento Tuxedo Black and Memento Luxe Rich Cocoa inks, White Amplify! (Tsukineko/IMAGINE Crafts); markers (Copic); Pale Peony and Kraft cardstock (Papertrey Ink); Happy Days 6x6 paper pad (Echo Park); cream pom pom trim (Hobby Lobby); foam tape

Friday, April 8, 2016

Thanks, Chickie

I loved the clean, fresh look of Michele's inspiration card for this week's Muse challenge, so I had to play along!  My take uses the same layout, color scheme, and gratitude theme, but changes up the images to make the design my own.

Thanks, Chickie card-designed by Lori Tecler/Inking Aloud-stamps and dies from Waltzingmouse Stamps
Instead of a light, airy butterfly die cut, I used a pair of feathers on my card.  The feather image is from the Waltzingmouse Stamps Funky Feathers set.  I stamped it twice, once in gray pigment ink and once in teal pigment ink, then cut the images out with the matching die.  I used foam tape to adhere the feather pair to the top of a green dotted patterned paper panel. After matting the panel on coordinating green cardstock, I layered it on to a gray cardstock panel.  The set's "thanks, chickie" sentiment was stamped in gray pigment ink on a narrow white strip, then added to the panel using foam tape.  I scattered a trio of lime green sequins around the patterned paper panel, then adhered the finished panel to a coordinating card base.

Materials Used:
Funky Feathers stamp set, Funky Feathers dies (Waltzingmouse Stamps); Memento Luxe Gray Flannel and Teal Zeal inks (Tsukineko/IMAGINE Crafts); Cement Gray cardstock (My Favorite Things); Blue Bayou cardstock (Stampin' Up!); Simply Chartreuse cardstock, Simply Chartreuse patterned paper (Papertrey Ink); lime sequins (Treehouse Studio); foam tape

Thursday, March 3, 2016

Doughnuts About You

I was so sad to see Claire's post about the closing of Waltzingmouse Stamps.  I've always been a big fan of Claire's stamps--and of Claire herself!  She really is one of the nicest ladies in the stamping business.  I put together this card for the current challenge at The Paper Players using two of my favorite coordinating WMS sets, Dinky Donuts and We Go Together.

Doughnuts About You card-designed by Lori Tecler/Inking Aloud-stamps from Waltzingmouse Stamps
I started out with the donuts first.  The stamps for the outline and icing are super easy to line up.  Once I had those stamped, I added the sprinkles in white pigment ink, then heat embossed them in white for a bit of texture.  The donuts were cut out with circle punches, then added to a kraft cardstock panel using foam tape.

Since I used pink for my donuts, I made that the dominant color for the rest of my card.  I adhered a pink dotted patterned paper panel, edged with a chocolate-y brown strip, to a pale pink cardstock panel, then topped it with the kraft panel with the donuts on it. The "doughnuts about you" sentiment was stamped on a white fishtail flag strip and added to the panel. The finished panel was adhered to a darker pink card base.

Materials Used:
Dinky Donuts and We Go Together stamp sets (Waltzingmouse Stamps); Memento Rich Cocoa and Angel Pink and Memento Luxe Wedding Dress inks (Tsukineko/IMAGINE Crafts); Pink Pirouette and Close to Cocoa cardstock (Stampin' Up!); Kraft and Lovely Lady cardstock (Papertrey Ink); Recollections Pink Tonal Dots and Snow embossing powder (Michaels); Die-namics Fishtail Flag STAX dies (My Favorite Things); circle punches (EK Success); foam tape

Friday, August 21, 2015

Love You More

Here’s my card for this week’s sketch at RetroSketches. I used the sketch along with stamps and dies from Waltzingmouse Stamps to make this sweet card.

Love You More card-designed by Lori Tecler/Inking Aloud-stamps and dies from Waltzingmouse Stamps
I stamped the sentiment in brown pigment ink on a white cardstock panel. The panel was accented with the to go cup and donut images from the We Go Together set. The cup was colored with Copic markers. The donut was stamped on kraft cardstock. I filled in the “icing” with a bit of Radiant Neon Amplify in white. When heat embossed, it puffs up and looks perfect on the donut image!

The sentiment panel was matted on berry cardstock, then adhered to a piece of dotted patterned paper. I wrapped a piece of white grosgrain ribbon around the bottom of the patterned paper panel, securing it with a knot, then layered the panel on to a berry card base.

Materials Used:
We Go Together stamp set, We Go Together dies (Waltzingmouse Stamps); Memento Tuxedo Black ink, Memento Luxe Rich Cocoa ink, White Radiant Neon Amplify (IMAGINE Crafts/Tsukineko); markers (Copic); Berry Sorbet cardstock (Papertrey Ink); Kraft cardstock (WPlus9); Cut and Paste-Flair 6x6 paper pad (My Mind's Eye); white grosgrain ribbon; foam tape

Monday, July 20, 2015

Mojo Monday 307-Have a Blast

Have a Blast card-designed by Lori Tecler/Inking Aloud-stamps from Waltzingmouse Stamps

Happy Monday!  It's time for a new Mojo Monday sketch.  My take on the sketch kind of stretches one of the elements a bit, but I think you can still see all of the pieces here!

I used the sketch and stamps from the Waltzingmouse Stamps Half-Pint Heroes stamp set to make an outer space scene.  I colored the rocket ship image with Copic markers, then cut it out.  It was added to a blue panel using foam tape.  To fill in the scene, I made a moon from a yellow circle debossed with a circle pattern and die cut a star from gold paper.  Those elements were adhered to the upper right side of the blue panel.

I layered the panel onto a blue cardfront covered with navy and red cardstock panels.  A narrow strip of gold cardstock hides the seam between the two panels.  Once all of the elements were in place, I stamped the "have a blast on your big day" sentiment on the blue panel in navy ink.

Head on over to the Mojo Monday blog for inspiration from the rest of the Mojo Makers and to link up your own take on this week's sketch!

Materials Used:
Half-Pint Heroes stamp set (Waltzingmouse Stamps); Memento Tuxedo Black and Nautical Blue inks, irRESISTible Lady Bug Pico Embellisher (IMAGINE Crafts/Tsukineko); markers (Copic); Night of Navy, Real Red, Crushed Curry, and Brocade Blue cardstock (Stampin' Up!); gold paper (Target); circle punch (EK Success); Polka Dots embossing folder (Lifestyle Crafts); foam tape

Saturday, July 18, 2015

Doughnut Know What I'd Do

It's Saturday morning, so I thought I'd share some donuts with you.  Okay, my donuts are paper ones and not exactly edible, but they're yummy-looking anyway, aren't they?  I used the Waltzingmouse Stamps Dinky Doughnuts set to make the sweet trio I used on my card for this week's sketch at Freshly Made Sketches.

Doughnut Know What I'd Do card-designed by Lori Tecler/Inking Aloud-stamps from Waltzingmouse Stamps
I stamped the donuts using a mix of pigment inks and my MISTI.  The MISTI was so helpful for lining up the donut outline and the icing filling!  Once I had a mix of donuts I was happy with, I cut them out using a pair of circle punches.  They were adhered to a pale pink card base using foam tape.  I stamped one of the sentiments from the We Go Together set beneath the top two donuts in brown pigment ink.  The finished panel was adhered to a kraft card base.

Materials Used:
Dinky Doughnuts and We Go Together stamp sets (Waltzingmouse Stamps); Memento Luxe Toffee Crunch, Angel Pink, Rich Cocoa, and Wedding Dress inks (IMAGINE Crafts/Tsukineko); Pink Pirouette cardstock (Stampin' Up!); Kraft cardstock (WPlus9); circle punches (EK Success); foam tape

Saturday, June 27, 2015

You're So Sweet

Here's my card for this week's sketch at Freshly Made Sketches. I've been looking for the opportunity to put together a card using this sweet sentiment from the Waltzingmouse Stamps We Go Together set and it worked perfectly on this sketch!

You're So Sweet card-designed by Lori Tecler/Inking Aloud-stamps and dies from Waltzingmouse StampsI started out by stamping the to go cup an donut images on white cardstock, then colored the images with Copic markers and cut them out with the matching dies.   The sprinkles on the donut were added with white pigment ink.  I used foam tape to adhere the pair to a kraft card base over a wide pink cardstock panel.  The super sweet sentiment was stamped at the bottom of the pink panel in rose pigment ink.

Materials Used:
We Go Together stamp set, We Go Together dies (Waltzingmouse Stamps); Memento Tuxedo Black and Memento Luxe Wedding Dress and Rose Bud inks (IMAGINE Crafts/Tsukineko); markers (Copic); Regal Rose and Pink Pirouette cardstock (Stampin' Up!); Kraft cardstock (WPlus9); foam tape

Monday, June 15, 2015

Waltzingmouse Stamps June Pajama Party

I couldn't resist inking my my new Waltzingmouse Stamps to play along in this month's WMS Pajama Party.  This card uses the We Go Together stamp set and coordinating dies as well as the color scheme from this month's coffee color challenge.

Doughnut Know card-designed by Lori Tecler/Inking Aloud-stamps and dies from Waltzingmouse Stamps
I stamped the coffee cup and donut images on white cardstock and colored them with Copic markers, then used the matching dies to cut out the images.  The donut's "icing" was made with something new to me--Radiant Neon Amplify!  I applied a thin layer to the image, then heated it with my heat tool to puff it up. Fun!

The images were adhered to a gingham panel using foam tape.  I edged the bottom of the panel with a narrow strip of dark brown paper, then added a piece of paper doily to the top before adhering the panel to kraft cardstock.  I stamped the "doughnut know what I'd do without you" sentiment beneath the patterned paper strip in brown pigment ink. The finished panel was adhered to a dark brown card base.

Materials Used:
We Go Together stamp set,We Go Together dies (Waltzingmouse Stamps); Memento Tuxedo Black and Memento Luxe Rich Cocoa inks, White Radiant Neon Amplify!  (IMAGINE Crafts/Tsukineko); markers (Copic); Chocolate Chip cardstock (Stampin' Up!); Kraft cardstock (WPlus9); 100 Days of Summer-Simple Pleasures (Simple Stories); stitched heart die (Lil' Inker Designs); brown enamel dots (Eyelet Outlet); white paper doily; foam tape

Tuesday, April 14, 2015

Waltzingmouse Stamps April Pajama Party


I'm joining in on this month's Waltzingmouse Stamps Pajama Party with a sweet baby card for the Bedtime Sketch.  I had every intention of also putting together a baby themed gift card using the A Good Egg set--I even had the stamps and dies out on my table--but kindergarten got the best of me.  Going back to work yesterday after spring break was hard and it was all I could do to get Chloe the cutie puppy walked yesterday before I fell into bed at 7:00. Probably earlier than most of my students . . .


Sweet Baby card-designed by Lori Tecler/Inking Aloud-stamps from Waltzingmouse Stamps
Anyway, I used the Nordic Baby set for my card.  The images were stamped on a cream panel using pigment inks to help pick up the details in the patterns on the stamps.  I matted the image panel on kraft cardstock and set it on a fun dotted patterned paper panel.  I edged the left side of the image panel with strips of dark and light pink cardstock, then added a little banner made from a strip of rose mini pom pom trim.  For a final feminine touch, I added a teeny, tiny pale pink self-adhesive pearl to each shoe.  So sweet!

Materials Used:
Nordic Baby stamp set (Waltzingmouse Stamps); Memento Luxe Angel Pink and Toffee Crunch inks (IMAGINE Crafts/Tsukineko); Sweet Blush and Raspberry Fizz cardstock, medium scallop die (Papertrey Ink); Crumb Cake cardstock (Stampin' Up!); Hey Birdie-Hustle designer paper (KaiserCraft); pale pink self-adhesive pearls (Mark Richards); pink pom pom trim

Saturday, April 4, 2015

You Bring Me Sunshine

Here's my card for this week's Muse challenge. I was inspired by the bold silhouette image and sunset background featured in Kristi's design.

You Bring Me Sunshine card-designed by Lori Tecler/Inking Aloud-stamps from Waltzingmouse Stamps
I used the palm tree image from the Waltzingmouse Stamps My Island set for my design.  I used a combination of several distress inks to make my backdrop and added a kraft strip with a torn and inked edge at the bottom to look like sand.  The trees were stamped in Versafine Onyx Black ink for a deep, dark color and bold contrast against the background.

The image was framed with a stitched rectangle that I die cut using a Lil' Inker Designs die.  After cutting out the inside of the rectangle and positioning the image inside, I adhered the finished image and frame to a white card base.  The set's "you bring me sunshine" sentiment was stamped along the edge of the image in aquamarine pigment ink.
 
Materials Used:
My Island stamp set (Waltzingmouse Stamps); Versafine Onyx Black ink (IMAGINE Crafts/Tsukineko); Peacock Feathers, Scattered Straw, Dried Marigold, and Wild Honey distress inks (Ranger); Aquamarine ink (Avery Elle); Bermuda Bay cardstock (Stampin' Up!); stitched rectangle die (Lil' Inker Designs)

Friday, February 27, 2015

Wishing You Fair Winds

This week's Blogger Challenge theme is travel.  I combined the challenge with the current Mojo Monday sketch for this nautical themed design using stamps from Waltzingmouse Stamps.  Waltzingmouse is having a release tomorrow and I'm looking forward to checking out the new sets and maybe doing some shopping . . .

Wishing You Fair Winds card-designed by Lori Tecler/Inking Aloud-stamps from Waltzingmouse StampsI used a red and blue striped panel to cover most of a large kraft panel.  The patterned paper is from an Americana themed paper pad, but it seemed to work well with my nautical theme.  A wide strip of red cardstock beneath it sets it off from the kraft just a bit.  I stamped the sentiment from the Ocean Bound set in red ink on a white circle, then matted it on a contrasting navy blue circle.  The circle was adhered to the striped panel over a long kraft fishtail flag strip.  Since the card is narrower than a standard A2 card, it'll still easily fit in a standard sized envelope.  I added a wood veneer anchor to the left edge of the sentiment panel as an accent.  The kraft panel was adhered to a navy card base.

Materials Used:
Ocean Bound stamp set (Waltzingmouse Stamps); Wild Cherry ink, Persimmon cardstock, DieNamics Fishtail Flag Stax die (My Favorite Things); Kraft cardstock (WPlus9); Night of Navy cardstock (Stampin' Up!); Americana 6x6 paper pad (Pebbles); circle die (Spellbinders); circle punch (EK Success); wood veneer anchor (Studio Calico)

Monday, December 15, 2014

Waltzingmouse Stamps December Pajama Party


I'm joining in on this month's Waltzingmouse Stamps Pajama Party.  I had high hopes for completing a few projects for the PJ party, but in the end, managed to put together just this one using the Bedtime Story sketch.

Christmas Greetings card-designed by Lori Tecler/Inking Aloud-stamps from Waltzingmouse Stamps
I stuck with Claire's suggestion of using the sketch's triangle element as a tree.  Mine is fashioned from layered scallop edged olive cardstock pieces, inked with distress ink to add depth to the color.  I added a tiny trunk made from a scrap of brown cardstock, then topped the tree with a die cut gold star.  I resisted the urge to add some red sequins or dot the tree with glitter glue or a Pico embellisher to make ornaments, but I may end up going back and doing just that . . .

I adhered the tree to a kraft panel stamped with the largest stamp from WMS's Woodgrain set and topped with a patterned fishtail flag strip and a contrasting solid red cardstock strip.  The "Christmas greetings" sentiment from the Teeny Trees set was stamped in brown pigment ink in the bottom right corner of the red panel.  I layered the finished panel on top of an olive card base, matching my festive tree.

Materials Used:
Teeny Trees and Woodgrain stamp sets (Waltzingmouse Stamps); Memento Luxe Rich Cocoa ink (Tsukineko); Crushed Olive distress ink (Ranger); Riding Hood Red, Old Olive, and Chocolate Chip cardstock, scalloped edge punch (Stampin' Up!); Desert Storm cardstock (Neenah); gold paper (Target); Season's Greetings 6x6 paper pad (Echo Park); stitched star die (Lil' Inker Designs); Fishtail Flag Stax die (My Favorite Things); foam tape

Saturday, November 15, 2014

Waltzingmouse Stamps November Pajama Party


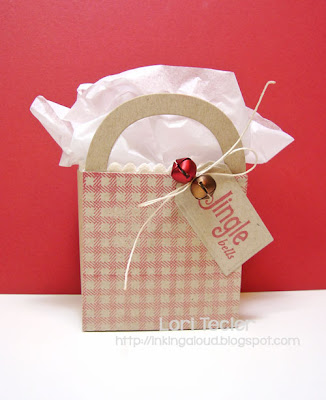
It's been busy week at work, but I managed to fit in one simple project for this month's Waltzingmouse stamps Pajama Party.  My project is for the Wrap it up Warm challenge.  I put together a little treat tote in a seasonal kraft and red color combo.

Jingle Bells Box-designed by Lori Tecler/Inking Aloud-stamps from Waltzingmouse Stamps
The treat tote was die cut from kraft cardstock, then stamped with one of the patterns from the Gingham and Co. set.  I used a pigment ink for a nice coverage.  To dress up the simple box just a bit, I ran a strip of cream faux velvet ric rac around the inside edge before lining the box with tissue.

I die cut a small tag from kraft cardstock, then stamped the "jingle bells" sentiment from the Seasons of Love Tags set on the tag in red ink.  After punching a hole in the tag, I threaded a piece of hemp twine through the hole and added a pair of tiny festive bells, securing them with a bow.  The tag was the perfect finishing touch for the tiny tote!

Materials Used:
Gingham and Co. and Seasons of Love Tags stamp sets (Waltzingmouse Stamps); Memento Luxe Rhubarb Stalk ink (Tsukineko); Party Favor 1 die (Clear and Simple Stamps); Traditional Tag Stax die (My Favorite Things); twine (Hemptique); bells, cream faux velvet ric rac trim (Michaels)

Saturday, November 8, 2014

Thanks Chickie

Here's a bold and bright thank you design inspired by the current Waltzingmouse Fanatics color challenge, this week's sketch at Freshly Made Sketches., and the current Curtain Call Inspiration challenge.  I haven't inked up my Waltzingmouse Stamps Funky Flowers set in a while and those feathers were so fun to use in this color scheme.

Thanks Chickie card-designed by Lori Tecler/Inking Aloud-stamps and dies from Waltzingmouse Stamps
I stamped two feathers, one in purple and one in teal, the cut them out with the matching feather dies.  They're arranged at the bottom of a lime panel, using foam tape on the top feather for dimension. I stamped the "thanks chickie" sentiment next to the feathers in gold ink, then wrapped the top of the panel with ribbon before adhering it to the teal card base.  A trio of teal green sequins completed the design.

Materials Used:
Funky Feathers stamp set, Funky Feathers dies (Waltzingmouse Stamps); Memento Luxe Lilac Posies ink, Delicata Golden Glitz ink (IMAGINE Crafts/Tsukineko); Aquamarine ink (Avery Elle); Tropical Teal and Limeade Ice cardstock (Papertrey Ink); ribbon (May Arts); teal sequins (Michaels); foam tape


Blogging tips