Showing posts with label Pretty Pink Posh. Show all posts

Wednesday, December 14, 2022

Color Throwdown 723-Winter Wishes

It's time for another Color Throwdown! Broni is our hostess this week with a pretty mix of colors--gold, pink, and ice blue.

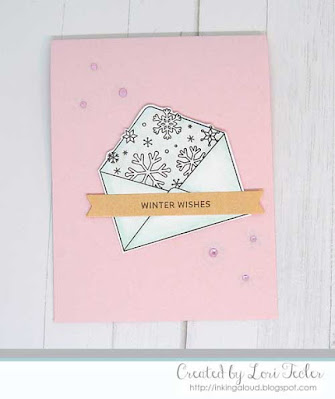
Winter Wishes card-designed by Lori Tecler/Inking Aloud
My super simple design is based on the current challenge at Sunday Stamps. I used Copic markers to color the snowflake filled envelope from Pretty Pink Posh's Holiday Envelopes in the lightest of icy blue before cutting out the image. The image was adhered to a pale pink card base on an angle using foam tape for dimension. I used a light blue pigment ink to stamp a trio of snowflakes above and below the envelope, then dotted each flake's center with a pink self adhesive crystal. The set's "winter wishes" sentiment was stamped on a gold fishtail flag strip in black ink. I positioned it over the envelope image to finish the design.

To play along, just create a paper crafted project using these colors as a starting point and add a direct link to your finished project using the linky tool found at the end of this week's CTD post.  As always, if you don’t have exact color matches, something close works just fine.  Just be sure that the challenge colors are the dominant ones in your project.  And, if you upload your project to an online gallery, use the keyword CTD723.  If you upload your projects on social media, go ahead and use the hashtag #ctd723 and #colorthrowdown.  You can find us on Instagram and on Facebook with the username colorthrowdown.  Before you get started, here’s some inspiration from the talented Color Throwdown team and this week's Guest Star Stamper.

** Amy Rohl **  Amy Rysavy **
** Broni ** Lisa ** Lynn **
** Susie **  Vickie ** Wanda **
** Guest Star Stamper Deborah Wheeler **

Materials Used:
Holiday Envelopes stamp set (Pretty Pink Posh); Memento Tuxedo Black ink (Tsukineko/IMAGINE Crafts); Winter pigment ink (Mama Elephant); markers (Copic); clear glitter brush marker (Spectrum Noir); Petal Pink cardstock (Recollections); gold paper (Target); Fishtail Flag STAX dies (My Favorite Things); pink self-adhesive crystals; foam tape

Wednesday, December 7, 2022

Color Throwdown 722-You're the Marshmallows to My Cocoa

It's time for another Color Throwdown! Our colors this week are a seasonal mix of red, black, green, and gold.

You're the Marshmallows to My Cocoa card-designed by Lori Tecler/Inking Aloud

The layout for my design comes from the current challenge at Try Stampin' on Tuesday. My focal image is a wintery mug created with the Winter Mug die set from Pretty Pink Posh. After assembling the mug, I adhered it to a large white circle die cut. The circle was adhered to a red card base overlapping a wide strip of black cardstock at the left side of the cardfront. To bring in the shimmery gold, I edged the black strip with gold, then adhered a wider gold strip across most of the cardfront. The "you're the marshmallows to my cocoa" sentiment from Lawn Fawn's Thanks a Latte set was stamped on the strip to finish the design.

To play along, just create a paper crafted project using these colors as a starting point and add a direct link to your finished project using the linky tool found at the end of this week's CTD post.  As always, if you don’t have exact color matches, something close works just fine.  Just be sure that the challenge colors are the dominant ones in your project.  And, if you upload your project to an online gallery, use the keyword CTD722.  If you upload your projects on social media, go ahead and use the hashtag #ctd722 and #colorthrowdown.  You can find us on Instagram and on Facebook with the username colorthrowdown.  Before you get started, here’s some inspiration from the talented Color Throwdown team and this week's Guest Star Stamper.

** Amy Rohl **  Amy Rysavy **
** Broni ** Lisa ** Lynn **
** Susie **  Vickie ** Wanda **
** Guest Star Stamper Samantha P **

Materials Used:
Thanks a Latte stamp set (Lawn Fawn); Memento Tuxedo Black ink (Tsukineko/IMAGINE Crafts); Real Red and Basic Black cardstock (Stampin' Up!); New Leaf cardstock (Papertrey Ink); gold paper (Target); Winter Mug dies (Pretty Pink Posh); circle dies (Spellbinders)

Monday, June 23, 2014

Poppy Sketches 7-Hello Deer


It’s time for a new sketch at Poppy Sketches! This time our sketch comes with a pop of pattern—polka dots. We’re being sponsored by Pretty Pink Posh, so you’ll see lots of sparkly sequin goodness on everyone’s cards. If you haven’t yet stopped by or shopped at Pretty Pink Posh, be sure to check out Paulina’s fabulous selection of sequins and other embellishments.

Hello Deer card-designed by Lori Tecler/Inking Aloud-stamps and dies from Lawn Fawn
My card features the Woodlands Mix sequins and the 4 mm Sparkling Clear sequins. Since the sequins were a woodland mix featuring flat green sequins along with a few sparkly gold leaves, I created a card featuring a woodland animal—the sweet deer from Lawn Fawn’s Into the Woods stamp set. I colored the deer with Copic markers and die cut it with the matching die, then added a bit of white flock to its tail for a fluffy look.

The deer was set on a simple background made from blue dotted paper with a strip of green cardstock grass at the bottom and some die cut felt clouds at the top. After the deer was in place, I went to town with the sequins! I added a bunch of the Woodlands Mix sequins to the grass. This was the first time I’ve used flat sequins. I really like how they look! I adhered some of the clear sequin to the space beneath the clouds as if they were raindrops.  It's super sparkly IRL!

For more inspiration, check out what the rest of the Poppy Sketches team has created using the sketch.  Here's where to find them:

Laura Davis, challenge owner
Lee Murphy, design team coordinator
Amy Crockett,
Amy Tsuruta
,
Lisa Petrella,
Lori Tecler--you're here!
Renee' Dezember


Materials Used:
Into the Woods and Hello Baby stamp sets, Let’s Polka patterned paper, Into the Woods and Spring Showers dies (Lawn fawn); Tropical Teal cardstock (Papertrey Ink); Kiwi Kiss cardstock (Stampin’ Up!); gold paper (Target); Woodlands Mix and 4 mm Sparkling Clear sequins (Pretty Pink Posh); grass border punch (Fiskars); white felt; foam tape

Monday, May 26, 2014

Poppy Sketches 5-Picture Perfect with The Cutting Cafe


It's time for a new sketch at Poppy Sketches!  Our sponsor for this sketch is The Cutting Cafe.  All of the designers are using some of their fun camera themed files on their cards today, along with the colors cornflower, pale pink, and elephant.

Picture Perfect shaker card-designed by Lori Tecler/Inking Aloud
I used the sketch to make a shaker card filled with sequins.  The shaker is made from one of the Polaroid style frames included in the Polaroid and Camera Fun Template and Printable Set from The Cutting Cafe.  I cut the frame with my Silhouette, then backed the opening with a piece of acetate.  The back of the shaker is a piece of striped paper with a textured look.  It's filled with a bunch of different sequins, including Cornflower and Pink Blush sequins from Pretty Pink Posh.

The camera and filmstrip elements were both printable files.  The camera was colored with Copic markers.  I printed it twice, cutting out the lens from one of the images and layering it on the other one with foam tape for dimension.  I cut the frames out of the film strip image, then adhered it to the cardfront over a strip of gray dotted washi tape to fill it in.  The "picture perfect" sentiment was also included in the files from The Cutting Cafe.  I ran the paper through my printer to add the words, then trimmed the paper to size for the card.  The finished panel was adhered to a pink card base.

Don't miss what the rest of the Poppy Sketches team has created using this week's sketch and pop of color.  Here's where to find them:

Laura Davis, challenge owner
Lee Murphy, design team coordinator
Amy Crockett,
Amy Tsuruta
,
Lisa Petrella,
Lori Tecler--you're here!
Renee' Dezember


Materials Used:
Polaroid and Camera Fun Template and Printable Set (The Cutting Cafe); markers (Copic); Brocade Blue and Pretty in Pink cardstock (Stampin' Up!); Rose Colored Glasses Collection-Tinted Rose Stripe designer paper (GCD Studios); Cornflower and Pink Blush sequins (Pretty Pink Posh); washi tape (My Mind's Eye); foam tape

Wednesday, May 21, 2014

You Brighten My Day

Here’s my card for this week’s Muse challenge. I was inspired by the chevron pattern and the card’s layout and incorporated those elements into my design.

You Brighten My Day card-designed by Lori Tecler/Inking Aloud-stamps and dies from My Favorite Things
Instead of making a card with a portrait-style orientation, I made one with a landscape orientation. I used the Chevron Stripes die from My Favorite Things to cut a pair of chevrons out of a white panel. I reassembled the cut panel on a kraft card base, mimicking the look of Marion’s card.

When I had the lightbulb die from MFT out the other day for this card, I cut a few extras to have on hand, so I decided I’d use one on this card. I used foam tape to attach the bulb to the cardfront. A piece of black twine extending from the top of the bulb to the top of the card ground the bulb so it’s not floating in space. I stamped the “you brighten my day” sentiment from the Watt’s Up set beneath the chevrons in black pigment ink. Since there were flourishy leaves framing the flower on the Muse card, I decided I needed something around my lightbulb, too. After considering a few options, including a circle of clear bling and a sun ray stencil, I ended up using a trio of clear sequins from Pretty Pink Posh.  The add just the right bit of sparkle!

Materials Used:
Watt’s Up stamp set, Steel Grey cardstock, Die-namics Chevron Stripes and Lightbulb dies (My Favorite Things); Memento Luxe Tuxedo Black ink (Tsukineko); Yoyo Yellow cardstock (Stampin’ Up!); Desert Storm cardstock (Neenah); silver paper (Target); black twine (Hemptique); Crystal Clear sequins (Pretty Pink Posh); foam tape

Saturday, April 26, 2014

Sequin Shaker Blog Hop

I’m joining in on the Pretty Pink Posh sequin shaker card blog hop. It’s been a white since I’d made one of these fun cards and I’m thrilled with how my card turned out.

I Like You a Watt-designed by Lori Tecler/Inking Aloud-stamps from Simon Says Stamp
My shaker panel features the light bulb image from the Simon Says Stamp Watts Up set. I added a hand-drawn string extending from the top of the bulb to the top of the panel to ground the light, then stamped the set’s “I like you a watt” sentiment at the bottom of the panel in bold, contrasting red ink.

After tossing in a mix of sequins that includes Pretty Pink Posh’s Lemon Meringue, Lemon Drop, Sparkling Clear, and Gold Star sequins (plus a few other random ones from my stash!), I added the yellow dotted die cut frame on top. The frame is adhered on an angle to a gray card base over a long yellow fishtail flag strip. I accented the shaker with a pair of die cut hearts.

Materials Used:
Watts Up stamp set (Simon Says Stamp); Memento Tuxedo Black ink and Memento Luxe Dandelion inks (Tsukineko); Cherry ink (Avery Elle); Steel Grey and Lemon Drop cardstock, Die-namics Fishtail Flag Layers Stax die (My Favorite Things); stitched rectangle and stitched heart dies (Lil’ Inker Designs); sequins (Pretty Pink Posh); acetate; foam tape

Friday, April 25, 2014

Believe You Can

Here’s my card for the current Mama Elephant inspiration challenge. I was inspired by the photo’s soft color scheme and used it as the basis for this design.

Believe You Can-designed by Lori Tecler/Inking Aloud-stamps and dies from Mama Elephant
I started off by making a cloud filled sky backdrop from a pale blue panel with a pair of vellum clouds, cut with ME’s Landscape Trio dies, layered at the bottom. I used the bunny from the Up and Away set as my focal image. I stamped the image on kraft cardstock and die cut it with the matching die, then added a little texture with some white flock on its belly. It’s adhered to a blue panel using foam tape.

The bunny’s hand is filled with a pair of round balloons from the Pandamonium set. The balloons were colored with Copic markers to match the soft green and yellow seen in the photo.  I stamped the “believe you can” sentiment from the True Friend set at the top of the panel in aqua ink. A few sequins from Pretty Pink Posh scattered around the panel add a little sparkle and shine to the soft scene.  In a nod to all of the white space in the photo, I adhered the finished panel to a white card base.

Materials Used:
Up and Away, Pandamonium, and True Friend stamp sets, Up and Away, Pandamonium, and Landscape Trio dies (Mama Elephant); Memento Tuxedo Black ink (Tsukineko); Aquamarine ink (Avery Elle); markers (Copic); Soft Sky cardstock (Stampin’ Up!); Desert Storm cardstock (Neenah); white vellum (The Paper Company); stitched rectangle die (Lil' Inker); Aquamarine and Lemon Meringue sequins (Pretty Pink Posh); white flock (Stampendous); foam tape

Tuesday, April 22, 2014

The Sky Is the Limit

I'm back with my second take on the current sketch at Seize the Sketch.  You still have time to play along--be sure to check out all the details on the current challenge here.

The Sky Is the Limit-designed by Lori Tecler/Inking Aloud-stamps from The Cat's Pajamas
I just love the big eared bunny from The Cat's Pajamas!  Here, he's riding in a hot air balloon in the Away We Go set.  I colored most of the image using Copic markers, then paper pieced the balloon using some chevron patterned paper.  It's shaded just a bit with markers to add some depth.  I cut the image out using the out of the box technique, allowing the bunny's big ears to extend beyond the edge of the oval panel.

I matted the colored image panel on a lime green oval, then adhered it to a matching lime green card base covered with aqua dotted patterned paper on top and turquoise cardstock on the bottom.  I added a pair of white felt clouds, cut apart from a strip of clouds cut with TCP's CutUps Cloud Border die, overlapping the balloon just a bit.  The set's "the sky is the limit" sentiment was stamped at the bottom of the cardfront in black ink.  A trio of blue sequins from Pretty Pink Posh scattered around the image panel add a little fun sparkle to the scene.

Materials Used:
Away We Go stamp set, CutUps Cloud Border die (The Cat's Pajamas); Memento Tuxedo Black ink (Tsukineko); markers (Copic); Hawaiian Shores, Aqua Mist, and Limeade Ice cardstock (Papertrey Ink); Cut and Paste-Adorbs 6x6 paper pad (My Mind's Eye); petite oval dies (Spellbinders); Aquamarine sequins (Pretty Pink Posh); white felt (Michaels)

Saturday, April 19, 2014

Hello, Sunshine

Here's my design for the current Deconstructed Sketch.  Given the ray of sunshine pattern in the sketch, I went with the obvious sunshine theme on my card using stamps and dies from Clear and Simple Stamps.

Hello, Sunshine-designed by Lori Tecler/Inking Aloud-stamps from Clear and Simple Stamps
I used one piece of designer paper for the slanted panels on the cardfront.  I liked the contrast of the paper's grid design with the round sun and curvy clouds.  So that I could get it right, I experimented a few times with scrap cardstock to see how to best cut the panel so the pieces could be relatively even.  I think I did okay!  I adhered the cut pieces directly to a blue card base, leaving just a bit of space (sky) peeking through between each piece.  A strip of gray cardstock covers the bottom of the patterned paper strips.

I made a sun from a golden yellow pinking circle die cut topped with a dot embossed circle die cut.  It's attached directly to the gray cardstock strip, then topped with a pair of white die cut clouds.  Once the sun and clouds were in place, I adhered a few sparkly sequins from Pretty Pink Posh around the panel.  There was just enough room at the bottom of the card to stamp the "hello sunshine" sentiment from the Clear and Simple Stamps Cloudy Days Sentiments set.

Materials Used:
Cloudy Days Sentiments stamp set, You're Such a Gray-cious Host ink, Golden Tiara, I Steel Got It, Trendsetter Blue, and White Pearl cardstock, Clouds Combo and Shapes:  Circles dies (Clear and Simple Stamps); patterned paper (Studio Calico); pinking circle die (Spellbinders); Spotted embossing folder (Lifestyle Crafts); Lemon Drop sequins (Pretty Pink Posh); foam tape

The Best Is Yet to Come

Here's my card for the current Card Concept challenge to feature an umbrella on your project.  This one falls somewhere between clean and simple and clean and layered--I can't decide!  I based my layout (loosely!) on this week's sketch from Freshly Made Sketches.

The Best Is Yet to Come-designed by Lori Tecler/Inking Aloud-stamps and dies from Mama Elephant
My umbrella comes from the Mama Elephant Up and Away set.  Here, it's being held by the set's cute monkey image.  Both images were colored with Copic markers and die cut, then adhered to the background panel using foam tape for dimension.  So that the monkey looks like he's holding the umbrella, I stamped the monkey image a second time, then colored and cut out just the monkey's hand.  I glued it in place over the umbrella handle once the pieces were in place.  The background was sponged with blue distress ink and a cloud template to give it a sky-like look.

I layered the panel on a blue card base, then added the sentiment on top.  The red is a nice contrast to the soft sky and matches the balloon, too.  I finished the design with a trio of coordinating aquamarine sequins from Pretty Pink Posh.

Materials Used:
Up and Away stamp set, Up and Away dies (Mama Elephant); Memento Tuxedo Black ink (Tsukineko); Tumbled Glass distress ink (Ranger); markers (Copic); Hawaiian Shores cardstock (Papertrey Ink); Real Red cardstock (Stampin' Up!); Aquamarine sequins (Pretty Pink Posh); cloud template; corner rounder; foam tape

Wednesday, April 16, 2014

Color Throwdown 288-Springtime Thank You


It’s time for another Color Throwdown! Melody is our hostess this week and she's selected this pretty trio--Gumball Green, Melon Mambo, and Basic Gray.

Springtime Thank You-designed by Lori Tecler/Inking Aloud-stamps and dies from Clear and Simple StampsI used the colors along with the current Mojo Monday sketch to make a springtime thank you card.  I used one of the pretty flowers from the Clear and Simple Stamps Flower Buds set as my focal image. The image was stamped on a matching white die cut piece and adhered to the lower right side of the sentiment panel using foam tape.  The "thank you" sentiment comes from the Baby Sentiments set.

I adhered the panel over a gray card base covered with a piece of green patterned paper edged with a strip of dark pink cardstock. A gray strip die cut with CSS's Eyelet Border is tucked under the edge of the pink cardstock strip.  I love how this border looks--I need to remember to use it more often!  Once the sentiment and image were in place, I added a trio of rosy pink sequins from Pretty Pink Posh around the card for a little sparkle.

To play along, just create a paper crafted project using these colors as a starting point and add a direct link to your finished project using the linky tool found at the end of this week's CTD post. As always, if you don’t have exact color matches, something close works just fine. Just be sure that your project mainly features the challenge colors. And, if you upload your project to an online gallery, use the keyword CTD288.

Before you get started, here’s some inspiration from the talented Color Throwdown team, our April guestie, Jeanne Jachna, and this week's Guest Star Stampers, Sandy Mathis and Jane Howden.

** Barbara ** Broni ** Joan ** Melody **
** Monika ** Tammy ** Vickie ** Wanda **
** April guestie Jeanne Jachna **
** Guest Star Stampers Sandy Mathis and Jane Howden **

Materials Used:
Flower Buds and Baby Sentiments stamp sets, Paint the Town Pink, Green with Envy, and You're Such a Gray-cious Host inks, Paint the Town Pink, Glamazon Green, You're Such a Gray-cious Host, and A Blanc Check cardstock, Eyelet Border, Favor Flags and Flower Buds dies (Clear and Simple Stamps); Chilled Cucumber Soup 6x6 paper pad (Jillibean Soup); Sweetheart Mix sequins (Pretty Pink Posh); foam tape

Sunday, April 13, 2014

Little Star

Here's my card for this week's Viva la Verve sketch.  It's doing double-duty as my entry for this month's Verve Diva Dare to create a baby or kid themed card.

Little Star-designed by Lori Tecler/Inking Aloud-stamps from Verve Stamps
The alphabet patterned paper I found in my paper stash was the perfect starting point for my baby card.  I adhered a strip of the patterned paper to a pale blue card base.  The panel was topped with a celery fishtail flag strip, then with a pair of pale yellow fishtail flag strips.

I stamped the set's "little star" sentiment in gray ink on a white stitched circle die cut.  After matting the sentiment on a blue circle, I added it to the cardfront over the fishtail flag strips.  To go with the sentiment, I die cut a small star from yellow cardstock and used foam tape to adhere it to the top of the sentiment panel.  A trio of clear sequins add a little sparkle--the perfect finish for a star themed design!

Materials Used:
Shining Star stamp set (Verve Stamps); Memento Luxe Gray Flannel ink (Tsukineko); Bashful Blue, Brocade Blue, Certainly Celery, and Barely Banana cardstock (Stampin' Up!); Baby -Ring Around the Rosie designer paper (American Crafts); circle die (Spellbinders); stitched circle and stitched star dies (Lil' Inker Designs); Die-namics Fishtail Flag Stax and Fishtail Flag Layers Stax dies (My Favorite Things); Sparkling Clear sequins (Pretty Pink Posh); foam tape

Tuesday, April 1, 2014

You Brighten My Day

I love the fun light bulb themed stamp set that came in my card kit from Simon Says Stamp!  I inked it up for the first time for this card based on the current Deconstructed Sketch.

You Brighten My Day-designed by Lori Tecler/Inking Aloud-stamps from Simon Says Stamp
I've really grown to like gray and yellow together, so I knew that was the color scheme I wanted for my card.  I started off with a gray card base, then topped it with a yellow and gray patterned paper panel.  To set the patterned panel off a bit from the cardfront, I matted it on a piece of solid yellow cardstock before adhering it to the card.  I stamped the set's "you brighten my day" sentiment in gray ink on a white panel, then matted it on a piece of yellow cardstock.  After adhering a gray cardstock strip across the patterned paper panel, I layered the sentiment on top.

I stamped the light bulb image using yellow and gray  pigment inks, then covered the stamped image with clear embossing powder and heat embossed it for a glass-like look.  It's adhered at the bottom of the sentiment panel.  I added a pair of die cut hearts clustered around the bulb--one gray and, for a pop of contrasting color, one red.  I finished things off with a trio of clear sequins from Pretty Pink Posh.

Materials Used:
Watts Up stamp set (Simon Says Stamp); Memento Luxe Dandelion and Gray Flannel inks (Tsukineko); Steel Grey and Lemon Drop cardstock (My Favorite Things); Real Red cardstock (Stampin' Up!); white cardstock (Michaels); Pinwheel 6x6 paper pad (Lily Bee Design); stitched heart dies (Lil' Inker Designs); Sparkling Clear sequins (Pretty Pink Posh); corner rounder; foam tape

Friday, March 28, 2014

You Go Girl

My friend Lesley, the talented and creative mind behind some of my favorite challenge blogs, has started sharing some sketches on her blog. I put together this card using the sketch Lesley shared this week and one of the rag dolls from Clear and Simple Stamps.

You Go Girl-designed by Lori Tecler/Inking Aloud-stamps and dies from Clear and Simple Stamps
This is Rag Doll Emma. I colored the die cut and stamped image with Copic markers, then used foam tape to adhere her to the white panel. The image panel is layered on to a green cardstock panel over an angled piece of multicolored chevron patterned paper. Once the panels were in place, I added the “you go girl” sentiment at the bottom using foam tape, then folded a die cut pink Favor Flag strip on top. After matting the green panel on a piece of blue cardstock, I adhered the pieces to a pink card base.  I added a trio of pink sequins around the image.  They're the perfect embellishment for a girly card like this one!

Materials Used:
Rag Doll Emma: Girl stamp and die set, Perfect Little Black Dress ink, I’m a Princess Pink, In the Limelight, Trendsetter Blue, and A Blanc Check cardstock, Copic markers (BG72, BG75, B000, YG101, YG11, YG13, YG25, Y32, YR21, YR24, E000, E00, E02, E33, E35), Favor Flags and Shapes: Circles dies (Clear and Simple Stamps); Everyday Eclectic 6x6 paper pad (Echo Park); Pink Blush sequins (Pretty Pink Posh); foam tape

Wednesday, March 19, 2014

Color Throwdown 284-Thanks a Bunch


It’s time for another Color Throwdown! Barbara is our hostess this week and she’s shared a pretty color combination with us—Brilliant Blue, Perfect Plum, and Bermuda Bay.

Thanks a Bunch-designed by Lori Tecler-Inking Aloud-stamps and dies from Reverse ConfettiI put together a clean and simple design using stamps and dies from Reverse Confetti along with the current sketch from Retro Sketches. I die cut a flower using the Confetti Cuts Petals ‘n Posies die, then stamped the matching dotted flower from the Petals 'n Posies set on the die cut piece using plum ink. For contrast, I stamped the flower’s center in teal ink.

The flower’s adhered to the end of a white strip stamped with the set’s “thanks a bunch” sentiment. I matted the sentiment on a scrap of Brilliant Blue cardstock, then adhered it to a piece of teal woodgrain pattern paper. The panel was adhered to the top of a white cardstock panel and matted with a piece of Brilliant Blue cardstock, then layered on a Bermuda Bay card base. I finished the design with a pair of deep blue sequins from Pretty Pink Posh. While these aren’t traditional “floral” colors, I think it worked out well here!

To play along, just create a paper crafted project using these colors as a starting point and add a direct link to your finished project using the linky tool found at the end of this week's CTD post. As always, if you don’t have exact color matches, something close works just fine. And, if you upload your project to an online gallery, use the keyword CTD284.

Before you get started, here’s some inspiration from the talented Color Throwdown team, our March guestie, Gloria Stengel, and this week’s Guest Star Stamper, Amy White.

** Barbara ** Broni ** Joan ** Melody **
** Monika ** Tammy ** Vickie ** Wanda **
** March guestie Gloria Stengel **
** Guest star stamper Amy White **

Materials Used:
Petals ‘n Posies stamp set, Petals ‘n Posies dies (Reverse Confetti); Memento Lulu Lavender and Danube Blue inks (Tsukineko); Aquamarine ink (Avery Elle); Bermuda Bay and Brilliant Blue cardstock (Stampin’ Up!); white cardstock (Michaels); Kraft in Color-Color 6x6 paper pad (Doodlebug Design); cobalt sequins (Pretty Pink Posh); foam tape

Sunday, March 16, 2014

Rain or Shine

Here's my card for this week's Viva la Verve sketch.  I combined the sketch with the current "spring has sprung" themed Diva Inspirations challenge.  My card was inspired by the colors in the inspiration photo and the traditional spring rain showers.  I'm hoping we'll start to see some springtime rain showers around here instead of snow soon--somehow we're expecting accumulating snow (yet again!) later on today in the DC area.

Rain or Shine-designed by Lori Tecler-Inking Aloud-stamps from Verve StampsI used Verve's Rain or Shine stamp set for my card.  One of the set's sentiments was stamped in blue ink on a white circle, a little bit off center to leave room for an embellishment.  I layered the sentiment on a pink panel, then on a white paper doily.  The doily was adhered to a piece of woodgrain patterned paper.  I substituted the patterned paper for the strips called for in the sketch.  The plank-like look of the woodgrain seemed close enough to paper strips to me!

Once the sentiment was in place, I added the pink umbrella to the left side of the panel using foam tape.  I tucked a pair of white die cut clouds underneath the umbrella and accented it with a trio of soft pink sequins.

Materials Used:
Rain or Shine stamp set (Verve Stamps); Aquamarine ink (Avery Elle); Memento Tuxedo Black and Memento Luxe Angel Pink inks (Tsukineko); Pink Pirouette and Shimmery White cardstock (Stampin' Up!); white cardstock (Michaels); Miss Caroline-Dolled Up 6x6 paper pad (My Mind's Eye); circle die (Spellbinders); Die-namics Pierced Circle Stax die (My Favorite Things); stitched cloud die (Lil' Inker Designs); Pink Blush sequins (Pretty Pink Posh); white paper doily; foam tape

Saturday, March 15, 2014

You Are My Fave

I used this week’s sketch from CASE(e) this Sketch to create this cheery floral design. It definitely says "springtime" to me!

You Are My Fave-designed by Lori Tecler-Inking Aloud-stamps and dies from Clear and Simple Stamps
The flowers are from the Clear and Simple Stamps Flower Buds stamp set. I die cut them from white cardstock using the matching dies, then stamped the flower images in bold pink and orange inks. They’re arranged at the edge of a round white panel, using foam tape for dimension. I tucked a pair of die cut leaves underneath the blooms to add a softer, contrasting color in the mix. The “you are my fave” sentiment comes from CSS’s All Wrapped Up set. I love the mix of fonts!

The sentiment panel is adhered over a pair of fishtail flag strips on a light pink card base. I matched the strips to the colors in the flowers to help tie everything together. A trio of clear sequins from Pretty Pink Posh finishes off the design. This is the first time I’ve used these clear sequins and I am in love! You’ll be seeing a lot more of these pretties on my designs . . .

Materials Used:
Flower Buds and All Wrapped Up stamp sets, Paint the Town Pink, Creamsicle Cardigan, and In the Limelight inks, I’m a Princess Pink, Paint the Town Pink, Creamsicle Cardigan, and A Blanc Check cardstock, Shapes: Circles and Flower Buds dies (Clear and Simple Stamps); Take Note 6x6 paper pad (Doodlebug Design); sparkling clear sequins (Pretty Pink Posh); foam tape

Thank You for Being My Friend

Here’s my card for this week’s My Favorite Things Wednesday Stamp Club sketch challenge. I kept things pretty simple on this one, using a fun patterned paper along with a large, bold sentiment and a die cut embellishment.

Thank You for Being My Friend-designed by Lori Tecler-Inking Aloud-stamps from My Favorite Things
The patterned paper comes (again!) from my stash of 12x12 papers that I need to make a big dent in. I layered the patterned paper on a coordinating pink cardstock mat, then machine stitched around the edges before adhering the panel to a mint card base. I stamped the “thank you for being my friend” sentiment from the Sending Thanks set in mint pigment ink on a white cardstock strip. After matting the stamped strip on a pink panel, I set it diagonally over the card base, trimming the edges to be even with the sides of the card.

I die cut a flower from coordinating solid cardstock scraps and adhered that to the left side of the sentiment strip as an accent. I couldn’t resist adding a few pink sequins around the panel for a little sparkle, too!

Materials Used:
Sending Thanks stamp set, Spearmint cardstock (My Favorite Things); Mint to Be ink (Avery Elle); Sweet Blush cardstock (Papertrey Ink); So Sophie “Pure Bliss” True Stripe designer paper (My Mind’s Eye); CutUps Flower Buttons die, cream linen thread (The Cat's Pajamas); Pink Blush sequins (Pretty Pink Posh); sewing machine; foam tape

Saturday, March 8, 2014

You Tickle My Fancy

Here’s my card for this week’s My Favorite Things Wednesday Stamp Club sketch challenge. I went with a clean-lined love themed design.

You Tickle My Fancy-designed by Lori Tecler-Inking Aloud-stamps from My Favorite Things
I die cut a circle from heart patterned paper and layered it on a coordinating blue cardstock mat. The layered circles were adhered to a light blue panel, then topped with a pair of blue layered cardstock strips. I stamped the “you tickle my fancy” sentiment from the Right on Target set on the strips in red pigment ink, then added a pair of red die cut feathers to the right of the words. The top feather was adhered with foam tape for a little dimension. I added a trio of pretty blue sequins from Pretty Pink Posh to the mix, too, then adhered the finished panel to a blue card base.

Materials Used:
Right on Target stamp set, Electric Red cardstock, Die-namics Pierced Circle Stax and Feathers and Arrows dies (My Favorite Things); Cherry ink (Avery Elle); Bashful Blue and Brocade Blue cardstock (Stampin’ Up!); Neopolitan Bean Bisque 6x6 paper pad (Jillibean Soup); circle die (Spellbinders); Cornflower sequins (Pretty Pink Posh); foam tape

Thursday, March 6, 2014

Sweet Birthday Wishes

Here’s my card for this month’s Sketch for You to Try. I used the Reverse Confetti Sweet Thing stamp set--and some new pretty sequins from Pretty Pink Posh—on my card.

Sweet Birthday Wishes-designed by Lori Tecler-Inking Aloud-stamps and dies from Reverse Confetti
I started off with a fresh, spring-like color combination. Most of the mint green cardfront is covered with a piece of mint colored grid patterned paper. I inked around the edges of the panel with some mint pigment ink before adhering it to the cardfront. The grid panel is topped with a piece of multicolored dotted paper matted with coordinating rose cardstock. I layered a strip of mint scallop edged cardstock over the paper panels, then adhered a piece of rose grosgrain ribbon along the top of the scalloped strip to add a little texture.

I combined a few of the sentiments from the Sweet Thing set to get the birthday sentiment I stamped in gray ink on the pale pink Tag Me die cut. To add a pop of color to the tag, I used the little circle die included with the Tag Me set to make a mint green ring to put around the hole at the top of the tag.  I threaded a piece of rose grosgrain ribbon through the hole and secured it with some twine. Instead of a round panel or element, I die cut a heart from rose cardstock using one of the dies from the Love Note die set and attached it to the top of the tag with foam tape. After putting the tag in place on the card, I scattered some pretty mint and pale pink sequins around the tag as accents.

Materials Used:
Sweet Thing stamp set, Confetti Cuts Love Notes and Tag Me dies (Reverse Confetti); Memento Luxe Gray Flannel ink (Tsukineko); Mint to Be ink (Avery Elle); Spearmint and Insulation Pink cardstock (My Favorite Things); Regal Rose cardstock, Regal Rose grosgrain ribbon, scallop edge punch (Stampin’ Up!); This and That-Grateful 6x6 paper pad (Echo Park); Fresh Mint and Pink Blush sequins (Pretty Pink Posh); foam tape
 
Blogging tips