Saturday, December 31, 2011

Cheers

My card for this year's final My Favorite Things Wednesday Stamp Club sketch challenge seems to be an appropriate one for my final post of 2011. The fun Cheers a la mode image is perfect for a new year's card--and to mark my completion of all of this year's MFT sketches, too!

I colored the girl with Copic markers, then cut the panel using the out of the box technique so the glass of bubbly stuff extends beyond the edge of the top of the panel. The glass is covered with Glossy Accents and sprinkled with glitter for a festive sparkle.

I used a trio of patterned papers from a My Mind's Eye paper pad on the cardfront. I thought the number pattern was perfect for a new year's card. A pretty gold glittery star adds a final celebratory touch.

I'm planning on spending a quiet New Year's Eve with Chloe the cutie puppy, watching some hockey on TV, followed by a movie or two. We're saving our big celebration for Monday's Rose Bowl game . . .

Materials Used:
a la modes Cheers stamp set (My Favorite Things); white cardstock (Taylored Expressions); Memento Tuxedo Black ink (Tsukineko); markers (Copic); Riding Hood Red cardstock, scallop edge punch, Dazzling Diamonds (Stampin' Up!); Hawaiian Shores cardstock (Papertrey Ink); Stella & Rose-Gertie 6x6 paper pad (My Mind's Eye); gold chipboard star (Recollections); Glossy Accents (Ranger)

Many Thanks

Here's a super quick thank you card for the current Paper Smooches Sparks challenge. The inspiration photo provided featured text in a mix of bold colors with a little bit of gray thrown in, so I made those elements the dominant features in my card.

I used one stamp--many thanks--from the Word Salad set, inking it up multiple times with multiple inks to get the stacked line of "thanks." The shape of the Memento dew drop ink pads made this easy to do. I started with the red at the bottom and worked my way up in "rainbow" order.

The word "many" was stamped twice in gray ink along the "thanks" images. To visually separate the two words, I made a teeny, tiny dot between them with a gray marker. The panel is set on a gray mat, then on a white card base. So fun and easy to make a quick bunch of, too!

Materials Used:
from i {heart} papers: Paper Smooches Word Salad stamp set, Tsukineko Memento Lady Bug, Tangelo, Dandelion, Pear Tart, Bahama Blue, and London Fog inks

other: Basic Gray cardstock (Stampin' Up!); white cardstock (Xerox)

Friday, December 30, 2011

Blogger Challenge: Week 236

***Scroll down to the post below to see my post for Bar's surprise retirement blog hop***

This week's blogger challenge theme is celebration. There are lots of ways you could go with this one, but I chose to go with the obvious one--New Year's Eve.

I made a super clean and simple card using the glass image from the Clear and Simple Stamps Taglines set along with a sentiment from the the limited edition Let's Celebrate set. The glass image is stamped repeatedly across a white card base. I purposely stamped the glass at varying angles so I didn't have to worry about being too exact about lining it up straight. I colored the glasses with Copic markers. Just one is covered with Glossy Accents and sprinkled with glitter.

The "it's a celebration" sentiment is stamped underneath the line of glasses, near the right edge of the card. After attaching a black cardstock strip below the images and sentiment, I ran a piece of yellow satin ribbon across the card, dressing it up with a little bow.

For more celebration-themed ideas, check out the list of links below. And, if you'd like to play along, add a direct link to your new creation using the linky tool below.

Materials Used:
Taglines and Let's Celebrate stamp sets, Perfect Little Black Dress ink, A Blanc Check and Perfect Little Black Dress cardstock, Copic markers (Y21, YR30, B0000), Say Yellow to All Your Fans satin ribbon (Clear and Simple Stamps); Dazzling Diamonds (Stampin' Up!); Glossy Accents (Ranger)

Happy Retirement, Bar!

The Color Throwdown girls and a few of our friends are having a surprise blog hop today to celebrate a very special occasion--Barbara's retirement! Today's her last day of work and we've created cards to mark the event.

I used the a la modes I Spy set from My Favorite Things for my card. Her dress is paper pieced with a fun, trendy chevron pattern and her magnifying glass is filled in with Glossy Accents to get a glass-like look. I cut the girlie out and used foam tape to set her over a bold patterned paper panel. A clear crystal flourish peeks out from behind her. The set's "I see . . ." sentiment is stamped on the green strip that runs across the card. I finished it off by stamping the "sunny days ahead" sentiment on the inside of the card. Bar, hope your retirement is filled with plenty of sun-filled days!

Here are links to the rest of the hoppers. Don't forget to stop by Barbara's blog, too!

Broni Holcombe
Lynn Put
Wanda Cullen
Lori Tecler - you're here!
Joan Ervin
Jody Morrow
Cindy Haffner
Tammy Hershberger
Christine Okken

Materials Used:
a la modes I Spy stamp set (My Favorite Things); white cardstock (Taylored Expressions); Memento Tuxedo Black ink (Tsukineko); markers (Copic); Aqua Mist and Simply Chartreuse cardstock, Simply Chartreuse satin ribbon (Papertrey Ink); Campfire designer paper (October Afternoon); Glossy Accents (Ranger); clear crystal flourish (Recollections); foam tape

Thursday, December 29, 2011

Enjoy

The latest CAS-ual Fridays challenge combines two of my favorite things--kraft and twine! I played along with a digi image from the challenge sponsor, Market Street Stamps. This is also my entry for Market Street's post-release Block Party.

I made a simple single K-cup holder from a piece of kraft cardstock. You can find more details on how to make this K-cup holder here. I covered it with pieces of a diagonal striped patterned paper, then dressed up the kraft circle left over when I punched out the hole to slide the K-cup in to.

I resized and printed the coffee mug digi image onto the kraft circle and attached a colored, cut out version of the digi image over it with foam tape. The word "enjoy" from the Simple Joys stamp set is stamped next to the mug in red ink. It's accented with a button tied with red baker's twine. I slipped a hot chocolate K-cup into the holder and it's good to go--the perfect winter pick-me-up!

Materials Used:
coffee cup digi image, Simple Joys stamp set (Market Street Stamps); white cardstock (Taylored Expressions); Memento Tuxedo Black and Rhubarb Stalk inks (Tsukineko); markers (Copic); Crumb Cake cardstock (Stampin' Up!); Christmas Eve Chowder designer paper (Jillibean Soup); circle punch (EK Success); baker's twine (The Twinery); red button (Michaels); foam tape

There's No Bunny Like You

This little card's based on this week's Mojo Monday challenge. I had to alter one of the sketch's elements to accommodate the bunny's super-sized ears, but I think it's still close enough to count!

I used the Skating Bunny set from The Cat's Pajamas, coloring the bunny with Copic markers and cutting it out before setting it on a silver "ice"/blue "sky" background. The set's "no bunny" sentiment is stamped to the left of the image in dark blue ink.

The bunny's attached to a blue paper with a snowflake pattern. I machine stitched around the edges of the panel for a finished look before attaching it to the blue card base. A navy strip is attached across the card at the top of the image panel. Some cornflower seam binding is tied around the middle of the navy strip, finished off with a pretty bow, moved to the opposite side as in the sketch because of those big bunny ears!

If you're like me and can't resist these big-eared bunnies, be sure to stop by The Cat's Pajamas. For each $25 you spend (through December 31), TCP will send you a gift worth at least $10 with your purchase. Gotta love that!

Materials Used:
Skating Bunny stamp set, cornflower seam binding (The Cat's Pajamas); Memento Tuxedo Black and Paris Dusk inks (Tsukineko); markers (Copic); Night of Navy, Bashful Blue, and Brocade Blue cardstock (Stampin' Up!); The Winter Magic matstack (DCWV); silver gel pen (Sakura); foam tape

Wednesday, December 28, 2011

Sending You My Love

Here's my card for today's SCS sketch challenge. I went with a Valentine's Day theme using the Sending Love set from Our Craft Lounge.

I colored the set's mailbox image with Copic markers. I used pretty traditional colors for the image, so I added a little glitter to all of the tiny hearts using a red Spica pen to give the image a fun sparkle.

The card's built on a red background panel. The patterned paper panels are both from the My Mind's Eye Love Me paper pad. I used a strip of red faux suede ribbon along the left edge of the image panel, accented with a red wood button tied with matching baker's twine. There was just enough room under the image panel for stamping the set's "sending you my love" sentiment.

Materials Used:
from i {heart} papers: Our Craft Lounge Sending Love stamp set, X-Press white Copic blending cardstock, Tsukineko Memento Tuxedo Black ink, Copic markers (R22, R24, R27, E23, E33, YG25, C00, C-1, C-3, C-5, B0000) and Lipstick Spica pen, My Mind's Eye Love Me 6x6 paper pad, May Arts red faux suede ribbon, Divine Twine Cherry Red baker's twine

other: Riding Hood Red and Crumb Cake cardstock

Happy Day Happy Anniversary

My parents are celebrating their wedding anniversary while en route all the way across the country to cheer on the Wisconsin Badgers in Monday's Rose Bowl game. Here's the card I made for them to mark the occasion.

Neither of my parents is a big fan of flourishes, fluff, or clutter and this card reflects that. I guess you could say that my clean and simple stamping style originates from my mom's influence--LOL! The card uses one of my new Papertrey Ink sets, Happy Day. I die cut the label shape from Hawaiian Shores cardstock, then stamped one of the matching images on the die cut in the same color ink. The anniversary sentiment is stamped in the center with silver ink.

I set the label on an aqua card base and accented it with cardstock strips--a wide red one and a narrower scallop edged shiny silver one. For texture, I die cut a heart from red felt and attached that at the bottom of the label piece. A few silver faux stitches finish the design.

Materials Used:
Happy Day stamp set, Hawaiian Shores ink, Aqua Mist, Hawaiian Shores, and Pure Poppy cardstock, Happy Day and Heart Prints dies, Pure Poppy felt (Papertrey Ink); silver paper (Recollections); Encore Silver ink (Tsukineko); scallop edge punch (Stampin' Up!); silver gel pen (Sakura)

Tuesday, December 27, 2011

#1 Football Fan

This week’s Our Craft Lounge challenge is a versatile sketch. I flipped the sketch to a vertical orientation for my version using the new #1 Sports Fan Crafty Single set.

I colored the sports fan with Copic markers and cut him out. His slippers are covered with some Platinum Sparkly Fluff for a fluffy look. I made a simple backdrop for him using a brown textured cardstock for the floor and a paper with a small pattern for "wallpaper." I used a few dimensional dots to put him in place.

He's set on a blue panel with a darker blue strip as an accent. Both the image and blue stripe are matted on kraft panels to set them off from the rest of the card. I stamped the set's football image on a scrap of white cardstock, colored it, and cut it out, then set it at the fan's feet with dimensionals to finish the scene.

Be sure to check out all of the creations for this week's challenge--and join us for a chance to win an OCL stamp set!

Materials Used:
from i {heart} papers: Our Craft Lounge #1 Sports Fan stamp set and Platinum Sparkly Fluff, X-Press white Copic blending cardstock, Tsukineko Memento Tuxedo Black ink, Copic markers (E0000, E000, E00, E23, E25, E31, E33, B91, B93, B95, B97, C00, C-1, C-3, C-5), Lily Bee Design Harvest Market Tiny Tablet, Sticky Thumb dimensional dots

other: Marina Mist, Not Quite Navy, and Crumb Cake cardstock (Stampin' Up!); Tan Leather cardstock (Gina K Designs)

I'll Drink to That!

I just got a few of the Moonlight Whispers Everyday Girls from Kraftin' Kimmie--love these fun girlies! I put the celebratory Sophia image to use for this week's Cute Card Thursday sketch. She was a little tall for the sketch, so I had to make a few adjustments, but I think you can still see the sketch's basic elements . . .

Sophia is colored with Copic markers. I left room on the image panel to stamp the accompanying "I'll drink to that" sentiment alongside the colored image.

I used a combination of pink, gray, and silver papers for the panels on the cardfront. I went with a plain dark gray for the largest panel, knowing that it would be mostly covered by the other layers. An elegant piece of pink patterned paper was layered on next. I used a sparkly silver strip for the long panel to the left of the image panel. After running a scrap of wrinkly silver ribbon I found in my scrap pile across the cardfront, I added a pale pink panel at an angle, then set the colored image on top of that. A trio of white pearls are clustered at the bottom of the image panel to keep with the card's elegant look and feel.

Materials Used:
Moonlight Whispers Sophia stamp set (Kraftin' Kimmie Stamps); white cardstock (Taylored Expressions); Memento Tuxedo Black ink (Tsukineko); markers (Copic); Blushing Bride and Basic Gray cardstock (Stampin' Up!); Berry Sorbet cardstock (Papetrey Ink); silver paper (Recollections); Uncommon 6x6 paper pad (Authentique); clear Stardust pen (Sakura); silver ribbon (Michaels); self-adhesive pearls (Recollections)

Monday, December 26, 2011

Holiday Sparkle

I made this glitter window card for today's SCS clean and simple challenge to make some form of a window card. This card may be a day or so late, but I really like it and may just add the design to the "consideration" pile for next year's holiday cards . . . It's been a while since I did this technique and I'd forgotten how easy--and how messy--it is!

I used a circle punch to make a "window" near the top of a Brocade Blue panel. A piece of clear packing tape was attached to the opening, sticky side up, and then covered with lots (and lots!) of glitter. After edging the panel with navy blue strips for contrast, I set the panel on a white card base stamped with a snowflake image from Our Craft Lounge's White Christmas stamp set, orienting the panel so the snowflake was somewhat centered inside the opening.

The holiday sentiment is stamped near the bottom of the panel in navy ink. It's a perfect match for the sparkly glitter window above it. I attached a silver die cut notch-edged strip just above the sentiment and dressed it up with a strip of adhesive clear crystals for even more sparkle and shine.

And, speaking of Our Craft Lounge, don't miss out on OCL's year end blowout sale. Use the code yearend2011 to receive 40% off all in-stock Crafty Cling Rubber and Crafty Cling Clear stamp sets (must order $20 or more for sale to apply; does not include Crafty Cling Rubber Singles; no backorders). Happy shopping! I'm off to enjoy some time at the dog park with Chloe the cutie puppy, who's been not-so-patiently waiting while I finished my card and blog post . . .

Materials Used:
White Christmas stamp set (Our Craft Lounge); Brocade Blue and Night of Navy Classic ink, Brocade Blue and Night of Navy cardstock, Dazzling Diamonds (Stampin' Up!); white cardstock (Xerox); silver paper, clear crystal strip (Recollections); circle punch (EK Success); double ended banner die (Papertrey Ink); packing tape

Papertrey Ink December Blog Hop


It's time for Papertrey Ink's December blog hop. As is the tradition, the theme for this blog hop is "holiday leftovers," meaning reusing or repurposing bits and pieces remaining from your holiday celebration. I received a fun gift wrapped in a fabulous blue cellophane with white dots and knew right away that it would be the perfect "leftover" to use for the blog hop.

The patterned cellophane made a great sky-like backdrop for the airplane from the new Tremendous Treats: Valentine set. After stamping the plane on a scrap of white cardstock, I colored it with Copic markers and cut it out. It's attached to a piece of the blue cellophane (wrapped around a white cardstock panel to keep it flat) with foam tape. A piece of Pure Poppy baker's twine stretches out behind the plane, dotted with felt hearts die cut with the tiniest heart from the Heart Prints die trio.

The panel is edged with red strips. A white scalloped strip makes a cloud-like accent at the top while the "love in the air" sentiment from the original Tiny Treats: Valentine set is stamped on an edge of a white panel die cut with the Happy Day die and slipped underneath the bottom of the panel. I set the piece on a Hawaiian Shores cardstock--the closest match I could come up with for the blue cellophane piece.

Materials Used:
Tremendous Treats: Valentine and Tiny Treats: Valentine stamp sets, Hawaiian Shores, Pure Poppy, and white cardstock, Heart Prints and Happy Day dies, Pure Poppy felt, Pure Poppy baker's twine (Papertrey Ink); Memento Tuxedo Black and Lady Bug inks (Tsukineko); markers (Copic); scallop edge punch (Stampin' Up!); blue cellophane; foam tape

Sunday, December 25, 2011

You Warm my Heart

Here's my clean and simple card for today's SCS featured stamper challenge. My original plan for the card was more like the original one here, but I ended up making a few adjustments along the way.

I used the coffee mug image from Papertrey Ink's Warm Happiness Too stamp set for my focal image. I had die cut three mugs from coordinating paper scraps to mimic the original design, but when I tried to place them on the cardfront, they were too big to all fit, so I decided to go with just the one fun striped pattern. I'm sure I can find another use for the other cute die cut mugs!

The mug is set on a berry cardstock strip that runs across the kraft card base. I stamped the set's open heart image above the mug, like in the original card. It's highlighted with a little glitter along the inside of the image. A strip of berry ribbon is knotted around the bottom of the matching cardstock strip and the sentiment is stamped just above the knot.

I've enjoyed a quiet day at home with Chloe the cutie puppy. We've taken a brisk walk in the cold morning air and cleaned out a few closets (that's one of my goals for my time off this week). I'm heading out soon to meet my family for our traditional Christmas night dinner at TGI Friday's. Not a bad way to spend the day!

Materials Used:
Warm Happiness Too stamp set, Berry Sorbet cardstock, Warm Happiness dies, Berry Sorbet satin ribbon (Papertrey Ink); Crumb Cake cardstock (Stampin' Up!); Memento Rich Cocoa ink (Tsukineko); Lime Twist-Life of the Party 6x6 paper pad (My Mind's Eye); clear Stardust pen (Sakura); foam tape

Warm Wishes for a Happy Holiday Season

Since today's Christmas Day, I figured it was appropriate to share a holiday card to wish all of my readers happy holidays. Here’s the design I settled on for my holiday cards this year.

The cute mitten pair from the Wplus9 Winter Wishes set is my focal image. I stamped the mittens in red ink and cut them out, then added a little bit of clear bling to the center of the snowflake on each mitten. The mittens are strung together on a bit of red baker’s twine.

The mittens are attached to a pink panel with a silver strip along the left edge. After stamping the sentiment beneath the mitten, I added a red notch-edged strip embellished with a small, knotted piece of pink grosgrain ribbon. The panel is set on a plain white card base to make it easy to write a message inside. I did my writing in red ink to make it all match!

Materials Used:
Winter Wishes stamp set (Wplus9); Riding Hood Red Classic ink, Real Red and Pretty in Pink cardstock (Stampin’ Up!); silver shimmer paper (Recollections); clear crystals (Recollections); red baker’s twine (Martha Stewart)

Saturday, December 24, 2011

Warm and Fuzzy Winter Wishes

Here’s a super clean and simple card for the current Lawnscaping challenge to add texture to your projects. I hadn’t inked up the adorable Winter Fox set yet, so I decided to use that for a sweet, feminine winter card.

I colored the fox with Copic markers, adding a girly pink and yellow scarf. A little white flock at the end of the fox’s tail adds a tiny bit of texture. And, the “coffee” inside the mug is coated with Glossy Accents for a liquid-like appearance. I stamped the set’s “warm winter wishes” sentiment in the upper right corner of the panel.

The colored image panel is set on a yellow cardstock strip that I set along the bottom of a pink card base. The strip has rounded edges for a softer look. The left side of the strip is filled in with a piece of pastel dotted paper. I scored a rose die cut circle at the center and wrapped it around the end of the yellow strip, then attached a knotted piece of white ribbon to the circle for one final feminine touch.

Materials Used:
from i {heart} papers: Lawn Fawn Winter Fox stamp set, X-Press white Copic blending cardstock, Tsukineko Memento Tuxedo Black ink, Copic markers (E13, E15, E17, E18, E25, R81, R83, RV00, Y21), My Mind’s Eye Six by Six Dwell paper pad, Stampendous Cotton Ball White flock, Ranger Glossy Accents, May Arts white satin ribbon

other: Pretty in Pink and Barely Banana cardstock (Stampin’ Up!); corner rounder

Frosty Fun

Here’s my card for this week’s My Favorite Things Wednesday Stamp Club sketch challenge. I went wintery on this one, even though we’ve had non-wintery weather around here for much of the week.

I used the cute Frosty Fun skating girl as my focal image. She’s colored with Copic markers and cut out. I made a little backdrop for her using a soft blue panel as the sky and a strip of shimmery silver paper as a sheet of ice for her to skate on, then attached the cut out image with foam tape.

The cardfront is covered with a pair of paneled papers from an Echo Park winter paper pad. A scallop edged strip runs across the cardfront and to bring in a little more shimmer, I attached a silver/gray ribbon I found in my scrap pile to the piece before attaching it to the cardfront. The image panel is layered on top of the card on an angle. I stamped the “have some frosty fun” sentiment on a piece of a fancy edged label die cut and slipped it under the image panel. A sparkly little snowflake accent at the top of the panel adds one final frosty-themed touch to the card.

Materials Used:
Frosty Fun stamp set (My Favorite Things); white cardstock (Taylored Expressions); Memento Tuxedo Black ink (Tsukineko); markers (Copic); Blue Bayou Classic ink, Soft Sky and Blue Bayou cardstock (Stampin’ Up!); silver shimmer paper (Recollections); Winter Park paper pad (Echo Park); medium scallop die (Papertrey Ink); Labels 18 die (Spellbinders); silver satin ribbon (Target); snowflake embellishment (K & Company); foam tape

Friday, December 23, 2011

Chloe's Thank You

I needed to make a thank you card from Chloe the cutie puppy, so I turned to this week’s Mojo Monday sketch to make this dog-themed creation to send on her behalf.

The dog image is from the Pawprints on Our Hearts set from Market Street Stamps. Colored up with Copic markers in shades of golden yellows and browns, the set’s large dog image looks enough like Chloe herself to work. I used red ink to stamp the collar image before coloring the dog. The little bone-shaped tag is colored in with a silver gel pen. Chloe used to have one of these on her collar, but after she chewed the identifying information off of three (yes, three!) of them, I had to come up with an alternate plan. She’s a piece of work, this puppy!

I cut out the image and set it on an oval panel with dimensional dots. I used two patterned papers from a My Mind's Eye pad to add some contrast to the pale blue cardfront. Chloe's not a girly-girl dog, so the colors are perfect for a Chloe card. The striped panel has a strip of ivory faux suede ribbon wrapped around it to break it up a bit. I left the card sentiment-free since my image ended up being a little bigger than the sketch was designed for and took up a lot of space. I think I'll add one or two of the set's pawprint images inside instead.

Materials Used:
from i {heart} papers: Market Street Stamps Pawprints on Our Hearts stamp set, X-Press white Copic blending cardstock, Memento Tuxedo Black and Rhubarb Stalk inks, Copic markers (YR21, Y23, Y32, E31, E33), My Mind's Eye Six by Six Blink of an Eye paper pad, Spellbinders oval dies, May Arts ivory faux suede ribbon, Sticky Thumb dimensional dots

other: Soft Sky and Sahara Sand cardstock (Stampin' Up!); silver gel pen (Sakura)

Blogger Challenge: Week 235

This week’s blogger challenge theme is “ornamental.” I combined the challenge with my Paper Craft Planet Fran*tage Friday project to make this fun shrink plastic snowman ornament.

The snowman from the Merry Snowman set was stamped on white shrink plastic, colored with Copic markers, and cut out. I carefully rolled the cut out image and placed it inside a clear glass ornament. I heated the ornament in my oven, shrinking the snowman to fit inside the ornament. After heating the ornament and shrink plastic piece, I poured a little champagne crushed glass glitter into the bottom of the ornament for a snow-like sparkle, then replaced the ornament’s top. A pretty red bow with a button embellishment dresses up the top.

You can find a more detailed tutorial (including photos) on this project here on the Paper Craft Planet blog. If you leave a comment on the PCP blog post, you’ll be entered into a drawing to win a great prize package from Stampendous.

For more ornament ideas, check out the link list below. And, if you’d like to join the challenge, add a direct link to your new project below.

Materials Used:
Merry Snowman stamp set, champagne crushed glass glitter (Stampendous); Jet Black StazOn ink (Tsukineko); markers (Copic); red grosgrain ribbon (Michaels); wood button (Simplicity); red baker’s twine (Divine Twine); shrink plastic; glass ornament

Thursday, December 22, 2011

You're Cool

This sweet little card was inspired by the current Paper Smooches Sparks challenge. I incorporated the color scheme and the holly leaf elements from the inspiration photo of a six pack of root beer "reindeer," along with a few other elements, in my design .

My focal image is from the Swanky Snowdudes set. When I stamped the image, I omitted the carrot nose, then went back and stamped the "hole" image from one of the golf images from the My Guy set in its place. I colored the nose red, like the red reindeer noses in the inspiration photo, and coated it with Glossy Accents for a shiny look. The hat's embellished with a little bit of white flock. The image is attached to a pair of layered die cut panels using dimensional dots.

To pull in another element from the inspiration photo, I used a holly leaf patterned paper for the cardfront's large panel. A strip of red checked ribbon runs across the panel with a loop underneath the right side of the layered die cuts, anchored with a red button, tied with some twine. The "you're cool" sentiment is a mix of sentiments--and pieces of sentiments--from the same two stamp sets as I used for the snowman. Love how easy it is to do this with clear stamps!

Materials Used:
from i {heart} papers: Paper Smooches Swanky Snowdudes and My Guy stamp sets, X-Press white Copic blending cardstock, Tsukineko Memento Tuxedo Black ink, Copic markers (R12, R22, R24, R27, B000, B0000), Echo Park Season's Greetings paper pad, Spellbinders oval and Labels 18 dies, Stampendous white flock, Ranger Glossy Accents, May Arts red and ivory checked ribbon, Creative Impressions twine thread, Sticky Thumb dimensional dots

other: Creamy Caramel, Real Red, and Very Vanilla cardstock (Stampin' Up!); red button (Michaels)

Tag Time

Here's a simple tag for this week's Kraftin' Kimmie "tag time" challenge. I went for a festive holiday look using the Moonlight Whispers Nadine image with a red and olive color combination.

The cookie platter toting girl is colored with Copic markers and cut out. There's a teeny, tiny clear crystal at the center of the heart on her dress for a little sparkly touch.

I cut a tag from olive cardstock, using a regular manila shipping tag as a guide. After inking the edges of the tag with some distress ink, I added a patterned paper panel near the bottom and edged it with a strip of cream lace. The cutout image is placed on top with foam tape.

I stamped the "what's cookin'?" sentiment on a cream circle in olive ink, layered it on a tan circle, then set it in the open space on the tag next to the image. A little olive ribbon is tied through the hole at the top of the tag. I think this little creation would make a nice addition to a package of yummy holiday treats.

Materials Used:
Moonlight Whispers Nadine (image) and Agnes (sentiment) stamp sets (Kraftin' Kimmie Stamps); white cardstock (Taylored Expressions); Memento Tuxedo Black ink (Tsukineko); Antique Linen distress ink (Ranger); markers (Copic); Old Olive Classic ink, Old Olive and Very Vanilla cardstock (Stampin' Up!); Season's Greetings 6x6 paper pad (Echo Park); circle punches (EK Success); clear crystal (Taylored Expressions); lace (Hobby Lobby); olive ribbon (Morex); foam tape

Wednesday, December 21, 2011

On Cloud 9

For this week’s SCS sketch challenge, I pulled out Love in the Air, one of the new releases from Our Craft Lounge, for this sweet Valentine’s Day card. It was a nice change from the wintery and holiday ones I've been making a lot of lately!

I colored the hot air balloon in shades of pink and red and cut it out. It’s set on a dot embossed light blue sky panel with dimensional dots. Sugar Sparkly Fluff covered clouds peek out from behind the balloon.

A pink gingham circle is set on the lower right side of the pink card base. After placing a strip of red faux suede ribbon across the card, I added the image panel. The "cloud 9" sentiment is stamped on a red sentiment flag strip and slipped under the edge of the balloon.

Don't forget to check out the sale going on at i {heart} papers. This set--and lots of other items--are marked down as part of Kate's end of the year inventory blow out . . .

Materials Used:
from i {heart} papers: Our Craft Lounge Love in the Air stamp set, Sugar Sparkly Fluff, X-Press white Copic blending cardstock, Tsukineko Memento Tuxedo Black ink, Copic markers (R24, R81, R83, R85, RV00, C-1, C-3, C-5), Lily Bee Design Head over Heels Tiny Tablet, Spellbinders circle dies, Lifestyle Crafts Polka Dot embossing folder, May Arts red faux suede ribbon, Sticky Thumb dimensional dots

other: Pretty in Pink, Bashful Blue, and Real Red cardstock (Stampin’ Up!)

Your Kindness Warms My Heart

This week’s Our Craft Lounge challenge is gift giving ideas. I put together a simple winter thank you gift for the challenge.


The gift’s built in a large white ceramic mug. I added two cocoa mix packets, a festive snowflake topped drink stirrer, and a pair of candy canes, then wrapped the goodies up in some clear cellophane.

I made a simple tag for the gift using the Tweet Winter Wishes set. I stamped the set’s winter gear strip on a white circle, then stamped the “your kindness warms my heart” sentiment above it in red. The sentiment’s a nice match for the gift, isn’t it? I stamped the winter wear a second time on a scrap of cardstock, colored it with Copic markers, and cut it out, then attached it to the circle with dimensionals. It's hard to see, but I added a little Sugar Sparkly Fluff to the earmuffs and hat--I wish I had some red for a little pop! After layering the circle on a red mat, I used red ribbon to tie it to the package, finishing it off with a bell for a fun touch.

Be sure to check out i {heart} papers for all the new OCL releases and for a great year end sale. You don't want to miss out on this one! Hundreds of items are marked down (some up to 75%!) for the end of year inventory blow out. Happy shopping!

Materials Used:
Tweet Winter Wishes stamp set, Sugar Sparkly Fluff (Our Craft Lounge); Memento Tuxedo Black and Lady Bug inks (Tsukineko); markers (Copic); Real Red cardstock (Stampin’ Up!); white cardstock (Taylored Expressions); circle dies (Spellbinders); red grosgrain ribbon (Michaels); dimensionals (Sticky Thumb); bell

Tuesday, December 20, 2011

TCPTuesday190-Let's Take Off

It’s our last TCP Tuesday challenge of the year—can you believe it? We’re finishing off 2011 with a great sketch, courtesy of Leigh. Here’s my bright and colorful take on the sketch using the Clownin’ Around set.

I colored up the clown car with the penguin duo (I’m guessing they’re up to no good!) for my focal image. I added a few sparkly elements, then cut the car out and attached to it an oval panel with foam tape.

To represent all of those different notch-edged pieces in the sketch, I turned to my ribbon scraps. I mixed and matched a bunch of colors and widths to coordinate with the fun dotted paper panel I used at the top of the card. Ribbon scraps are one of Chloe the cutie puppy’s most favorite things in the world to steal (and there are a lot of things she likes to steal—in just the last week, that sneaky puppy has snagged a flash drive, socks, and a new package of straws for my reusable cold cup. . .), so I consider it a victory that I only lost one piece to her as I was assembling this card! The pieces are secured to the back of the matted paper panel. After wrapping some black baker’s twine around the panel, I attached it to the card, then added the image panel over top. The “let’s take off” sentiment, borrowed from the Wheel Love set, is stamped on tiny pieces of aqua cardstock and attached to the dotted paper panel.

I hope you’ll give the sketch a try. Add your finished project up to the guest book on Alma’s blog to be entered to win this week’s Cat Cash prize. With a new release (yes, another TCP release!) coming up in January, you’re going to want to have a little spending money in your wallet . . .

Materials Used:
Clownin’ Around and Wheel Love stamp sets, Neenah white cardstock, black baker’s twine (The Cat’s Pajamas); black ink (Marvy Matchables); markers (Copic); Aqua Mist and Smokey Shadow cardstock (Papertrey Ink); Poppy Parade cardstock, Dazzling Diamonds (Stampin’ Up!); Lime Twist-Out of the Blue 6x6 paper pad (My Mind’s Eye); ribbon scraps (assorted); Silver Fox Smooch (Clearsnap); Tiny Twinkle (Taylored Expressions); foam tape

Soothing Sympathy Set

Here’s a quick sympathy card for this week’s CAS-ual Fridays challenge to make a card and matching envelope set. I used a set that’s different from what I usually use for sympathy cards and I’m happy with how this turned out.

I usually use a tree or leafy branch image for sympathy cards, but instead used Papertrey Ink’s Asian Fusion stamp set. I stamped the solid vase image in an aqua-ish ink, darker than Aqua Mist, on a white panel, then added one of the set’s floral branch images in green. To bring in a little more of the green color, I attached a green scallop edged strip at the bottom of the image panel. The panel is set on an Aqua Mist card base.

I stamped the set’s “with deepest sympathy” sentiment on a Hawaiian Shores strip in the same blue ink I used for the vase and embellished the strip with a piece of green satin ribbon and a pair of pearls. It’s set across the image panel to complete the design.

To decorate the envelope, I stamped the same floral branch image I used on the image panel at the bottom left of the envelope. I don’t usually think to decorate or stamp on my envelopes (probably because most of the cards I send out aren’t mailed right away—if at all!), but it does make a nice finishing touch.

Materials Used:
Asian Fusion stamp set, Aqua Mist, Hawaiian Shores, and Spring Moss cardstock, Spring Moss satin ribbon (Papertrey Ink); Vivid Beach Glass and Wild Lime inks (Clearsnap); scallop edge punch (Stampin’ Up!); pearls (Recollections)

Monday, December 19, 2011

Mitten Weather

As soon as I saw the sketch for this week’s SCS clean and simple challenge, I knew what I wanted to do. My thinking was probably influenced by the billion or so mittens involved in finishing my holiday cards, but I don’t think that influence was a bad thing!

I flipped the sketch upside down to accommodate a pair of hanging mittens. The mittens from Papertrey Ink's Snowfall set were stamped on a cranberry cardstock scrap in matching ink, cut out, and connected by a linen thread string. A small silver bell's tied on the string, too. I used a little foam tape to position the mittens on the snow patterned circular cardfront. The wintery sentiment is stamped on a blue-gray strip and set on the opposite side of the cardfront. The decorated panel is set on a cranberry scallop edged card base.

Materials Used:
Snowfall stamp set, Ocean Tides ink, Ocean Tides cardstock (Stampin' Up!); Cranberry Crisp Classic ink, Cranberry Crisp cardstock (Stampin' Up!); Jingle designer paper (Lily Bee Design); circle and scalloped circle dies (Spellbinders); linen thread (The Cat's Pajamas); bell; foam tape

Wedding Congratulations

One of my colleagues at work is getting married on New Year's Eve. I made this simple card based on the latest Fall to Layout for our staff to sign and present to her along with a gift certificate at our office's holiday luncheon later on this week.

I used the glass image from the Clear and Simple Stamps Taglines set for my focal image. The glass is stamped twice with the set's tiny heart image stamped between the pair in red ink. I colored the glasses with Copic markers, then coated them with Glossy Accents and some glitter for a bubbly appearance.

I've been drawn to the yellow/gray/black combination a lot lately and I thought this would work nicely with the champagne glass focal image. I found a pretty yellow on cream pattern for the top of the panel underneath the glasses and a gray dotted pattern for the bottom. The gray was simple enough that I could stamp the "congratulations" sentiment from the Icon Extras set in black ink directly on the paper without it getting lost in the pattern. The panels are layered on a black mat, then on a gray card base that's light enough for everyone to write their personal congratulatory messages on inside the card.

For more CSS inspiration, be sure to check out the CSS iPhone/iTouch app. A new project is shared daily, complete with step by step instructions. Here’s a sneak peek of my project that will be shown on the app tomorrow. You can get all the info on downloading the app here.

Materials Used:
Taglines and Icon Extras stamp sets, Perfect Little Black Dress and Haute Red Couture inks, You're Such a Gray-cious Host, Perfect Little Black Dress, and A Blanc Check cardstock, Copic markers (Y23, Y32, YR30, B0000), Perfect Little Black Dress satin ribbon (Clear and Simple Stamps); Carolina Breeze 6x6 paper pad (Teresa Collins); Blissful 6x6 paper pad (Authentique); silver shimmer paper (Recollections); circle dies (Spellbinders); Glossy Accents (Ranger); Dazzling Diamonds (Stampin' Up!)

Sunday, December 18, 2011

Never Too Old

Here's my card for this week's SCS featured stamper challenge. Bonnie Rose's gallery is full of bright creations and I chose to use this set of clean and simple designs with an inspirational quote as the focal point as the basis for my design.

I love the sentiments in Verve's Words of Wisdom set and thought I could find at least one quote in the set that would work to make my own version of the card. I ended up going with the Mark Twain quote about dreams as my focal image. It's stamped in black ink at the center of a white card base.

Instead of using bold floral stickers as an accent, I dug through my stash of embellishments until I found the perfect one--a bunch of multi-colored plastic star embellishments. I mixed and matched different colors, sizes, and open/closed versions, then clustered them around the sides of the sentment, using a combination of glue dots and liquid glue to attach them to the cardfront. I was done in no time at all, which is great since I need to spend time today getting my now completed holiday cards ready to go out in the mail tomorrow. Wish me luck!

Materials Used:
Words of Wisdom stamp set (Verve Stamps); white cardstock (Xerox); Memento Tuxedo Black ink (Tsukineko); plastic stars (American Crafts)

Happy Holidays

Here's my card for the current Market Street Stamps Paint the Town color challenge. The colors are neutrals--nearly nude, champagne, and gunmetal gray--with a pop of rich amethyst purple. I made a simple, but elegant card using two of Market Street's latest releases.

The focal panel is a piece of a fancy edged kraft die cut that I dressed up with a trio of creamy snowflakes. The snowflakes are sprayed with a sparkly mist for an icy look. Their centers are dotted with clear crystals that I colored with a Copic marker to get that deep purple shade.

The die cut piece is set on a dark gray card base stamped in gray ink with the new Flurries background. Love these pretty snowflakes! I stamped the "happy holidays" sentiment from the new Essential Holiday Sentiments set in a shimmery beige ink on a purple strip. After slipping the strip's edge underneath the largest snowflake, I added a pretty cream faux suede ribbon piece to the other end. I just wish this had photographed better to show off the true colors and the sparkle. Guess that's what I get for being a late night crafter . . .

Materials Used:
from i {heart} papers: Market Street Stamps Flurries and Essential Holiday Sentiments stamp sets, Tsukineko Memento London Fog ink and Frost Shimmer Spray, Spellbinders Labels 18 die, Zva Creative clear crystals, Copic marker (BV08), May Arts ivory faux suede ribbon

other: Smokey Shadow and Royal Velvet cardstock (Papertrey Ink); Kraft Like a Rockstar Cream cardstock (Clear and Simple Stamps); Crumb Cake cardstock (Stampin' Up!); Brilliance Pearlescent Beige ink (Tsukineko); snowflake dies (My Favorite Things)

Saturday, December 17, 2011

TCPTuesday189-Absolutely No Peeking

This week’s TCP Tuesday challenge, A Cool Yule, comes to us from Susan. She’s challenging us to use our TCP stamps, plus the Big Scallop CutUps die (if you have it!) to create a holiday card.

I used PJ Bear from the Peeking set for my card. PJ’s colored with Copic markers. The gift box in his hands (wonder what’s tucked in there?) is paper pieced using a striped print for the box and a coordinating solid for the ribbon/bow.
For the background I arranged three paper blocks—two coordinating patterns and one neutral solid—on a cranberry panel cut along the lower edge with the CutUps Circus Border die. I machine stitched the seams between the patterns for a fun detail, then added PJ with foam tape. The “absolutely no peeking” sentiment is stamped in black ink on the dotted print paper.

So, if you need to finish up another card or two (or more!) for your holiday stash, I hope you’ll play along with this week’s challenge. Just upload your project to the photo album on Alma’s blog to enter for your chance to win some Cat Cash and get your holiday cards finished up at the same time.

Materials Used:
Peeking stamp set, Neenah white cardstock, CutUps Circus Border die (The Cat’s Pajamas); Memento Tuxedo Black ink (Tsukineko); Cranberry Crisp, Mellow Moss, and Very Vanilla cardstock (Stampin’ Up!); Jingle Tiny Tablet (Lily Bee Design); sewing machine; foam tape

Superstar

Here's a masculine version of this week's My Favorite Things Wednesday Stamp Club sketch. I used the new Have a Ball set and a coordinating star print paper I've had in my stash for quite a while to put this one together quickly.

I used the star paper to pick the colors for the card. I went with light blue for the card base and shades of orange for the wide strips at the center of the card. The layered die cut shapes bring in more of the paper's colors.

I stamped the circular "superstar" sentiment in Pumpkin Pie ink on white paper and punched it out with my 1 3/4" circle punch--it was a perfect fit. The star is stamped in So Saffron ink on white paper and cut out. I was going to use foam tape to attach it to the card, but in the end, just stuck it directly to the circle.

Materials Used:
Have a Ball stamp set (My Favorite Things); Pumpkin Pie and So Saffron Classic inks, Pumpkin Pie, Bashful Blue, So Saffron, and Whisper White cardstock, Peach Parfait Prints designer paper (Stampin' Up!); star designer paper (KI Memories); 1 3/4" circle punch (EK Success); Nesting Labels 2 (Lifestyle Crafts); copper brads (Recollections)

Friday, December 16, 2011

Our Craft Lounge Valentine Release Blog Hop-Day Two

Welcome to Day Two of Our Craft Lounge’s Valentine Release Blog Hop. We’re excited to share the rest of the ten brand new sets/singles that will be arriving at your favorite stores (including i {heart} papers!) very soon. Check out the full list of participating designers on the OCL blog so you don’t miss a thing—or your chance to win a prize!

Today, I have two masculine cards to share with you. The first uses the new Smooth Sailing set. I used the set’s lighthouse image as part of a simple scene. The background is made from a pair of layered, torn kraft paper strips, inked along the edges with a little white pigment ink to make a sandy shore, and a sky made from blue ink sponged along a cloud template.

I masked off a narrow, triangular area for the beam from the lighthouse and sponged it with yellow ink, then sprayed the matching Fireworks shimmer spray over it for a nice sparkly glow. The lighthouse is colored with Copic markers and cut out, then attached to the scene with dimensionals. The windows are coated with Glossy Accents for a glassy look. I added the set’s “let your light shine” sentiment on a narrow tab slipped under the edge of the image panel—it works perfectly with the glowing beam coming from the lighthouse.

My second card uses the new Crafty Singles #1 Sports Fan set. I have a feeling this one will end up in my dad’s hands sometime—I made it cardinal and white to match the colors of our family favorite Rose Bowl bound Wisconsin Badgers with that in mind.

I colored the guy and his comfy chair with Copic markers and cut the image out. It’s set on a simple backdrop I made with a faux woodgrain floor, covered by a cozy oval rug. No patterned paper or fussy accents here to keep this one a great, all-purpose masculine card!

We’re giving away 4 prizes to lucky winners, so be sure to leave comments along the hop. And, if you “like” OCL on Facebook and leave a comment on the OCL blog letting us know you did, you’ll get an extra entry in the prize drawing. Winners will be announced this weekend on the OCL blog and Facebook page.

Here's a list of all the stops on today's hop:

OCL Blog
Kendra Wietstock
Lori Tecler -you're here!
Tammie Edgerton
Broni Holcombe
Debbie Fisher
Carolyn King
Lori Barnett
Debbie Corbari
Lisa Eisner
Stephanie Serrano
Amber Hillman
Meredith Winston
Joy Stagg
Michelle Pearson
Dawn Barrett
Melissa Cash
Latrice Murphy
Deb Felts

Materials Used-Let Your Light Shine card:
from i {heart} papers: Our Craft Lounge Smooth Sailing stamp set, X-Press white Copic blending cardstock, Tsukineko Memento Tuxedo Black, Summer Sky, Dandelion, and Lady Bug inks, Dandelion Fireworks, Copic markers (R12, R22, R24, B000, B000, B14, B16, C-5, C-3, C-1), Ranger Glossy Accents, Divine Twine Cherry Red baker’s twine, Sticky Thumb dimensional dots

other: Not Quite Navy, Real Red, and Crumb Cake cardstock (Stampin’ Up!); Fresh Snow ink (Papertrey Ink); red button (Michaels)

Materials Used-#1 Sports Fan card:
from i {heart} papers: Our Craft Lounge #1 Sports Fan stamp set, X-Press white Copic blending cardstock, Tsukineko Memento Tuxedo Black ink, Copic markers (R12, R22, R24, B000, B000, B14, B16, C-5, C-3, C-1), Spellbinders oval die, Sticky Thumb dimensional dots, ScorPal

other:
Creamy Caramel Classic ink, Riding Hood Red, Bashful Blue, Dark Chocolate, and Crumb Cake cardstock (Stampin’ Up!); Fresh Snow ink (Papertrey Ink)

Blogger Challenge: Week 234

This week’s blogger challenge theme is “tie it up.” I made a sweet little holiday gift set that’s the perfect little token for friends who like to bake.

I picked up an inexpensive seasonal cookie cutter, a set of measuring spoons, and a wooden mixing spoon and “tied” them up with a coordinating tag. The tag is die cut from red cardstock with the large die from the Tags 1 die set from Clear and Simple Stamps. To match the cookie cutter, I used a snowflake punch to cut a snowflake shape from the center of the tag, then backed it with a piece of shimmery silver paper. Between that and the clear crystal I added to the center of the flake, the tag has a pretty sparkle. The “celebrate the season” sentiment (free with any purchase from the CSS online store before the end of the year!) is stamped underneath the flake in silver ink. I used matching red satin ribbon to tie all of the pieces together.

Materials Used:
Let’s Celebrate (limited edition) stamp set, Dare to Be a Diva Red cardstock, Dare to Be a Diva Red satin ribbon, Tags 1 die (Clear and Simple Stamps); silver paper, clear crystal (Recollections); snowflake punch (Martha Stewart)

Thursday, December 15, 2011

Our Craft Lounge Valentine Release Blog Hop-Day One

Welcome to Day One of Our Craft Lounge’s Valentine Release Blog Hop. We’re excited to share ten brand new sets/singles that will be arriving at your favorite stores (including i {heart} papers!) very soon. Check out the full list of participating designers on the OCL blog so you don’t miss a thing—including your chance to win a prize!

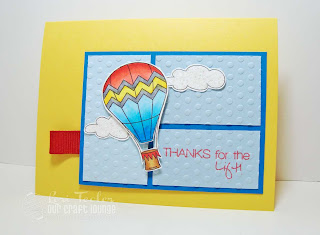
Today, I’m showing off cards using two of the new sets. This one uses the new Love in the Air set. This hot air balloon themed set is great for Valentine’s Day and a bunch of other occasions, too. I made a cheery thank you card using one of the set’s hot air balloons as the focal image.

The balloon is colored with Copic markers and cut out, then layered over a multi panel dot embossed “sky” using dimensional dots. The clouds underneath it (also from this set) are covered with a little Sugar Sparkly Fluff for a fun look. I stamped the set’s “thanks for the lift” sentiment on one of the sky panels in bold red ink.

And, here’s a peek at one of the new Crafty Singles rubber sets, Bug Hugs. I used one of the cute bugs as my focal image. The bug’s colored with Copic markers in shades of red and pinkish-reds. Its shell is coated with Glossy Accents for a shiny look.

I used Lily Bee Design’s Head Over Heels paper pad to make the patterned paper strip that runs across the bottom of the card. The colored image sits on the cardfront, overlapping the top of the patterned paper strip, along with a red button, tied with baker’s twine. The set’s “sending bug hugs” sentiment is stamped next to the image in red ink.

We’re giving away prizes to 4 lucky winners, so be sure to leave comments along the hop. And, if you “like” OCL on Facebook and leave a comment on the OCL blog letting us know you did, you’ll get an extra entry in the prize drawing. Winners will be announced this weekend on the OCL blog and Facebook page.

Here's a list of all the stops on today's hop:

OCL Blog
Kendra Wietstock
Lori Tecler -you're here!
Tammie Edgerton
Broni Holcombe
Debbie Fisher
Carolyn King
Lori Barnett
Debbie Corbari
Lisa Eisner
Stephanie Serrano
Amber Hillman
Meredith Winston
Joy Stagg
Michelle Pearson
Dawn Barrett
Melissa Cash
Latrice Murphy
Deb Felts

I’ll be back tomorrow with more OCL sneak peeks . . .

Materials Used-Thanks for the Lift card:
from i {heart} papers: Our Craft Lounge Love in the Air stamp set and Sugar Sparkly Fluff, X-Press white Copic blending cardstock, Tsukineko Memento Tuxedo Black and Lady Bug inks, Copic markers (R12, R22, R24, Y11, Y13, Y15, B02, B12, B14, B16, E23, E25, E31, C-5, C-3, C-1), Sticky Thumb dimensional dots

other: Daffodil Delight, Pacific Point, and Bashful Blue cardstock (Stampin’ Up!); ribbon (Michaels); Polka Dot embossing folder (Cuttlebug)


Materials Used-Sending Bug Hugs card:
from i {heart} papers: Our Craft Lounge Bug Hugs stamp set, X-Press white Copic blending cardstock, Tsukineko Memento Tuxedo Black and Rhubarb Stalk inks, Copic markers (R12, R20, R22,R24,R27, BG0000), Lily Bee Design Head Over Heels tiny tablet, Spellbinders circle dies, Ranger Glossy Accents, Divine Twine Cherry Red baker’s twine

other: Aqua Mist and Hawaiian Shores cardstock (Papertrey Ink); Riding Hood Red cardstock (Stampin’ Up!); sewing machine
 
Blogging tips