Monday, February 28, 2011

Hello Friend

Here's my card for today's SCS clean and simple challenge. This week's challenge was to create a project inspired by the great outdoors.

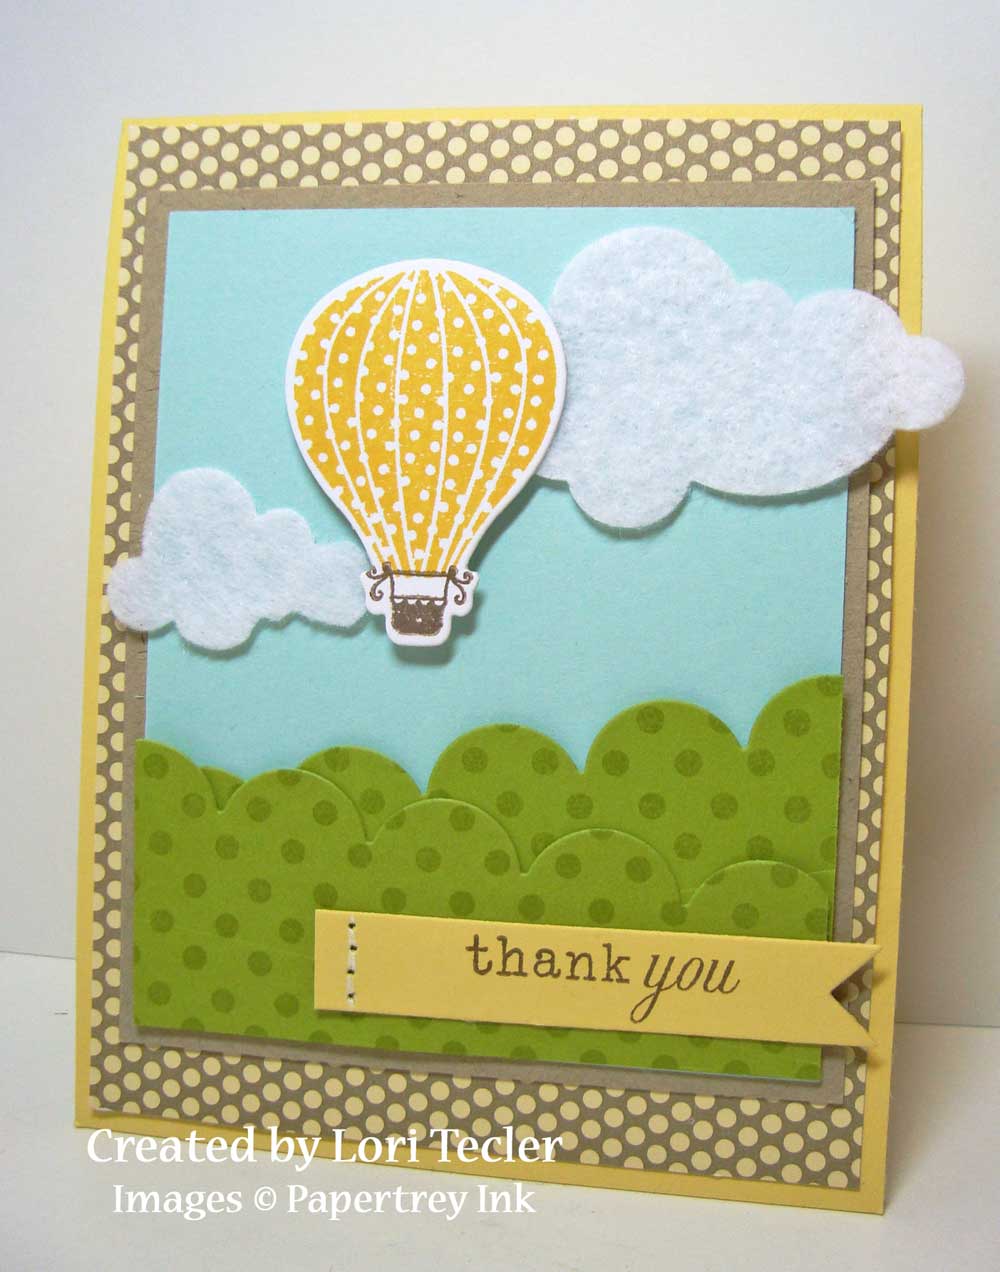
I used one of my favorite sets, Papertrey Ink's Little Bitty Bird, for the challenge. I stamped the branch on a blue circle, then filled in the leaves with a Copic marker. The bird outline image was stamped above the branch and filled in with a matching felt die cut. I added a small clear crystal for the bird's eye.

I made a Spring Moss card base and ran a strip of coordinating Happy Spots patterned paper down one side. I topped it with a strip of Aqua Mist ribbon, then set the circle on the card. A die cut felt cloud finishes off the card, adding some balance to the design.

Materials Used:
Little Bitty Bird stamp set, Dark Chocolate ink, Spring Moss cardstock, Happy Spots patterned paper, cloud and Little Bitty Bird dies, Aqua Mist grosgrain ribbon, Harvest Gold felt (Papertrey Ink); Baja Breeze cardstock (Stampin' Up!); marker (Copic); clear crystal (Imaginisce); white felt

Tickled Pink

Here’s my card for this week’s Hip Hop sketch challenge. I just got the Echo Park Little Girl Collection Kit from i {heart} papers and couldn’t wait to cut into it, so I made a sweet baby card using the sketch and Unity’s Tickled Pink Itty Bitty.

I stamped the stroller on a white panel and colored it in shades of pink using Copic markers. To make it really girly, I added some tiny clear crystals to the centers of the stroller’s wheels.

I used two papers from the Little Girl line for the card—a dotted one that covers most of the card and a fun striped one that’s placed under the image panel. I matted the striped paper on a green panel for some contrast and machine stitched along the edges, too. A piece of coordinating green crepe ribbon runs across the card and is tied in a bow. I used a bit of pink baker’s twine to make a second bow—love how it turned out! The image panel is layered on a rose panel, then set on the card, overlapping the pretty crepe ribbon. I didn’t have room for the coordinating “tickled pink” sentiment on the cardfront, so I went ahead and stamped it on the inside of the card.

Materials Used:
from
i {heart} papers: Unity Stamp Co. Tickled Pink Itty Bitty, Memento Tuxedo Black ink, X-Press Copic blending cardstock, Copic markers (RV00, R81, R83, R85, B000, B0000, C-5, C-1)Zva Creative clear crystals, Spellbinders rectangle dies, Echo Park Little Girl Collection Kit, Creative Impressions celery crepe ribbon, Divine Twine Cotton Candy Pink baker’s twine

other: Sweet Blush cardstock (Papertrey Ink); Regal Rose cardstock (Stampin’ Up); sewing machine

Sunday, February 27, 2011

Beautiful Blooms Birthday Wishes

Here's my card for today's SCS featured stamper challenge. It's based on this colorful birthday card. I loved the card's clean and simple design and bold color scheme.

For my version, I kept the card's layout and theme the same, but used a softer, spring-inspired color palette. I stamped one of the bold, solid flower images from Papertrey Ink's Beautiful Blooms II set on squares of pink, gold, and aqua cardstock using Versamark. The image was coated with clear embossing powder, then heat embossed. I love the tone-on-tone look this created. I rounded one corner on each panel, then arranged them on a green strip. A crystal, colored to match using Copic markers, was added to the center of each flower instead of a button.

After setting the green strip in place on the cardfront, I stamped the "birthday wishes" sentiment from the Make a Wish set in green ink just above it to finish the card. I think I might prefer the sentiment better in a blue ink, but I decided to leave it as is for now.

Materials Used:
Beautiful Blooms II and Make a Wish stamp sets, Simply Chartreuse ink, Aqua Mist, Sweet Blush, Harvest Gold, and Simply Chartreuse cardstock (Papertrey Ink); white cardstock (Xerox); Versamark ink (Tsukineko); Crystal Clear embossing powder (Stampin' Up!); markers (Copic); clear crystals (Studio 18)

You're Too Cute

The challenge for this month's My Favorite Things guest designer challenge was to use MFT's Die-Namics dies to get die-mensional on your project. I used three different MFT Die-Namics dies to make my card.

I started by coloring the girl image from the Enjoy Every Moment set. I went with warm shades of orange, accented with a rosy pink. It's hard to see in the photo, but I added a teeny, tiny crystal to her headband and some Stickles to the heart on her dress--they seemed like good, girly details. Once she was colored, I carefully cut her out and set her aside to build a simple scene with lots of dimension to set her in.

The scene is arranged on a blue panel embossed with polka dots. I used the grass die to cut three green strips that I placed on the bottom using foam tape between each strip for dimension. I used the sun die on a patterned paper scrap to get a fun, dotted piece. It too is attached to the scene with foam tape. I added an orange button to the center, tied with some baker's twine for a finished look. The flat-bottom clouds are cut from felt, adding both dimension and texture. After all of the pieces were arranged, I put the little girl in place, again using foam tape. The set's "you're too cute" sentiment is stamped in orange on a banner die cut and slipped underneath the edge of the image. I attached the scene to a patterned paper panel, then a yellow cardfront.

Here's a side view of the card that shows all of the different layers. I guess this is one card that will definitely need to be hand-delivered to its recipient!

Materials Used:
Enjoy Every Moment stamp set, Die-Namics grass, sun, and flat-bottom cloud dies (My Favorite Things); white cardstock, Tiny Twinkle (Taylored Expressions); Tuxedo Black ink (Tsukineko); markers (Copic); Baja Breeze and Kiwi Kiss cardstock (Stampin' Up!); Harvest Gold cardstock, double-ended banner die, Orange Zest button (Papertrey Ink); Modern Homemaker designer paper (October Afternoon); A Walk in the Park Collection Kit (Echo Park); Polka Dots embossing folder (Sizzix); yellow baker's twine (Timeless Twine); Cotton Candy Stickles (Ranger); white felt: foam tape

Saturday, February 26, 2011

Way to Go

When I saw the new All-Star a la mode set from My Favorite Things, I knew I needed to add her to my collection. I’m a big sports fan and I loved the girl holding on to her pennant. I resisted the urge to create my card for this week’s MFT Wednesday Stamp Club sketch in a color scheme matching one of my favorite sports teams (my college alma mater, the University of Wisconsin-Madison, or my hometown hockey team, the Washington Capitals) and went with a fun one inspired by the pennant-patterned paper from My Mind’s Eye.

I built the card first before I colored the image. The sketch is flipped on its side to accommodate the image I wanted to use. I started with a panel of the pennant patterned paper and added a strip of embossed gold paper at the bottom. The embossed dots mirror the dots on the pennants in the patterned paper. I layered this on a kraft panel, then on an Aqua Mist card base. A strip of orange ribbon is knotted around the bottom of the card and a scallop edged strip is slipped underneath the bottom edge of the ribbon.

Once I had all of those pieces in place, I was ready to color the image. I used shades that matched the colors in the papers I used for the card. The "#1" from one of the set's sentiments is stamped on the colored pennant. I carefully cut out the colored image and attached it to the card with foam tape. The set’s “way to go” sentiment, stamped on an aqua scrap and attached to the patterned paper, finishes off the card.

Chloe the cutie puppy and I are spending the rest of the evening relaxing from our busy day. I ran a bunch of errands in the morning, then both my mom and my dad came over (separately), which absolutely thrilled Chloe. She loves them both. Then, we visited the dog park and Chloe had a puppy "tantrum" when we left for home before she was ready. She threw herself down in the parking lot next to the car and refused to get in. I had to lift her 55+ pound body into the backseat of my car. At that point, neither of us was very happy! I followed that up with ride on the brand-new highway that opened right near my house this week. It's going to be a very expensive toll road shortly, so my friends and I wanted to check it out before the charges start next week. We had a nice dinner after our trip, then stopped at the grocery store before heading home. I'm finally settling down to watch the Caps (one of my favorite teams--see above!) hopefully score a victory on the ice. I'll be back in the morning with another MFT goodie.

Materials Used:
a la modes All-Star stamp set (My Favorite Things); white cardstock (Taylored Expressions); Memento Tuxedo Black ink (Tsukineko); markers (Copic); Aqua Mist, Hawaiian Shores, and Harvest Gold cardstock (Papertrey Ink); Crumb Cake cardstock (Stampin’ Up!); Fine and Dandy True Blue 6x6 paper pad (My Mind’s Eye); Polka Dots embossing folder (Sizzix); orange grosgrain ribbon (Michaels); medium scallop die (Papertrey Ink); foam tape

Handle with Care

Here’s my card for this week’s Color Throwdown challenge to use So Saffron, Tangerine Tango, Pretty in Pink, and Chocolate Chip. I had the bear image from the Bear Hugs set from The Cat’s Pajamas already colored in just the right colors for the challenge, so he became the starting point for my project.

I found patterned papers that included the challenge colors in a My Mind’s Eye paper pack. I used one to cover the cardfront and one for a strip across the cardfront. I didn’t have any Tangerine Tango cardstock in my stash, so I substituted some Pumpkin Pie cardstock for the scalloped strip that I stitched on to the bottom of the orange patterned panel.

I layered a pink and an orange circle to make the backdrop for the bear. The pink circle is embossed with a dotted pattern to add some texture. The bear is attached with foam tape. The “handle with care” sentiment is stamped on a banner die cut. Its end is slipped under the raised image. I added a pink button, tied with some pink baker’s twine, to the bottom of the circle. Just like the already colored image, I found the button sitting on my table and incorporated it into my project. One less thing to clean up later--LOL!

Materials Used:
Bear Hugs stamp set, Cotton Candy Pink baker’s twine (The Cat’s Pajamas); white cardstock (Taylored Expressions); Memento Tuxedo Black ink (Tsukineko); markers (Copic); So Saffron, Pumpkin Pie, Pretty in Pink, and Chocolate Chip cardstock (Stampin’ Up!); Fine and Dandy True Blue 6x6 paper pad (My Mind’s Eye); circle dies (Spellbinders); medium scallop and double-ended banner dies, button (Papertrey Ink); Polka Dots embossing folder (Sizzix); sewing machine; foam tape

Friday, February 25, 2011

Papertrey Ink March 2011 Blog Hop

The theme for this month’s Papertrey Ink Blog Hop is scallops. They are a big trend in paper crafting and I have to admit that I use them a lot in my projects. I made two projects for today’s hop featuring scallops as part of simple scenes that I built using PTI's stamps and dies.

This card uses scalloped strips as the grass in an outdoor scene. I started with an Aqua Mist panel and layered two scalloped strips at an angle along the bottom of the panel. The strips were stamped with polka dots from the Polka Dot Basics set using ink that matches the cardstock for a subtle look. This simple detail adds a lot of interest to the design.

I stamped one of the hot air balloon images from Up, Up, & Away on a matching die cut. I found that Vivid’s Straw ink is a nice match to PTI’s Harvest Gold. After adding a pair of white felt clouds to the panel (and somehow losing the smaller cloud die—I will be spending some time searching for it over the weekend . . .), I used foam tape to set the balloon in place. The set’s “thank you” sentiment is stamped in brown ink on a double-ended banner die cut. I did a little faux stitching at the end to “attach” the panel to the card. The scene is set on a kraft panel, then layered on a piece of Dotty Biscotti patterned paper and a Harvest Gold card base.

Materials Used:
Up, Up, & Away and Polka Dot Basics stamp sets, Simply Chartreuse and Dark Chocolate inks, Simply Chartreuse, Aqua Mist, Harvest Gold, Kraft, and white cardstock, Dotty Biscotti patterned paper, medium scallop, cloud, hot air balloon, and double-ended banner dies (Papertrey Ink); Vivid Straw ink (Clearsnap); white felt, foam tape


This little tag was actually my first idea for the blog hop. Here, I used several layered scalloped strips as water. I cut them from Hawaiian Shores cardstock with the medium scallop die and attached them to the bottom of the Aqua Mist Tag Sale #3 die cut so that they were offset.

I stamped the fish image from the Pond Life set in Orange Zest ink on a matching cardstock scrap, then covered it with clear embossing powder and heat embossed it. I cut it out and added a blue crystal for its eye before attaching it to the tag with foam tape. The “birthday fishes” sentiment is stamped on an orange double-ended banner die cut and anchored to the bottom of the tag with a button tied with a little baker’s twine. I threaded some ribbon through the tag’s hole and secured it with another button to finish it off.

Materials Used:
Pond Life and Pond Life Sentiments stamp sets, Orange Zest ink, Aqua Mist, Orange Zest, and Hawaiian Shores cardstock, Orange Zest grosgrain ribbon, medium scallop, Tag Sale #3 and double-ended banner dies, Orange Zest buttons (Papertrey Ink); Tuxedo Black ink (Memento); clear embossing powder (Stampin’ Up!); baker’s twine (The Twinery); blue crystal (Imaginisce); foam tape

Blogger Challenge: Week 192

This week’s blogger challenge is a sketch. At first, I had a hard time figuring out what I wanted to do with it, but once I got an idea in mind, the card came together pretty quickly.

I used the a la modes Cheers set from My Favorite Things for the card. I started by stamping and coloring the girl image. Her dress is sparkly, courtesy of a little shimmer spray, and the champagne is, too. I covered the glass with a thin layer of Glossy Accents, then dusted on a bit of glitter to get its sparkly look. She’s set on a piece of paper doily for a super feminine look

I continued with the sparkly theme on the cardfront. I used a piece of glittery designer paper from a KaiserCraft pad to cover most of the Melon Mambo cardfront. I ran a piece of coordinating pink grosgrain ribbon across it and added a matching bow made with my Bow Easy. The set’s “here’s to you” sentiment is stamped on a banner die cut.

For more ideas using this sketch, check out the links below. And, if you join in the challenge, feel free to add your link to the list.


Materials Used:
a la modes Cheers stamp set (My Favorite Things); white cardstock (Taylored Expressions); Memento Tuxedo Black ink, Sparkle shimmer spritz (Tsukineko); markers (Copic); Melon Mambo cardstock, Dazzling Diamonds (Stampin’ Up!); Candy Lane paper pad (KaiserCraft); pink grosgrain ribbon (Michaels); Glossy Accents (Ranger); doily (Wilton); Bow Easy; foam tape

Thursday, February 24, 2011

Color Me Happy

Here’s my card for this week’s Kraftin’ Kimmie challenge. I used the sketch along with the Lola Davinci image and some Echo Park papers for a bright and colorful card.

Lola is colored with Copic markers. I carefully cut her out, using a craft knife for some of the interior cuts, and layered her on an aqua circle using foam tape.

I paired two papers from Echo Park’s A Walk in the Park collection kit for the cardfront. I used a bold diagonal plaid piece for the larger panel and stitched around the edges for a nice, finished look. For the smaller panel, I went with a less busy dotted pattern. A strip of satin ribbon hides the seam between the two papers. I added an aqua piece at the top corner of the dotted paper, dressing it up with a button tied with some baker’s twine. The patterned papers are layered on a blue panel, then on a green card base. I set the image panel in place and added the “color me happy” sentiment from the Annie the Artist set on a sentiment flag. A trio of green buttons at the bottom of the panel completes the card.

Materials Used:
Moonlight Whispers Lola Davinci and Annie the Artist stamp sets (Kraftin’ Kimmie Stamps); white cardstock (Taylored Expressions); Tuxedo Black ink (Memento); markers (Copic); Aqua Mist, Hawaiian Shores, and Simply Chartreuse cardstock, Double-Ended Banner die, Simply Chartreuse satin ribbon, Simply Chartreuse and Hawaiian Shores buttons (Papertrey Ink); A Walk in the Park Collection Kit (Echo Park); circle die (Spellbinders); baker’s twine (The Twinery); Lime Green Stickles (Ranger); foam tape; sewing machine

You Warm My Heart

The yummy combination of colors for this week’s TCP Tuesday challenge-pink, dark chocolate, and teal--is a perfect match for one of my old favorite SU! paper packs. In fact, I liked this paper so much that I found that I have two unopened packs, plus a bunch of scraps. I made a little dent in my stash by combining two of the pack’s patterned papers with the sweet You Suit Me set for this card.

The girl is colored with Copic markers to match the challenge colors. I added some glitter to the steam coming from her mug for a little sparkle and shine. She’s layered on a piece of patterned paper using foam tape. I stitched around the panel with my sewing machine for a nice, finished look.

I used another patterned paper from the same paper package to cover most of the teal card base and layered the panel with the girl on it over that. A strip of rose grosgrain ribbon stretches across the whole card. It's dressed up with a matching button-embellished bow, tied with a little baker's twine, at the end of the panel opposite the little girl. The sentiment from the Like You a Latte set is attached on a little tab that sticks out from underneath the patterned paper panel.

Materials Used:
You Suit Me and Like You a Latte stamp sets, pink Divine Twine (The Cat’s Pajamas); white cardstock (Taylored Expressions); Tuxedo Black ink (Memento); markers (Copic); Regal Rose and Taken with Teal cardstock, Loves Me designer series paper, Regal Rose grosgrain ribbon, Dazzling Diamonds (Stampin’ Up!); button (Papertrey Ink); foam tape; sewing machine

Wednesday, February 23, 2011

Spring Thank You

Here's a quick card for today's SCS sketch challenge. When I first saw the sketch, I couldn't figure out what I wanted to use on the sketch's 4 small square panels. The idea came to me while Chloe and I were on our brisk late afternoon, trying to beat the sunset walk.

I used the cloud image from the Mint Motif Very Square set to make a cloudy backdrop for a kite. The cloud image was stamped in Palette Ballet Blue ink on scraps of white cardstock. I punched out the squares using my 1 3/8" square punch (which, from the fuzzy-ish edges it left behind, apparently needs a little sharpening).

I used two patterns from Echo Park's A Walk in the Park Collection Kit to cover the cardfront. A piece of green striped twill ribbon runs across the spot where the patterns meet, adding a little texture and making a nice transition between the two. Each stamped panel is attached to an aqua mat. I set them in a square, then attached one of the kit's coordinating stickers using dimensional dots. Before I attached the kite sticker, I dabbed it with my anti-static bag that I use for embossing to lessen the sticky stuff. A sentiment from Mint Motif's Very Square Sentiments, stamped in the corner of the card in brown ink, finishes the design.

Materials Used:

other: Aqua Mist cardstock (Papertrey Ink); Whisper White cardstock (Stampin' Up!); square punch (EK Success)

A Note to Brighten Your Day

Before the month ends, I have one more card to share with you using images from the Spring set, this month’s Stamp of the Month from Clear and Simple Stamps. I created a bright and cheery note card using the set’s teeny, tiny umbrella images.

I inked each umbrella individually to get the rainbow colored line-up. To get the total of seven, I needed to stamp part of the image a second time—the clear images make it easy to line up just right. The stamped panel is layered on a Green with Envy mat, then on a Say Yellow to All Your Fans mat.

I covered a Green with Envy card base with a coordinating paper with a subtle grid pattern. I pleated some matching satin ribbon across the front of the card, then centered the image over the pleated ribbon, using foam tape to secure it. The set’s “just a note to brighten your day” sentiment is stamped underneath the image panel.

For more Clear and Simple Stamps inspiration, be sure to stop by the CSS app for your iPhone or iTouch. You can find all the details on downloading the app here. In the meantime, here’s a peek at my project that’s featured there today.

Materials Used:
Spring stamp set, Dare to Be a Diva Red, Say Yellow to All Your Fans, Creamsicle Cardigan, Green with Envy, True Blue Fan, VIP Purple, and Perfect Little Black Dress inks, Green with Envy, Say Yellow to All Your Fans, and A Blanc Check cardstock, Green with Envy satin ribbon (Clear and Simple Stamps); Sweet Nectar patterned paper (K & Company)

Tuesday, February 22, 2011

Enjoy Your Special Day

Here’s my card for this week’s Our Craft Lounge photo inspiration challenge. The inspiration photo featured large, bold flowers in shades of gray and green on a white background. I tried to mirror the look and feel of the photo with an almost one layer card with lots of white space.

I stamped three flowers from the Pretty Petals set in black ink along the right corner of a white card base, masking to get a layered look. I added in a pair of petals, then colored the images with Copic markers. Gray flowers wouldn’t be my usual way to go, but I took my cue from the photo. I added a little Stickles to the flower centers for some sparkle. The “enjoy your special day” sentiment from the Big Birthday Wishes stamp set is stamped in the open space to the left of the flowers.

To balance out the design, I added some sheer green ribbon with white dots along the top of the card. I tied the ribbon ends in a bow for a feminine detail.

Materials Used:
from
i {heart} papers: Our Craft Lounge Pretty Petals and Big Birthday Wishes stamp sets, Memento Tuxedo Black ink, X-Press Copic blending cardstock, Copic markers (C00, C-1, C-3, C-5, C-7, YG11, YG13, YG21, YG25, B0000), Ranger Crystal Stickles, May Arts sheer parrot green and white dotted ribbon

Celebrate with a Cupcake

Here's my card for this week's Papertrey Ink Make it Monday challenge. This week's challenge was to make glitter strips with ScorTape. I haven't done this in a while, so it was fun to come up with a layout that would show off the sparkly strips.

I used the Cupcake Collection die set to make a sweet cupcake. The top pieces are cut from felt and dressed up with a button "cherry" on top. The base is made from heavy duty aluminum foil, cut with the die, then run through my paper crimper for a textured look.

The cupcake is set on a piece of Dotty Biscotti patterned paper. I stamped the "celebrate" sentiment from the Fillable Frames #5 set in Raspberry Fizz ink on a Sweet Blush double-ended banner die cut and slipped the end of the strip under the cupcake base.

I added strips of Raspberry Fizz cardstock to the top and bottom of the Dotty Biscotti panel, then placed strips of 1/4" ScorTape on the paper. After removing the paper covering, I sprinkled on some sparkly glitter, dusting off the excess with a fluffy paint brush that I have on my desk just for that purpose. The panel is set on a Sweet Blush card base. I added a ribbon tab to the top of the panel, anchoring it with a big Raspberry Fizz button.

Materials Used:
Fillable Frames #5 stamp set, Raspberry Fizz ink, Sweet Blush and Raspberry Fizz cardstock, Dotty Biscotti patterned paper, Cupcake Collection and Double-Ended Banner dies, Vintage Cream and Dark Chocolate felt, Raspberry Fizz button (Papertrey Ink); pink grosgrain ribbon (Michaels); Dazzling Diamonds (Stampin' Up!); pink baker's twine (The Twinery); paper crimper (Fiskars); ScorTape

Monday, February 21, 2011

Who's Turning 5?

No one I know is turning 5 (at least not for a while!), but I made a fun birthday card for a soon-to-be 5 year old for this week's SCS clean and simple challenge. I went with a bold primary color scheme and a faux-letterpress background for my card.

I used Papertrey Ink's By the Numbers impression plate to make the number background. The plate was inked with white pigment ink, then run through my Big Shot with kraft cardstock. I love the subtle look!

I built the rest of the card around a Spring Moss circle. I used bold shapes and colors with lots of texture. I added a Harvest Gold die cut felt star and a die cut "5" to the circle. The 5 is embossed with a dotted pattern for more texture. The "who's turning" sentiment from PTI's Big Birthday Wishes set is stamped in black on a double-ended banner die cut. It's anchored to the blue circle with a blue button that's tied with baker's twine.

Materials Used:
Big Birthday Wishes stamp set, Pure Poppy, Spring Rain, and Kraft cardstock, By the Numbers impression plate, Seeing Stars, By the Numbers, and Double-Ended Banner dies, Harvest Gold felt, Enchanted Evening button, Enchanted Evening baker's twine (Papertrey Ink); circle die (Spellbinders); white craft ink (Stampin' Up!); Tuxedo Black ink (Memento); Polka Dots embossing folder (Sizzix); foam tape

Warm Thoughts

I'm not a coffee drinker, but there's still something that draws me to coffee-themed stamp sets. I used Papertrey Ink's Warm Thoughts Too set for this card using the color combination from Heather's latest Totally Hues challenge.

I stamped the dotted cup image in Aqua Mist and the cup outline in Dark Chocolate on the die cut cup. It's set on an Aqua Mist circle using foam tape. I used Smokey Shadow ink, stamped off once, to stamp the steam. It's hard to see in the photo, but I traced over the lines with a glue pen and covered it with glitter for a little sparkle.

The sentiment is stamped on a Raspberry Fizz double-ended banner die cut. Finding the die, which had fallen behind a shelf, took longer than the making of the entire card! I set the pieces on a piece of Happy Spots patterned paper, then on an Ocean Tides card base. The Raspberry Fizz felt hearts were a last minute addition to the design. I clustered the trio of hearts just over the top of the steam for a fun detail.

Materials Used:
Warm Happiness Too stamp set, Dark Chocolate, Smokey Shadow, and Aqua Mist ink, Ocean Tides, Raspberry Fizz, Aqua Mist, and white cardstock, Happy Spots patterned paper, Warm Happiness, Heart Prints, and Double-Ended Banner dies, Raspberry Fizz felt (Papertrey Ink); Dazzling Diamonds (Stampin' Up!); circle die (Spellbinders); foam tape

Sunday, February 20, 2011

Ticket to Love

Here's my card for today's SCS featured stamper challenge. It's based on this simple Valentine's Day card. I've had Papertrey Ink's Just the Ticket and the matching ticket strip die in my collection for a while, but hadn't figured out how to use them yet. I don't usually add trinkets like tickets or charms to my cards, so this set's really challenged me. I thought that using this challenge to try a card using the set would be a good start.

I die cut a strip of tickets from kraft cardstock, then stamped one of the frame images inside each of the individual tickets using red ink. The "ticket to love" sentiment and heart element is also stamped on each ticket. The die cut tickets are too cute--I love how they are perforated and tear just like the real thing!

I played around with the placement of the ticket strip and a red felt die cut heart for a long time (pretty much the entire second period of the Caps-Sabres hockey game!), before settling on this setup. The ticket strip runs along the bottom of a white panel. The heart is attached on an angle on the left side of the strip. I added a button for a little texture and interest. The white panel is layered on a red card base to add just a bit more color.

It's a nice afternoon here, so Chloe the cutie puppy and I are off to spend some time at the dog park. It's finally dried up enough there that my feet don't sink into the grass, which makes it a much more fun time for me--not that Chloe ever minded the mud!

Materials Used:
Just the Ticket stamp set, Pure Poppy ink, Pure Poppy cardstock, ticket strip and heart dies, Pure Poppy felt, wooden button, Pure Poppy baker's twine (Papertrey Ink); white cardstock (Xerox)

Blue Bird Thank You

Here's my card for this week's Paper Craft Planet sketch challenge. Wendy's designed a great sketch for us that features a fun, fancy cut edge.

I used the sketch to make a spring-like thank you card featuring Papertrey Ink's Little Bitty Bird stamp set. I stamped the bird and branch image in brown ink on an aqua card base. A felt die cut bird covers the stamped image and adds texture, too. The bird has a teeny, tiny crystal eye for a little bit of sparkle. I added a pair of die cut white felt clouds to the scene to fill up the empty space.

I used a trio of scraps for the strips along the bottom half of the card. I went with a solid green for the top strip, partly because it looks like a grassy base underneath my image and partly because I wanted to stamp my sentiment so it could be seen. The sentiment I used is from the Fillable Frames #5 set. I attached a strip of Happy Spots patterned paper beneath the green and tied a Hawaiian Shores satin ribbon between the two. The bottom strip is more Hawaiian Shores, cut with a decorative edge die to create the card's fancy edge.

I hope you'll join us for this week's challenge. If you try out the sketch, be sure to add a direct link to your creation here on the Paper Craft Planet blog.

Materials Used:
Little Bitty Bird and Fillable Frames #5 stamp sets, Dark Chocolate and Hawaiian Shores inks, Aqua Mist, Spring Moss, and Hawaiian Shores cardstock, Happy Spots patterned paper, Little Bitty Bird and cloud dies, Hawaiian Shores felt, Hawaiian Shores satin ribbon (Papertrey Ink); Perfect Bracket Edge die (My Favorite Things); marker (Copic); clear crystal (Imaginisce); white felt

Saturday, February 19, 2011

Love and Kisses

Here's my take on Verve's Get Your Diva On guest designer challenge. My projects are based on elements in the challenge's Valentine's Day themed inspiration photo, including the colors, the candle, and the heart theme.

I made a candle and card set using coordinating colors and image. I completed the candle first. I stamped a few different heart images from the Text Objects and Love Notes sets on white tissue paper, then used waxed paper and my heat tool to adhere the stamped piece to a short white pillar candle. A pink grosgrain ribbon is knotted around the candle's center. I made a matching tag using Verve's Sweet Scallop Tag die and matching stamp set. It's decorated with a heart image from the Text Objects set and a sentiment from the Love Notes set. I'm probably the last to figure this out, but I discovered that one of the small solid heart images in the Love Notes set matches the heart in the word "love" in the sentiment--love how it looks!

The card also has a love theme. I used several of the same elements as I did on the candle to tie the set together (big deep pink heart with a button and twine embellishment, sentiment on a sentiment flag piece, pink grosgrain ribbon). It's based on this week's Viva la Verve sketch. I used patterned papers from Echo Park's Be Mine Collection Kit for the two panels on the cardfront. They're machine stitched to a shimmery pink panel. I added a paper doily to the card's center, then ran a strip of pink grosgrain ribbon from the top edge of the card down its center. A gray circle sits at the center of the doily to help set off the pink felt heart, cut with Verve's Jotted Heart die, from the rest of the card. The "i heart you" sentiment" stamped on a pink notch-edged strip and anchored with a button completes the card.

Materials Used:
Text Objects, Love Notes, Sweet Scallop Tag stamp sets, Jotted Heart and Sweet Scallop Tag dies (Verve Stamps); Melon Mambo Classic ink, Melon Mambo, Pink Pirouette, and Basic Gray cardstock (Stampin' Up!); pink shimmer cardstock, buttons (Papertrey Ink); circle die (Spellbinders); circle punch (EK Success); pink grosgrain ribbon (Michaels); gray baker's twine (Divine Twine); doily (Wilton); white tissue paper; sewing machine; foam tape

And, while I had the Love Notes set out, I made a card for last week's Viva la Verve sketch, too. This one's a mostly "scrappy" one with just a stamped sentiment.

I built the card around a piece of dotted paper from My Mind's Eye's State of the Heart Collection Kit. The dotted panel is attached to a dark brown mat and machine stitched along one edge, then attached to a kraft panel on a slant. I ran a piece of dark brown twill across the panel and attached a felt heart over it. A matching button adds a little interest to the twine.

I've had this teeny tiny envelope punch for a long time and barely used it, so I was happy to pull it out for this sketch. I punched the envelope from cream cardstock and slipped a small kraft tag "love note" inside it. The note has the "xoxo" and heart trio images from the Love Notes set on it. I tied a piece of red twill to the tag to finish it off.

Materials Used:
Love Notes stamp set, Jotted Heart die (Verve Stamps); Riding Hood Red Classic ink, Crumb Cake, Dark Chocolate, and Very Vanilla cardstock (Stampin' Up!); Rich Cocoa ink (Memento); State of the Heart Collection Kit (My Mind's Eye); tag die (Sizzix); envelope punch (Marvy Uchida); Fine Linen felt, Fine Linen button, twine, Pure Poppy twill (Papertrey Ink); dark brown twill (Martha Stewart); sewing machine

Thanks, Teacher

Here’s my card for this week’s My Favorite Things Wednesday Stamp Club sketch challenge. I went pretty simple on this one with just a little bit of stamping.

I started off by deciding what I’d use for the sketch’s star shaped element. I went with a dimensional apple sticker I picked up a while ago in the dollar section at Michaels. Once I had that picked out, the rest of the card came together quickly. The apple was the perfect starting point for a teacher thank you card.

The sentiment comes from the Who’s That Girl Teacher’s Pet set. I stamped the line image in brown, then added the “thank you” in red ink for some contrast. I used two patterns from Crate Paper’s School Spirit line for the panels on the card. A strip of red grosgrain ribbon runs across the card, underneath the letter print patterned panel, adding a little texture to the simple design.

Materials Used:
Who’s That Girl Teacher’s Pet stamp set (My Favorite Things); Rich Cocoa ink (Memento); Riding Hood Red Classic ink, Poppy Parade and Very Vanilla cardstock (Stampin’ Up!); School Spirit designer paper (Crate Paper); red grosgrain ribbon, dimensional apple sticker (Michaels)

Friday, February 18, 2011

Friends with Flair: Out of This World

Happy Friday! I'm so glad the work week's almost over and that it's a long weekend on top of that. I made a fun card for today's Friends with Flair incorporating both this week's Hip Hop sketch challenge and some hearts, this month's theme for Unity's new monthly challenge.

I used the Out of this World Itty Bitty. It has some tiny hearts, so it fits the challenge without being too love themed now that Valentine's Day's past. The image is colored with Copic markers. I stamped the earth part a second time, colored it in and cut it out, then used a dimensional dot to attach it to the image panel. It's hard to see in the photo, but the earth is covered with Glossy Accents for an epoxy sticker-like look. The hearts are dotted with some Stickles for just a bit of sparkle.

The rest of the card is pretty simple. I used two different patterned papers, one from Jillibean Soup and one from My Mind's Eye, on the cardfront. A strip of light blue faux suede ribbon runs across the cardfront. The sentiment is stamped above it. It's kind of hard to see, so I may go back and stamp it on a solid cardstock piece and add it to the card.

Be sure to stop by the Unity blog for the full list of Friends with Flair players. You don't want to miss out on the great Unity inspiration!

Materials Used:
from i {heart} papers: Unity Stamp Co. Out of this World Itty Bitty, Memento Tuxedo Black ink, X-Press Copic blending cardstock, Copic markers (B0000, B000, B00, R12, R22, R24, R27, YG11, YG13, YG25), Spellbinders oval dies, Ranger Glossy Accents and Ruby Slippers Glitz Stickles, Zva Creative dimensional dots, Jillibean Soup Soup Staples patterned paper, My Mind's Eye Fine and Dandy Tickled Pink 6x6 paper pad, May Arts light blue faux suede ribbon

other: Crumb Cake and Baja Breeze cardstock (Stampin' Up!); New Leaf cardstock (Papertrey Ink)

Blogger Challenge: Week 191

This week’s blogger challenge is embossing. I managed to do both dry and heat embossing on my simple, sweet baby card.

I used the dotted lamb image from the Polka Dot Pals set from There She Goes and the color combination from this week’s TSG challenge, pink, cream and kraft. They may be somewhat non-traditional baby card colors, but I like the soft look and feel. I think having the pink be the dominant color helped here.

The lamb outline was stamped in brown ink on a pink scrap. I used a cream pigment ink to stamp the matching dotted image that fills in the outline. The ink was sprinkled with cream embossing powder and heat embossed (with the assistance of Chloe the cutie puppy, who is fascinated with the heat tool for some reason that I can’t figure out), then cut out. I used foam tape to attach it to a cream circle, then layered it on a label die cut.

I embossed a pink panel with a polka dot pattern, matching the pattern on the lamb. It’s layered on a kraft card base. I paper pierced a kraft strip and attached that to the cardfront and added a strip of pink grosgrain ribbon down the strip’s center, extending beyond its end to almost the bottom of the card. The image panel is layered over the strip. The set’s “dream” sentiment was stamped on a scrap of pink cardstock. It extends from the edge of the image panel and is anchored with a cream button that’s tied with a little pink baker’s twine.

For more ideas using embossing, check out the links below. And, if you join in the challenge, feel free to add a direct link to your project to the list.


Materials Used:
Polka Dot Pals stamp set (There She Goes); Vintage Cream ink, Sweet Blush cardstock, cream button (Papertrey Ink); Very Vanilla and Crumb Cake cardstock, vanilla embossing powder (Stampin’ Up!); Rich Cocoa ink (Memento); Polka Dots embossing folder (QuicKutz); Labels 10 die (Spellbinders); pink grosgrain ribbon (Morex); pink baker’s twine (Divine Twine)

Thursday, February 17, 2011

P.S. I Love You

Here’s my card for this week’s Our Craft Lounge supply challenge to use buttons and bows on your card. I used a button-bow combination on this super sweet love note using OCL’s Sending Love set.


The set’s mailbox image is stamped on a white panel and colored with Copic markers. The hearts are dotted with some red Stickles for a little sparkle.

I used a dotted paper from Echo Park’s A Walk in the Park line for the panel on the bottom of the cardfront. It’s machine stitched to the red mat—please ignore the wonky corners, I’m not sure what my sewing machine’s issue was. Once the dotted panel was in place on the pink card base, I added the image panel. A strip of red faux suede ribbon runs along the right side of the image. I added a button embellished bow, tied with a little red baker’s twine, to the ribbon, setting it just at the top corner of the image panel. The “P.S. I love you” sentiment is stamped on a pink scrap, matted on a red panel and attached to the card, overlapping the image panel on one side.

Materials Used:
from
i {heart} papers: Our Craft Lounge Sending Love stamp set, Memento Tuxedo Black ink, X-Press Copic blending cardstock, Copic markers (C00, C-1, C-3, C-5, C-7, R22, R24, R27, YG13, YG17, YG25, E25, E31, E34, B000, B0000), Ranger Ruby Slippers Glitz Stickles, Echo Park A Walk in the Park Collection Kit, May Arts red faux suede ribbon, Divine Twine Cherry Red baker’s twine

other: Cherry Cobbler cardstock (Stampin’ Up!); Bubblegum Pink cardstock (Gina K Designs); sewing machine

You Make Life Sweet

This week’s TCP Tuesday challenge was to incorporate a non-traditional item—candy!—into your project. I happened to have a bag of heart-shaped lollipops sitting on my craft table (way far in the back so Chloe the cutie puppy couldn’t help her always hungry little self!), so I pulled out one to use for my card.

I decided that I’d place the lollipop in Honey Bear’s hand. I stamped him on white cardstock, colored the image with Copic markers, then cut it out. I used a handheld punch to make a hole through his outstretched paw and threaded the lollipop’s stick through the hole.

To coordinate with the bear image and the red/white lollipop, I used a kraft, brown, and red color scheme for the rest of the card. I started with a kraft panel embossed with a dotted pattern and machine stitched around the edges. I cut and embossed a large red circle, matting it with dark brown before setting it on the edge of the kraft panel. The left side of the circle is cut off so it’s flush with the card’s edge. A strip of red cardstock, paper pierced along the bottom, sits underneath the circle. I ran a strip of brown twill across the card to add some more texture. A red button, tied with red baker’s twine, anchors the end of the twill. The “you make life sweet” sentiment from the Like You a Latte set is stamped on a cream panel and slipped under the red strip. Once everything was in place, I used foam tape to secure Honey Bear and his sweet treat to the cardfront.

Materials Used:
Honey Bear and Like You a Latte stamp sets, Licorice Red Divine Twine baker’s twine (The Cat’s Pajamas); white cardstock (Taylored Expressions); Tuxedo Black ink (Memento); markers (Copic); Crumb Cake, Chocolate Chip, Riding Hood Red, and Very Vanilla cardstock (Stampin’ Up!); Polka Dots embossing folder (QuicKutz); Polka Dots embossing folder (Sizzix); brown twill (Martha Stewart); button (Papertrey Ink); sewing machine; foam tape

Wednesday, February 16, 2011

Who Rules?

Here's my card for this week's SCS sketch challenge. I went super girly with the princess image from the new Antidepresstamps Royalty set from Starving Artistamps.

The princess is colored with Copic markers. I dotted some pink Liquid Pearls on her crown for a fun sparkle and some dimension.

I used several shades of pink for the cardfront. The base is covered with a piece of striped paper. To add some texture, I used rose cardstock embossed with a dotted pattern for the panel on the left side of the cardfront. The "girls rule" sentiment is stamped on ribbon strip and set on a solid deep pink panel with paper piercing along the bottom. The colored image panel is set on the right end of this strip. Looking at it now, I probably should have added some bling along the edge of the embossed panel. I just might go back and do that later on . . .

Materials Used:
Antidepresstamps Royalty set (Starving Artistamps); white cardstock (Taylored Expressions); Tuxedo Black ink (Memento); markers (Copic); Pink Pirouette, Regal Rose and Melon Mambo cardstock (Stampin' Up!); Be Mine Collection Kit (Echo Park); Polka Dots embossing folder (QuicKutz); pink grosgrain ribbon (Morex); pink Liquid Pearls (Ranger)

And, in the interest of fairness, I figured I'd make things even and share a little boy card featuring the set's prince image. I used the colors from this week's Color Throwdown as inspiration for my card--they're perfect for a boy card!

I colored the prince with Copic markers and again dotted the crown with Liquid Pearls. Since this is a boy card, I went pretty simple. I built the card around a piece of Basic Grey's Marjolaine designer paper that matched the challenge colors.

I added a piece of twill, custom colored with a Copic marker to get a darker shade of green. I added some brown ric rac underneath the twill. A blue button, tied with baker's twine, anchors the trims and ties them together. I stamped the set's "boys rule" sentiment above the trims. The celery panel at the bottom of the card was a last-minute addition. It breaks up the pattern just enough. In the end, I'm not sure who rules--boys or girls--but both are cute!

Materials Used:
Antidepresstamps Royalty set (Starving Artistamps); white cardstock (Taylored Expressions); Tuxedo Black ink (Memento); markers (Copic); Ballet Blue and Certainly Celery cardstock (Stampin' Up!); Marjolaine paper pad (Basic Grey); circle dies (Spellbinders); gold Liquid Pearls (Ranger); twill, ric rac (Martha Stewart); button, baker's twine (Papertrey Ink)

Oops!

Here’s my card for this week’s Kraftin’ Kimmie Stamps challenge. This week’s challenge was a recipe—three main colors, two patterned papers, one button, and one ribbon.

I used this week’s Sweet Sunday Sketch Challenge, flipped on its side, and Kraftin’ Kimmie’s Red Riding Hood image as the starting points for my card. Since I was using Red Riding Hood, I knew I’d want to include some red as one of my colors, so I found a reddish dotted paper in an October Afternoon collection and paired it with a fun yellow pattern from the same collection. Once that was settled, the rest of the card came together quickly.

Red is colored with Copic markers. I used a little bit of Stickles on the barrettes in her hair for some sparkle. The colored image is layered on a yellow mat, then attached to the cardfront. A strip of red seam binding, with a scallop edged cardstock strip slipped underneath its edge, runs along the right edge of the image panel. I added the “oops” sentiment on a circle panel, then topped it with a button embellished bow. A trio of yellow crystals along the bottom of the image panel finishes off the design.

Materials Used:
Moonlight Whispers Red Riding Hood image (Kraftin Kimmie Stamps); white cardstock (Taylored Expressions); Tuxedo Black ink (Memento); markers (Copic); Daffodil Delight and Cherry Cobbler cardstock, scallop edge punch (Stampin’ Up!); Fly a Kite paper pad (October Afternoon); circle punches (EK Success); Ladybug seam binding (Martha Stewart); button, twine (Papertrey Ink); Ruby Slippers Glitz Stickles (Ranger); yellow crystals (Imaginisce)

Tuesday, February 15, 2011

Check It Out!

***Second post for today. Scroll down to see my project for this month's IHP DT challenge.***


You don't want to miss the latest issue of Paper Crafts Magazine. Clear and Simple Stamps has teamed up with Paper Crafts to offer readers access to web-only bonus projects created by CSS designers. The projects can be accessed by scanning the special barcode in CSS's ad on page 33 of the March/April 2011 issue of the magazine. If you don't have a QR reader installed on your phone, you can download one here. Enjoy!

Story Time with the IHP DT

This month’s i {heart} papers design team challenge is to create a project inspired by a story. As a kindergarten teacher, I have an extensive collection of children’s picture books and quite a few favorites. I decided to take my inspiration from the book If You Give a Cat a Cupcake by Laura Numeroff, one of a series of fun pictures books with a circular story pattern. In this installment, the fun starts with giving a cat a cupcake. Following a mishap with some sprinkles to decorate it, chaos ensues, and the story's events eventually circle back to end with yet another cupcake and some more sprinkles.

Here’s my project inspired by the story. I made a little box, sized perfectly for giving a cupcake already decorated with some sprinkles. To get started, I went to the grocery store and bought a ready-made cupcake (you didn’t think I’d actually bake one myself, did you?? If you know me, you’d know that would pretty much never happen—LOL!). I used the treat to plan out the size of the box. I used a square of dotted paper from Echo Park's A Walk in the Park Collection Kit for the box’s base. With a few scores (done with the ScorPal) and a few cuts, plus some redline tape, the box was quickly assembled.

I made a coordinating lid from a square of solid cardstock. I used a Nestabilities circle die to cut a circle from the center of the lid so that the recipient could see the cupcake inside the box. To tie the box base and lid together, I ran the lid through my Big Shot with a polka dotted embossing folder. The dotted texture adds interest and is a perfect match for the paper. A piece of acetate is attached to the inside of the lid to cover the window opening and protect the cupcake.

I dressed up the box with a little pink satin ribbon wrapped around the lid. I added a bow to the ribbon and used it to secure a little circle tag decorated with a cupcake from Unity’s Sweet Birthday Celebration kit stamped on it. I replaced the stamped cherry with a sparkly self-adhesive crystal one, colored with a red Copic marker, and added some Stickles to the cupcake for even more sparkle.

Be sure to check out what the rest of the IHP DT has created for this month’s challenge. Here’s where to find them:
Materials Used:
from i {heart} papers: Echo Park A Walk in the Park Collection Kit, i {stick} papers redline tape, ScorPal, Spellbinders circle dies, QuicKutz Polka Dots embossing folder, May Arts pink/light pink reversible satin ribbon, Unity Stamp Co. Sweet Birthday Celebration kit, Memento Rich Cocoa ink, Zva Creative self-adhesive clear crystal lines, Copic marker (R35), Bow Easy, Cotton Candy Stickles

other: Pink Pirouette cardstock (Stampin’ Up!); acetate

Monday, February 14, 2011

Hugs and Kisses

Here's my super quick card for today's SCS clean and simple challenge. It's based on a sketch that's a square card base with a square panel in the center. The image on the square panel was set in the upper left corner, so I incorporated that in my version, along with this week's Make it Monday technique from Papertrey Ink, stamping a sentiment on vellum.

I started with one of the smaller leafy branch images from PTI's Turning a New Leaf set. It's stamped in Ripe Avocado ink on a Spring Moss panel. I added pink blossoms from the Beautiful Blooms II set. Each blossom has a dot of Flamingo Liquid Pearls at the center for a little sparkle and dimension.

The stamped panel is layered on a Hibiscus Burst mat, then on a Ripe Avocado cardfront. The get well sentiment from Healing Touch Sentiments is stamped in Ripe Avocado ink on a vellum strip. A button, knotted with some pink twill, is attached to to the right end of the vellum panel, hiding the adhesive I used to attach it to the card.

Materials Used:
Turning a New Leaf, Beautiful Blooms II, and Healing Touch Sentiments stamp sets, Ripe Avocado and Hibiscus Burst inks, Ripe Avocado, Hibiscus Burst, and Spring Moss cardstock, Simply Chartreuse button, Hibiscus Burst twill (Papertrey Ink); Flamingo Liquid Pearls (Ranger); vellum (The Paper Company)

Bee My Honey Bee

Here's my card for this week's TCP Tuesday inspiration challenge. I took my inspiration from a few different elements in the inspiration photo, including the aqua and brown color scheme, the dotted elements, and the layered buttons, and used this month's Sketch for You to Try as a starting point.

I used the adorable Honey Bear as my focal image. He's colored with Copic markers and cut out. I used foam tape to attach him to the card.

Honey Bear is sitting on a panel of brown paper with a stripe and dot pattern. I picked another dotted paper for the panel that runs along the left side of the card. Both panels are matted with a dark aqua cardstock.

A matching strip of grosgrain ribbon runs across the card, over both panels. I stamped the "bee my honey" sentiment, then stamped the "bee" again at the end to customize my sentiment. A pair of layered buttons, tied with a little baker's twine, sits at the end of the ribbon.

The little bee at the top was a spur of the moment addition. I though he'd look cute fluttering around up there! I stamped the bee on a scrap of white cardstock, colored it, and cut it out. The wings are coated with a little glitter for some sparkle. It's attached to the card with foam tape, adding a little whimsical touch to the design.

Materials Used: Honey Bear stamp set (The Cat's Pajamas); Aqua Mist and Hawaiian Shores cardstock, Hawaiian Shores grosgrain ribbon, Hawaiian Shores and Dark Chocolate buttons (Papertrey Ink); white cardstock (Taylored Expressions); Tuxedo Black ink (Memento); markers (Copic); Joyride mini deck (Cosmo Cricket); Fine and Dandy True Blue 6 x 6 pad (My Mind's Eye); Dazzling Diamonds (Stampin' Up!); foam tape

Sunday, February 13, 2011

Birthday Fishes

Here's my card for today's SCS featured stamper challenge. My card's based on this simple design here. Since Charlene was an original Mint Motif design team member, I thought I'd go with Mint Motif images for my card. I kept the birthday theme and basic layout of the original design, but altered the other design elements to make my own version of the card.

I used two different Mint Motif sets on my card. The first is the Beyond Borders set. I used it to make my own patterned paper for the bottom of the card. This image made me think of waves, so I used it to create some water for my simple scene. The stamped panel is attached to the bottom of the card base and some turquoise striped twill runs along its top edge, adding some texture and contrast.

Instead of a felt flower, I used a fish Woolie from the Max & Whiskers collection. And, I made my own sentiment by combining parts of two different sentiments from the MM Very Square Sentiments set. I inked the "f" from the "hope you feel better soon" stamp in black ink and stamped it first, then inked the "birthday wishes" part of the set's birthday sentiment, omitting the "w" in wishes. I carefully stamped the image, placing it so that the "f" would replace the "w" to spell "birthday fishes." Successful on the first (and only) try! It seemed to need a little contrasting color thrown in, so I wrapped some orange baker's twine around the card and secured it with a button to finish the design. From start to finish, the card took less than 20 minutes, including experimenting with a few blue-green inks to find a good match, doing all the fussy inking of the stamps, and wrapping and tying the twine. Love when that happens! Gives me plenty of extra time to spend with Chloe the cutie puppy at the dog park. We're on our way now!

Materials Used:
from
i {heart} papers: Mint Motif Beyond Borders and Very Square Sentiments stamp sets, Memento Tuxedo Black ink, May Arts turquoise striped twill ribbon, Basic Grey Max and Whiskers Woolie, Jillibean Soup orange baker's twine

other: Hawaiian Shores ink, Hawaiian Shores cardstock, Orange Zest button (Papertrey Ink); white cardstock (Xerox); Corner Chomper

I Heart You

Last night, I realized that Valentine's Day is on Monday and I hadn't yet made cards for my parents or my sister. Yes, I've been making Valentine's Day cards all month, but I like to give them something they haven't seen on my blog yet. So, I got to work and created a pair of clean and simple cards using some supplies from Verve and the colors from this week's Color Throwdown.

I created my own background paper by stamping the heart strip from Verve's Thankful Hearts set repeatedly in red ink on a white panel. It's set on a black mat, then on a pink card base.

I used the Jotted Heart die to cut a pink heart from a piece of felt. It's attached to the left side of the card along with a pair of red and purple buttons. Some purple baker's twine strings the buttons together and adds a little more purple to the design. Since I'll be hand-delivering the cards, it doesn't matter that the layered buttons add a lot of thickness to the card. I stamped the "i heart you" sentiment from the Love Notes set in black ink on a red ribbon strip. One end of the strip is slipped under the heart and the other hangs just slightly off the edge of the card. Mission accomplished!

Materials Used:
Love Notes and Thankful Hearts stamp sets, Jotted Heart die (Verve Stamps); Real Red Classic ink, Melon Mambo and Basic Black cardstock (Stampin' Up!); Perfect Little Black Dress ink (Clear and Simple Stamps); white cardstock (Xerox); red grosgrain ribbon (Michaels); buttons (Papertrey Ink); purple baker's twine (The Twinery); pink felt

Saturday, February 12, 2011

A Hundred Hearts

Here's my card for this week's My Favorite Things Wednesday Stamp Club sketch and this week's Crazy 4 Challenges challenge to use hearts. I got this lovely sentiment set from a stamping buddy and wanted to make sure I used it before Valentine's Day passed.

I stamped the hundred hearts sentiment from the Clearly Sentimental about Love set in red on a cream die cut. The die cut's edges are inked with some distress ink to add an aged, softer look. A trio of heart brads serve as an accent under the sentiment. They were originally a pale pinkish color, so I colored them with a red-orange Copic marker to better coordinate with my card's color scheme.

The rest of the card is pretty simple. I used two coordinating papers from the My Mind's Eye Be Loved Collection Kit for the cardfront. A pair of layered felt hearts, accented with a button and ribbon tab combo, sits at the top of the paisley panel. A strip of grosgrain ribbon runs across the card and the stamped sentiment panel is set over the top edge of this strip to finish the card.

Materials Used:
Clearly Sentimental about Love stamp set, Framed Greetings and Hearts a Plenty Die-Namics (My Favorite Things); Melon Berry cardstock, Fine Linen grosgrain ribbon, Fine Linen and Pure Poppy felt, Fine Linen button, twine (Papertrey Ink); Riding Hood Red Classic ink, Poppy Parade and Very Vanilla cardstock (Stampin' Up!); Tea Dye distress ink (Ranger); Be Loved Collection Kit (My Mind's Eye); brads (Making Memories); marker (Copic); sewing machine
 
Blogging tips