Monday, October 31, 2011

Nuts About You

Here’s my super quick card for today’s SCS clean and simple challenge to use red, cream, and brown. I used the acorn die and matching stamp set from Li’l Inker Designs along with this week’s sketch from Clean and Simple Stamping to pull this together in less than 10 minutes.

I started with a panel of red and cream designer paper that I matted on a chocolate brown panel. The panel is attached to a cream panel, then a chocolate card base. I die cut the acorn pieces from kraft and chocolate brown scraps. To add interest, I stamped one of the matching acorn top stamps on the top of the acorn before attaching it to the card with foam tape. I stamped the “nuts about you” sentiment on a notch-edged strip and set that on the cardfront with one end tucked under the acorn.

Now, as promised, a photo of Chloe the cutie puppy all decked out in her Halloween costume. This year, I found one that was just perfect for her feisty personality—a super sparkly red devil. She looks absolutely adorable in her costume, though I probably should have bought it a size smaller and I’ll be cleaning up stray teeny, tiny red sequin-y things from my kitchen floor for the rest of my life . . . Chloe’s been a real trouper about wearing it. She wore the costume at a local pet store’s Halloween event for an hour and a half yesterday and is wearing it again tonight to help answer the door. I think she associates wearing the costume with food and if there's food involved, Chloe's all in! The matching devil’s horns are another story completely, though. She is not a fan of anything on her head, no matter how cute it makes her look!


Materials Used:
Acorn stamp set and die (Li’l Inker Designs); Memento Rich Cocoa ink (Tsukineko); Vintage Cream cardstock (Papertrey Ink); Riding Hood Red Classic ink, Chocolate Chip and Crumb Cake cardstock (Stampin’ Up!); designer paper (October Afternoon); foam tape

Clean and Simple Halloween

I couldn't let today pass without one more Halloween card! This one's for this week's CAS-ual Fridays challenge. I combined the sketch with the Paper Smooches Halloweenies set for this sort of spooky card.

I used the spider web as the sketch's circular element. It's stamped in gray ink for a softer look and layered on a black circle. I used dimensional dots to attach the web to a panel made from an orange and gray dotted paper on top and dark gray cardstock on the bottom with a little black baker's twine wrapped around the center. I tried some Halloween twine first, but it was too busy, so I settled on black. The set's "Happy Halloween" sentiment is stamped just above the twine.

The spider is stamped in black ink on the gray panel. I used a little Glossy Accents on the the eyes for a fun detail. A short piece of clear fishing line anchors the spider to its web.

I'll be back later on today with some photos of Chloe the cutie puppy decked out in her Halloween costume . . .

Materials Used:
from i {heart} papers: Paper Smooches Halloweenies stamp set, Memento London Fog and Tuxedo Black inks, Echo Park The Apothecary Emporium 6x6 paper pad, Divine Twine Black Licorice baker's twine, Sticky Thumb dimensional dots

other: Basic Gray, Basic Black, Whisper White (Stampin' Up!); circle punches (EK Success)

Sunday, October 30, 2011

Floral Hi

This week's SCS featured stamper, Michelle, is also one of our current Our Craft Lounge guest designers. So, I picked one of the cards in her gallery and remade it using an OCL set.

I replaced the large flower image with one of the line image flowers from the Build-A-Bouquet set. I colored the flower and leaves with Copic markers and filled in the flower's center with a little Sparkly Fluff.

The flower's layered onto a pink cardfront that's covered with a sparkly pink dotted paper on top and a gray canvas embossed panel on the bottom. After sliding the leaves underneath the flower, I cut apart a few pieces of a crystal flourish and added them around the flower, too. Chipboard letters spelling "hi" sit at the bottom of the card and add even more sparkle to the mix and finish off the very cheery card.

Materials Used:
Build-A-Bouquet stamp set, That's Hot Pink Sparkly Fluff (Our Craft Lounge); white cardstock (Taylored Expressions); Memento Tuxedo Black ink (Tsukineko); markers (Copic-RV21, RV23, RV25, YG01, YG03, YG13, YG17, YG25); Basic Gray and Melon Mambo cardstock (Stampin' Up!); Home Glitter Book 6x6 paper pad (My Mind's Eye); Linen & Canvas impression plate (Papertrey Ink); clear crystal flourish (Recollections); Thickers (American Crafts); foam tape

Warm Wishes

In honor of yesterday's extra early first snowfall of the season, I made this winter themed card for this week's Kraftin' Kimmie monochromatic challenge. I went with a mostly blue color scheme, using this week's Cute Card Thursday sketch.

I colored Piper in shades of blue and added a little white flock to the pom pom on her hat. After cutting her out, I attached her to a snowy scene made from a dot embossed panel with a torn strip of shimmery white cardstock along the bottom. The raised dots were rubbed with a little shimmery white ink for a snowy look.

I set the image on a snow patterned paper, then attached the sentiment strip along the bottom of the image panel. The "warm wishes" sentiment from the Willard set is stamped in turquoise and accented with some coordinating baker's twine that I wrapped around the panel and secured with a button. I added a trio of snowflake brads, each with a big clear crystal at the center, next to the image. Perfect for a snowy day--though I hope it will be a while before we see another one around here!

And, in more seasonally appropriate news, I'm taking Chloe the cutie puppy to a Halloween costume parade at a local pet store today. If she cooperates, I'll share a few photos later--or maybe tomorrow on Halloween . . .

Materials Used: Piper and Willard Moonlight Whispers stamp sets (Kraftin' Kimmie Stamps); white cardstock (Taylored Expressions); Memento Tuxedo Black and Brilliance Moonlight White inks (Tsukineko); markers (Copic); Tempting Turquoise Classic ink, Tempting Turquoise and Shimmery White cardstock (Stampin' Up!); Polar Expressions-All Bundled Up (Imaginisce); Polka Dots embossing folder (Cuttlebug); snowflake brads (Recollections); white flock (Stampendous); aqua baker's twine (Divine Twine); button (Michaels); clear crystals (Studio 18); foam tape

Saturday, October 29, 2011

Here's to You

Here's my card for this month's My Favorite Things guest designer challenge. This month's theme is bling and I think I have it covered!

I used the celebratory girl from the à la modes Cheers stamp set as my focal image. I colored her with Copic markers, then paper pieced her dress using a scrap of pink faux mother of pearl paper left over from another project. The paper has a pink pearly appearance that made the perfect blingy party dress. A little line of silver glitter edges the bottom of the dress. The glass is covered with Glossy Accents and sprinkled with a little Dazzling Diamonds for a subtle sparkle.

The à la modes girl is set over a piece of doily that I layered on a piece of dotted pink paper. I attached part of a huge clear crystal swirly flourish over the doily before setting the image in place. The set's celebratory "here's to you" sentiment is stamped on a scrap of silver cardstock and slipped underneath the edge of the image.

Materials Used:
à la modes Cheers stamp set (My Favorite Things); white cardstock (Taylored Expressions); Memento Tuxedo Black ink (Tsukineko); markers (Copic); Pink Pirouette and Glossy White cardstock, Dazzling Diamonds (Stampin’ Up!); Tutu Pink designer paper (BoBunny); silver paper, crystal flourish (Recollections); Glossy Accents (Ranger); paper doily (Wilton); foam tape

Thankful For You

Here’s my card for this week’s My Favorite Things Wednesday Stamp Club sketch challenge. The tall and skinny à la modes Sweetest Pumpkin in the Patch was a perfect fit for the panel—and for the season, even though there’s talk that there may be some snow here today! I've lived in the DC area pretty much all my life and snow in October, even at the very end, is pretty much unheard of. I'm hoping this isn't a sign of a bad winter . . .

I colored the pumpkin-toting gal with Copic markers and matted her on a chocolate brown panel. The rest of the card’s pretty simple. I used a panel of October Afternoon designer paper underneath the image and ran a piece of chocolate brown grosgrain ribbon across that. Once the image was in place, I added the set’s “thankful for you” sentiment on a circle panel using dimensional dots. Everything's set on a golden yellow panel and attached to a kraft card base.

Materials Used:
à la modes Sweetest Pumpkin in the Patch stamp set (My Favorite Things); white cardstock (Taylored Expressions); Memento Tuxedo Black ink (Tsukineko); markers (Copic); Chocolate Chip and Crumb Cake cardstock, Chocolate Chip grosgrain ribbon (Stampin’ Up!); Sweet Corn cardstock (Gina K Designs); Campfire-Camp Stove designer paper (October Afternoon); circle punches (EK Success); foam tape

Friday, October 28, 2011

Blogger Challenge: Week 227

This week’s blogger challenge theme is happy haunting. I emphasized the “happy” part in my Halloween card featuring the cute little witch image from the Witchy set from The Cat’s Pajamas.

I used this week’s CPS sketch as a starting point for my card, then mixed and matched a pair of patterned papers in Halloween-like oranges and greens. The patterned papers are layered on deep purple panels and machine stitched along the edges, then set on a green card base. I wrapped a strip of purple satin ribbon around the panels.

The little witch image is colored with Copic markers. I used the out of the box technique to cut out the panel so that the very top of the witch’s hat extends over the panel’s border. The image is matted on an orange circle and accented with a purple satin bow. I stamped the set’s “witch way is the candy?” sentiment on a little strip of orange paper and set it along the edge of one of the patterned paper panels.

For more Halloween ideas, check out the links below. And, if you decide to give the challenge a try, feel free to add a link to your project to the list.

Materials Used:
Witchy stamp set, Neenah white cardstock (The Cat’s Pajamas); Memento Tuxedo Black ink (Tsukinkeo); markers (Copic); Kiwi Kiss and Pumpkin Pie cardstock (Stampin’ Up!); Royal Velvet cardstock, Royal Velvet satin ribbon (Papertrey Ink); circle dies (Spellbinders); Kiwi Double Dot designer paper (BoBunny); plaid designer paper (?); sewing machine

Winter Peace

Here’s my card for this week’s Waltzingmouse sketch challenge. When I first saw the sketch, nothing came to mind. I thought on it for a few days and finally came up with what you see here.

I made a simple winter scene using the largest bare tree/branch from the Teeny Trees set. The backdrop is made by sponging a piece of white cardstock with Broken China distress ink. For a little sparkle, I sprayed the sponged panel with a bit of Summer Sky Fireworks. Before I started sponging and spraying, I masked off a circular shape with a sticky note, then went back and filled in the circle with yellow ink to make a big, full moon.

After letting the ink and spray dry, I attached a piece of shimmery white cardstock, torn along the top for an irregular edge, along the bottom of the panel. I stamped the tree on the panel in brown ink, then added the small bird image in blue. The bird’s eye is filled in with a teeny, tiny crystal for just a little more sparkle. The “peace” sentiment from Say It Loud Winter Holidays is stamped at the bottom of the panel in blue ink. The panel is layered on a turquoise mat, then set on a dark blue card base. After my original uncertainty about how to tackle the sketch, I’m happy with the simple, peaceful look and feel of the design.

Materials Used:
Teeny Trees and Say It Loud Winter Holidays stamp sets (Waltzingmouse Stamps); So Saffron Classic ink, Tempting Turquoise, Not Quite Navy, Whisper White and Shimmery White cardstock (Stampin’ Up!); Broken China distress ink (Ranger); Enchanted Evening ink (Papertrey Ink); Memento Rich Cocoa ink, Summer Sky Fireworks (Tsukineko); 1 ½” circle punch (EK Success); clear crystal (Taylored Expressions)

Thursday, October 27, 2011

Happy Birthday, Dad

My dad celebrated his birthday earlier this week and I made him this fun birthday card based on the latest Paper Smooches Sparks inspiration challenge. I used the shape of the vintage van in the photo, along with the colors and woodgrain texture as the basis for my card.

One of the television sets from the Boob Tubes set is shaped similarly to the van in the photo, so I used that as my focal image. It’s colored with Copic markers and the screen is filled in with some silver shimmery paper that’s covered with acetate. I stamped the word “dad” at the center of the screen before setting the acetate in place. The knobs are coated with a little white Enamel Accents for a dimensional look.

The television is set on a simple backdrop made from a pair of papers from a Jillibean Soup pad. I picked a woodgrain one in a nod to the tree trunk in the photo and an orange one to match the color of the van. I added a corduroy ribbon tab with a button and baker’s twine embellishment along the left side, then stamped the “happy birthday” sentiment from the Sentiment Sampler set in the open space. After layering the panel on a dark brown mat, I set it on a kraft card base. I hope he likes it!

Materials Used:
from i {heart} papers: Paper Smooches Boob Tubes and Sentiment Sampler stamp sets, X-Press white Copic blending cardstock, Tsukineko Memento Tuxedo Black ink, Copic markers (Y35, Y38, YR12, YR15, YR16, E25, E31, E33), Jillibean Soup Apple Cheddar Soup 6x6 paper pad, May Arts orange corduroy ribbon, Divine Twine orange baker’s twine, Ranger white Enamel Accents, Sticky Thumb dimensional dots

other: Crumb Cake and Chocolate Chip cardstock (Stampin’ Up!); Fine Linen button (Papertrey Ink); silver paper (Recollections); acetate

We've Got Chemistry

Here’s my card for this week’s Kraftin’ Kimmie challenge. I couldn’t let Halloween pass without using some of my Moonlight Whispers images again, so I used the Potionmaster set for the sketch. To fit the image, I stretched the panels a bit, but stayed pretty close to the layout aside from that.

I stamped the image on a white panel and colored it with Copic markers. I added a little clear glitter to her goggles and some Glossy Accents to the beaker in her hand.

The image is set on a green circle that’s layered over a pair of chevron patterned panels. The panels are machine stitched around the edges and set on an orange panel, then on the green card base. The "we've got chemistry" sentiment is stamped on a circle and set at the side of the image panel using foam tape.

Materials Used:
Moonlight Whispers Potionmaster stamp set (Kraftin’ Kimmie Stamps); white cardstock (Taylored Expressions); Memento Tuxedo Black ink (Tsukineko); markers, silver Spica pen (Copic); Pumpkin Pie and Kiwi Kiss cardstock (Stampin’ Up!); Happy Halloween Collection Kit (Echo Park); circle die (Spellbinders); circle punches (EK Success); Glossy Accents (Ranger); sewing machine; foam tape

Wednesday, October 26, 2011

Color Throwdown 165-Wishing You Sunshine


It’s time for this week’s Color Throwdown! Laura is our hostess this week and she’s challenging us to use Daffodil Delight, Peach Parfait, Pool Party, and Old Olive.

I combined the colors with this week’s TCP Tuesday challenge to use acetate for this sweet card. I used the little puddle jumper image from the Wet Puddle set as my focal image. It’s colored with Copic markers and the boots are coated with Glossy Accents for a shiny look. I used foam tape to attach the image to a dot embossed blue circle. An acetate rain puddle is slipped underneath the boots—it’s hard to see in the photo, but it’s there! I added a pair of felt clouds, cut apart from a strip I made with the CutUps Cloud Border die, and a yellow button sun tied with orange baker’s twine to finish the scene.

I attached a strip of peach-y patterned paper at the bottom of a Daffodil Delight cardfront, then added the scene so it overlapped the top of the patterned strip. The set’s “wishing you sunshine” sentiment is stamped on an orange strip and set on the patterned paper panel.

Be sure to check out what the rest of the Color Throwdown team and this month’s special guestie have come up with using these colors. Here’s where to find them:

Materials Used:
Wet Puddle stamp set, Neenah white cardstock, CutUps Cloud Border die, orange Divine Twine, acetate (The Cat’s Pajamas); Memento Tuxedo Black ink (Tsukineko); markers (Copic); Baja Breeze, Daffodil Delight, and Pumpkin Pie cardstock (Stampin’ Up!); Fine and Dandy-True Blue 6x6 paper pad (My Mind’s Eye); circle die (Spellbinders); Swiss Dot embossing folder (Cuttlebug); Harvest Gold button (Papertrey Ink); Glossy Accents (Ranger); foam tape

Tuesday, October 25, 2011

Papertrey Ink October Blog Hop


This month’s Papertrey Ink blog hop is an inspiration challenge based on this seasonal photo found here. I made a clean and simple card inspired by the colors, patterns, and images in the photo.

Instead of making pumpkins the focus of my design, I used leaves. I stamped the leaf pair from Autumn Acorns on cream cardstock in Orange Zest ink. While playing around with the arrangement of images on the card, I found that one of the single leaf images is the same size as the smaller one in the pair image, so I stamped that leaf, too, and attached it to the pair with foam tape.

I attached a plaid panel from the Autumn Abundance paper pad to a kraft card base, then ran a strip of Ripe Avocado ribbon across the panel. The “ever so grateful” sentiment is stamped in brown just beneath the ribbon. I added the leaves at the opposite side. To fill in a little white space, I added an orange half-circle to the top of the plaid panel and accented it with a pair of copper brads. The warm copper color was the perfect complement to the rest of the card's colors.

Materials Used:
Autumn Acorns stamp set, Orange Zest and Dark Chocolate inks, Orange Zest, Kraft, and Vintage Cream cardstock, Autumn Acorns die collection, Ripe Avocado grosgrain ribbon (Papertrey Ink); circle punch (EK Success); copper brads (Making Memories); foam tape

Coffee for a Friend

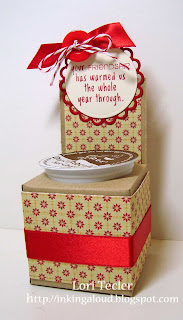
Have you checked out this year’s Holiday Cards and More issue from Paper Crafts? If not, you should—it’s full of holiday inspiration, including card and gift ideas. And, if you check it out, you’ll find this little holiday gift idea I created on page 115. With those single serving coffee machines being all the rage now, I thought it would be nice to have a way to package one of the little coffee packets. I designed a simple box template that’s a perfect fit for a single serving and I'm sharing it as this week’s Paper Craft Planet 3D Tuesday challenge project.

Here’s a little sample. I made the box out of kraft cardstock and decorated it with pieces of patterned paper. I wrapped a piece of red satin ribbon around the box, then added a sentiment tag at the top, dressed up with a button and a little ribbon. The sentiment is from the Cup of Cocoa set from Clear and Simple Stamps.

You can find the template here on the Paper Crafts magazine website (note—it says to print the template on 11x17 paper, but I fit it on a standard 8 ½” x 11 sheet). I can’t wait to see your take on the challenge! Be sure to tag your uploaded photo with the keyword 3d137 so I can add it to the album with the rest of this week’s projects.

Materials Used:
Cup of Cocoa stamp set, Haute Red Couture ink, Kraft Like a Rockstar, Dare to Be a Diva Red, and On the Catwalk Cream cardtock, Dare to Be a Diva Red satin ribbon, Dare to Be a Diva Red button (Clear and Simple Stamps); This & That 6x6 paper pad (Lily Bee Design); circle and lacey circle dies (Spellbinders); 1 ¾” circle punch (EK Success); Cherry Red baker’s twine (Divine Twine)

Monday, October 24, 2011

Our Craft Lounge Breast Cancer Awareness Week Hop

Our Craft Lounge is dedicating this week to breast cancer awareness. You'll want to check out the OCL blog each day for creative projects and information around this important cause that impacts so many of us. Today, we're kicking the week off with a blog hop and we will be giving away some great OCL products as blog candy ~ how about a Granny's Support Team stamp set and 2 jars of Sparkly Fluff ~ in shades of PINK!!!! So leave comments along the way today and we will pick a winner tomorrow morning.

Here's my card for today's hop. I wanted to go with a pretty much monochromatic pink design, so I started off with a piece of pink on pink dotted paper. I added a rose strip to the panel and set a piece of pale pink ribbon over the strip, extending beyond its bottom edge. A strip of clear crystals adds a touch of girly sparkle. The focal image is from the Granny's Support Team set. The bra image is colored with Copic markers and set on an oval panel using foam tape. I added the "don't forget to squish 'em" sentiment underneath it in black.

Here's a list of all of today's participating designers. Don't forget to leave comments for a chance to win the prize!
Kendra Wietstock
Amber Hillman
Carolyn King
Deb Felts
Debbie Fisher
Lori Tecler (you're here!)
Stephanie Serrano
Tammie Edgerton
Michelle Pearson
Dawn Barrett
Lori Barnett
Cassie Trask

Materials Used:
Granny's Support Team (Our Craft Lounge); white cardstock (Taylored Expressions); Memento Tuxedo Black ink (Tsukineko); markers (Copic); Regal Rose cardstock (Stampin' Up!); Pink Tutu patterned paper (BoBunny); oval die (Spellbinders); clear crystal strip (Recollections); pink grosgrain ribbon (Morex); foam tape

Get Well Goodie Bag

For the latest Lawnscaping challenge to use paper piecing, I made a simple little get well gift starting with a tiny kraft paper bag. I noticed the bag was the perfect size for a tea bag and I thought that would make the perfect little pick-me up gift for a sick friend.

I paper pieced the tissue box image from Lawn Fawn's On the Mend set with a scrap of patterned paper. The tissue coming out of the top is a piece of tissue paper that's inserted into a slit I made at the top of the image. I used dimensional dots to set the box on a yellow cardstock strip edged with a dotted paper strip at the top and some ruffled trim along the bottom. After stamping the set's "get well soon" sentiment in blue ink, I attached the panel to the little bag. To dress it up a little more, I made a liner for the inside of the bag using more of the same paper I used for the tissue box. I got the nicely curved shape to match the bag's by cutting the top edge of the panel with a circle die before putting it in place. I slipped a tea bag inside and it's ready to go! I think I'll keep this in my desk at work so I'll have it ready to give to a co-worker when the inevitable winter cold and flu season arrives.

Materials Used:
from i {heart} papers: Lawn Fawn On the Mend stamp set, Tsukineko Memento Tuxedo Black and Bahama Blue inks, Lily Bee This & That 6x6 paper pad, Maya Road cream ruffle edge trim, Canvas Corp. kraft mini bag, Spellbinders circle die, Sticky Thumb dimensional dots

other: Barely Banana cardstock (Stampin' Up!); white tissue paper

Sunday, October 23, 2011

Scaredy Cat

Here's my card for today's SCS featured stamper challenge. It's based on this Halloween card that also features a pumpkin and a cat. It also fits this week's Our Craft Lounge challenge to use purple, green, orange and black

I colored the image from Our Craft Lounge's Scaredy Cat set with Copic markers and outlined around the edges with pale blue markers. I kept the layout the same as in the original card and used a pair of patterned papers from Echo Park's Happy Halloween collection on the cardfront. The black and white dotted panel has one scalloped edge, just like in the original version. After layering the colored image panel over the dotted panel, I added a pair of green buttons to the right side of the patterned paper. The buttons are tied with some black and orange Halloween baker's twine for a fun touch. I wanted to add the set's "boo" sentiment and finally decided to stamp it in black near the top of the card.

Don't miss out on a chance to win an OCL set for yourself by playing along with this week's challenge. And, the OCL design team has a week-long special event starting tomorrow, so be sure to stop by the Lounge to learn more.

Materials Used:
Scaredy Cat stamp set (Our Craft Lounge); white cardstock (Taylored Expressions); Memento Tuxedo Black ink (Tsukineko); markers (Copic); Pumpkin Pie and Basic Black cardstock, scallop edge punch(Stampin' Up!); Happy Halloween Collection Kit (Echo Park); Halloween baker's twine (Timeless Twine); green buttons

Make a Wish

Here's my card for this week's My Favorite Things Wednesday Stamp Club sketch challenge. All of the layers are a little outside of my comfort zone, but I think I got it to work!

I used the a la modes Dream Big girl as my focal image. She's colored with Copic markers and the panel is cut using the out of the box technique so that her leg extends beyond the bottom edge of the panel.

I used three different papers from the My Mind's Eye Dwell pad. The pastel tones worked nicely with the peaceful feel I was going for in my design. The two smaller panels are matted on aqua panels, then set on the dotted panel over a pair of yellow satin ribbon strips. I used pieces of sentiments from two different Pure Innocence sets to come up with the "make a wish" sentiment. The silver star was a last minute addition--I think it's the perfect finishing touch!

Materials Used:
a la modes Dream Big and Pure Innocence Better Get Better and Make Mine a Double stamp sets (My Favorite Things); white cardstock (Taylored Expressions); Memento Tuxedo Black ink (Tsukineko); markers (Copic); Tempting Turquoise Classic ink, ticket corner punch (Stampin' Up!); Aqua Mist and Lemon Tart cardstock (Papertrey Ink); Six by Six-Dwell paper pad (My Mind's Eye); yellow satin ribbon (Michaels); silver wooden star (Hobby Lobby)

Saturday, October 22, 2011

And Away We Go

***Scroll down to the post below for info about a special birthday event!***


This week’s TCP Tuesday challenge is an inspiration one based on this fun photo collage. I was inspired by the rock and roll theme, plus the circle shape of the record in the photo. All of that translated in a roundabout way to this cute circle card that features a rockin’ clown car.

I built the card on a black card base. I used a slightly smaller circle, made from a dotted paper with a piece of solid gray at the bottom to act as a road for the car. After coloring and cutting out the clown card from the new Clownin’ Around stamp set, I attached it to the card with a penny/foam tape mechanism that allows the card to “rock” from side to side. Hard to show in a photo, but a lot of fun in person! I added a pair of white felt clouds made from the CutUps Cloud Border die and stamped the “and away we go” sentiment from the Away We Go set to finish things off.

We'd love it if you'd play along with us in this week's challenge and show us how the photo collage inspires you. One lucky participant in this week’s challenge who uploads their card to the guestbook on Alma’s blog will be the recipient of the weekly Cat Cash prize. And, be sure to stop by Alma’s blog throughout the week for links to the Cat Pack’s creations using these colors.

Materials Used:
Clownin’ Around and Away We Go stamp sets, CutUps Cloud Border die, Neenah white cardstock, Versafine Onyx Black ink (The Cat’s Pajamas); Basic Gray and Basic Black cardstock (Stampin’ Up!); markers (Copic); Fresh Snow ink (Papertrey Ink); designer paper (BoBunny); circle dies (Spellbinders); Silver Fox Smooch (Clearsnap); Diamond Stickles (Ranger); white felt; foam tape; pennies

Happy Birthday, Susanna!

Today, October 22nd, we are celebrating Susanna's Boyd's birthday with a week-long challenge event that every Paper Craft Planet member can participate in!

The Super Novas got together and each made a special birthday gift for Susanna's birthday. In honor of this momentous occasion, we invite everyone to post a birthday project or card for a chance to win some fabulous prizes! Yes, there are several chances to win some awesome paper crafting goodies just by posting a birthday themed project!

Further details can be found by clicking on The Planet Blog. Check out where the party is and join us for a week of celebrations!

And, here’s my contribution to the party. I made a little gift set using Adela’s new Bottle of Cheer template and images from the Vintage Wine stamp set from Our Craft Lounge. I cut the template base from deep purple cardstock and added some fun accents like a gold “foil” wrap around the neck of the bottle and a little cork top. It's hidden in the photo, but there's a clear tube filled with some sweet treats inside the bottle. To tie the pieces together, the card uses coordinating colors and the same patterned paper. I added some cream crepe ribbon and a little ruffled trim for a feminine touch.

We hope you'll join us at the party! Can't wait to see what you bring along!

Materials Used:
from i {heart} papers: Our Craft Lounge Vintage Wine stamp set, X-Press white Copic blending cardstock, Tsukineko Memento Tuxedo Black ink, Copic markers(YG93, YG95, YG97, BV01, BV11, BV13, BV23, E33, R39, Y23, Y26, BG0000)
Lily Bee Design Harvest Market 6x6 paper pad, Spellbinders petite oval dies, Creative Impressions cream crepe ribbon and cork sheet, Maya Road cream ruffle edge trim, Bow Easy, ScorPal, SRM clear plastic mini tube with lid

other:
Bottle of Cheer template (Creations by AR); Elegant Eggplant and Old Olive cardstock (Stampin' Up!); gold paper (Target)

Friday, October 21, 2011

Clear and Simple Meets CAS-ual Fridays

Clear and Simple Stamps is sponsoring this week’s CAS-ual Fridays challenge. This week, the challenge is keeping things clean and simple with coloring, whether it be watercoloring, colored pencils, or markers.

My card uses images from this month’s Stamp of the Month, Craft Room. I used the jar of scissors and markers as my focal image. It’s colored with Copic markers and cut out.

I used a layout that’s great for using up a bunch of scraps. I stamped the text block stamp from the coordinating Crafty Sentiments set repeatedly in gray ink on a wide blue strip, then added a narrower, longer dark pink strip to the left side before setting the strips on a light purple card base. I die cut a fancy shape from patterned paper and set that on the card, then attached the sentiment strip. The sentiment is stamped in gray on a long, narrow gray strip. It’s accented with a strip of clear crystals. The image is set over the sentiment strip using foam tape. A green button adds a fun pop of color while anchoring the strip.

Be sure to check out the CAS-ual Fridays blog for all the details about the challenge--and the fabulous prizes offered by CSS for some challenge players. And, don't forget to check out the CSS iPhone/iTouch app for daily CSS inspiration. Here's a little sneak peek at my project that will be featured on the app tomorrow. You can get all the info about downloading the app here.

Materials Used:
Craft Room and Crafty Sentiments stamp sets, You're Such a Gray-cious Host and Perfect Little Black Dress ink,VIP Purple, Paint the Town Pink, True Blue Fan, You're Such a Gray-cious Host, and A Blanc Check cardstock, Copic markers (B0000, BV00, BG53, RV55, YG13, C00, C-1, C-3, W00, W-1), Green with Envy button (Clear and Simple Stamps); Labels 4 die (Spellbinders); Lime Twist-Happy Go Lucky 6x6 paper pad (My Mind’s Eye); green baker’s twine (Divine Twine); clear crystal strip (Recollections); foam tape

Blogger Challenge: Week 226

This week’s blogger challenge theme is fall blooms. I created this clean and simple card featuring the sunflower image from Our Craft Lounge’s Fall Sunflower set to fit the challenge.

The sunflower’s stamped on a white panel and colored with Copic markers. I stamped the flower part a second time, colored it, and cut it out so I could layer it on the image with a dimensional dot. The flower’s center is covered with Brown Sugar Sparkly Fluff for a textured look.

I attached a panel of patterned paper near the bottom of a golden yellow card base and ran a strip of orange corduroy ribbon over the paper to add some texture before setting the image panel over it. A wooden button, tied with green baker’s twine, sits at the end of the ribbon. I stamped one of the set’s coordinating sentiments at the bottom of the card in orange ink.

For more ideas incorporating fall blooms, check out the links below. And, if you decide to give the challenge a try, feel free to add a link to your project to the list.

Materials Used:
from i {heart} papers: Our Craft Lounge Fall Sunflower stamp set and Brown Sugar Sparkly Fluff, X-Press white Copic blending cardstock, Tsukineko Memento Tuxedo Black and Tangelo inks, Copic markers (Y21, Y23, Y35, Y38, YR30, YG01, YG13, YG17, YG25), Crate Paper Farmhouse 6x6 paper pad, Spellbinders oval dies, May Arts orange corduroy ribbon, Divine Twine Green Apple baker’s twine, Sticky Thumb dimensional dots

other: Spring Moss cardstock (Papertrey Ink); Sweet Corn cardstock (Gina K Designs); wooden button (Simplicity)

Thursday, October 20, 2011

Challenges by AR-Holiday Fun

With the holidays fast approaching, everyone’s mind is turning to gifts and festive home decor. So, our theme for the latest challenge at Challenges by AR is to create a 3D project with a holiday theme.

I used Adela’s Golden Nugget Box template to make this pretty little seasonal package. The template is cut from light blue cardstock. I made the belly band from turquoise cardstock and covered it with a coordinating snowflake patterned paper.

The box is decorated with some turquoise satin ribbon and a pretty felt snowflake that I cut using a CutUps die from The Cat’s Pajamas. For a little sparkle, I attached blue crystals to the snowflake. It’s set on the box with a button at its center. I stamped the “merry wishes” sentiment from the TCP Merry Wishes set on a turquoise oval in turquoise ink and attached that to the box.

To join the challenge, all you need to do is create a shaped card or 3-d item with a holiday theme and link it to the challenge post on the Challenges by AR blog. One lucky participant will receive a template of their choice from Creations by AR.

Materials Used:
Golden Nugget box template (Creations by AR); Merry Wishes stamp set, CutUps Snowflake and Circus Panels dies, aqua Divine Twine, blue felt (The Cat’s Pajamas); Tempting Turquoise Classic ink, Bashful Blue and Tempting Turquoise cardstock (Stampin’ Up!); designer paper (Heidi Grace Designs); turquoise satin ribbon, white button (Michaels); ScorTape

Life Is How You Bake It

Here’s my card for this week’s Kraftin’ Kimmie challenge to use your favorite Kraftin’ Kimmie image. Well, it was too hard to pick just one favorite, so I picked an image from my favorite line of Kraftin’ Kimmie stamps—the Moonlight Whispers. I put together this simple card featuring Nadine as the focal image.

Nadine is colored with Copic markers with a little red glitter from a Spica pen as an accent. After matting her on a red panel, I set her on a light blue cardfront over a strip of floral patterned paper. To bring in a little more red, I ran a piece of red grosgrain ribbon over the floral paper before adding the image. A little bow, made with my Bow Easy, sits at the bottom of the image. I stamped the “life is how you bake it” sentiment that came with the Agnes image on a circle and layered it on a red mat, then attached it to the open space underneath the plate of cookies.

Materials Used:
Moonlight Whispers Nadine and Agnes stamp sets (Kraftin’ Kimmie Stamps); white cardstock (Taylored Expressions); Memento Tuxedo Black ink (Tsukineko); markers (Copic); Real Red and Soft Sky cardstock (Stampin’ Up!); Happy Go Lucky-Carefree designer paper (Pebbles); circle punches (EK Success); red grosgrain ribbon (Michaels); Bow Easy

Wednesday, October 19, 2011

Hi, Pumpkin

***Scroll down to the post below for my "official" Color Throwdown post!***

Here’s another card using this week’s Color Throwdown colors--Rich Razzleberry, Pumpkin Pie, Old Olive, and Basic Black. This one’s based on this week’s SCS sketch challenge. I had this little Pure Innocence cutie already colored up and she was a perfect fit for the sketch and the colors—which is a good thing since I’m short on crafty time today since I had to give an evening presentation to a community group after work. She is just too cute to not find her way onto a card!

The girl and pumpkin are colored with Copic markers. I set her on a cardfront covered with patterned papers that match this week’s CTD colors. A piece of olive grosgrain ribbon at the seam between the two patterned papers adds a little texture to the design. I added the “Hi, pumpkin” sentiment on a circle in the open space underneath the pumpkin.


Materials Used:
Pure Innocence Li'l Pumpkin and Heart Stripes stamp sets (My Favorite Things); white cardstock (Taylored Expressions); Memento Tuxedo Black ink (Tsukineko); markers (Copic); Old Olive, Pumpkin Pie, and Basic Black cardstock (Stampin' Up!); patterned paper (?); olive grosgrain ribbon (Michaels); circle punches (EK Success); foam tape

Color Throwdown 164-Best Witches

This week's Color Throwdown is being hosted by Broni and she's challenged us to use Rich Razzleberry, Pumpkin Pie, Old Olive, and Basic Black. The colors are a great seasonal combination that's perfect for Halloween cards, so that's the direction I went for my card.

I used the Best Witches set from Our Craft Lounge for my card. The card is based on the sketch for this week's OCL challenge, flipped around a bit to fit the orientation of the image. The image is colored with Copic markers and highlighted with a little bit of clear Spica pen. I stamped the "best witches" sentiment right underneath those fun shoes.

I cut squares from two different patterned papers for the panels on the cardfront. They're layered on an olive panel, then on a black one. After wrapping a piece of orange grosgrain ribbon around the center of the panel, I set it on an orange card base. The image panel is set on a black panel for contrast, then attached to the cardfront. I used 3 mini brads as an accent on each side of the card. They're so teeny tiny that it was hard to get ahold of them to put them in place!

Be sure to check out what the rest of the Color Throwdown team has done with these fun colors. Here's where to find them:
October Guestie Amy Sheffer
Be sure to link up your project using these colors to this week's post so we can all check it out!

Materials Used:
Best Witches stamp set (Our Craft Lounge); white cardstock (Taylored Expressions); Memento Tuxedo Black ink (Tsukineko); markers, clear Spica pen (Copic); Pumpkin Pie, Old Olive, and Basic Black cardstock (Stampin' Up!); Happy Halloween-Trick or Treat designer paper (Echo Park); Homemade 6 Bean Soup-Navy Bean designer paper (Jillibean Soup); oval dies (Spellbinders); orange grosgrain ribbon (Michaels); black mini brads (Recollections)

Tuesday, October 18, 2011

i {heart} papers DesignTeam Challenge: Check Out the Fireworks

Welcome to this month’s i {heart} papers design team challenge! This month, we’re all showing off a product new to the store, Fireworks shimmer sprays. The sprays are by Tsukineko and coordinate with their line of Memento inks. You’re going to want to make sure you visit all of the DT members because Kate will be giving away some Fireworks to a random commenter ON TODAY’S DT POSTS so the more you hop and comment, the more chances you have to win! Winner will be announced on Friday so you have until Thursday 9PM EST to leave those comments!

With Halloween coming up, I decided to make a project that would be a great accessory for a Halloween costume. I used one of the long clear plastic tubes to create a magic wand. I filled the wand with water and some chunky pink glitter and secured the top on with a little glue, then decorated it with a fun and feminine topper.

I cut a piece of striped patterned paper in the shape of a star as a base, then layered on a piece of star-shaped cardstock with a mix of Rose Bud and Angel Pink Fireworks sprayed over it. To personalize the wand, I added an “S” sticker from the sticker sheet in a paper collection kit. A pink bow, made with my Bow Easy and a piece of white ribbon sprayed with more Fireworks, adds another girly touch. For some magic sparkle, I cut apart a crystal flourish and attached the pieces underneath the smaller star.

For one final girly frill, I used some pretty silver metallic velvet ribbon. It's tied around the tube and twisted at the ends for a curly look. The ribbon held the curly shape nicely.

Be sure to visit the rest of the IHP DT to see their creative uses for Fireworks—and leave comments for a chance to win some for yourself. Here’s where to find them:

And, since the post wouldn't be complete with a photo of the wand in action, here's my little friend Sydnie showing it off for us!

Don't forget to comment for your chance to win some Fireworks--and don't forget about the ongoing Swimming for Katie fundraiser in honor of Katie Emerson Renz. Some new digis have been added to the collection since the start of the fundraiser last week and the adorable octopus that's the fundraiser symbol is available as a clear stamp as well. You can check out all the stamps and digis for sale here.

Materials Used:
from i {heart} papers: Tsukineko Rose Bud and Angel Pink Fireworks, SRM clear plastic magic wand tube, My Mind’s Eye Lime Twist-Happy Go Lucky 6x6 paper pad, Echo Park Little Girl Collection Kit, Zva Creative clear crystal flourish, May Arts silver metallic velvet and 3/8" solid/tow tone satin whiteBow Easy, Sticky Thumb dimensional dots, i {stick} papers redline tape

other: white cardstock (Papertrey Ink); Cupcake Sugar Coating glitter (Doodlebug Designs)

Halloween Treats

Here’s my little project for the latest Paper Smooches Sparks inspiration challenge. I loved the fun fabric tomato pincushions, but didn’t have a PS tomato in my collection, so I substituted with a seasonal pumpkin instead.

I decorated a tiny treat bag using the pumpkin from the Halloweenies set. The pumpkin’s paper pieced with a scrap of orange on orange houndstooth paper. I covered the eyes with a little Glossy Accents for a shiny look.

After covering the bottom of the bag with a strip of green cardstock edged with a piece of chevron patterned paper, I attached the pumpkin to the bag with dimensional dots. The set's "Happy Halloween" sentiment is stamped in contrasting orange ink. I finished the bag off with some fun Halloween baker's twine--it's a fabulous accent for seasonal projects! All that was left to do was put a few Halloween colored candy treats inside the bag.

Materials Used:
from i {heart} papers: Paper Smooches Halloweenies stamp set, Tsukineko Memento Tuxedo Black and Tangelo inks, X-Press white Copic blending cardstock, Copic markers (YG01, YG03, YG13, YG17, B000, B0000), My Mind's Eye Lime Twist-Fly a Kite 6x6 paper pad, Ranger Glossy Accents, Canvas Corp kraft mini bag, Divine Twine Halloween baker's twine, Sticky Thumb dimensional dots

other: Spring Moss cardstock (Papertrey Ink)

Monday, October 17, 2011

Waltzingmouse Stamps October Blog Waltz

Here's my card for this month's Waltzingmouse Stamps Blog Waltz. This month's theme is gratitude/Thanksgiving and I'd been waiting (not so) patiently for my September order to arrive before tackling my project for the Waltz. In the end, even though the new stamps arrived late last week, I used an older set along with October's Sketch for You to Try (sponsored this month by WMS) for my seasonal card.

I used the largest tree from the Teeny Trees set for my focal image. I stamped a few of the leaf clusters at the ends of the branches in fall shades of rust and gold, then added a felt strip as grass along the bottom of the panel. The set's "happy Thanksgiving" sentiment is stamped directly on the felt.

Instead of using paper for the panel underneath the image, I used a piece of burlap. After stretching a piece of brown satin ribbon over the burlap and the patterned paper panel, I set the image panel on top. The panel is accented with a rust button at the bottom and a pair of layered felt clouds at the top. Simple, but with lots of texture to add interest.

Materials Used:
Teeny Trees stamp set (Waltzingmouse Stamps); Memento Rich Cocoa ink (Tsukineko); Terracotta Tile ink, Simply Chartreuse felt, Terracotta Tile button (Papertrey Ink); Vivid Straw ink (Clearsnap); Tea Dye distress ink (Ranger); Dish All the Dirt Brown ink (Clear and Simple Stamps); Really Rust, Chocolate Chip, and Very Vanilla cardstock (Stampin' Up!); Valise designer paper (Memory Box); brown satin ribbon (Michaels); CutUps Cloud Border die, linen thread (The Cat's Pajamas); burlap; white felt; foam tape

Sunday, October 16, 2011

Birthday Bird

Here's my card for this week's SCS featured stamper challenge. I pulled out my Little Bitty Bird set from Papertrey Ink to create my own version of this cheerful bird card.

I kept the layout pretty much the same as in the original card, but changed the color scheme to a warm color palette based on the strip of patterned paper from a Stella & Rose paper pad. I stamped the set's branch image on a white panel, then added a coordinating blue felt birdie atop the branch. The set's "happy birthday" sentiment is stamped underneath the branch in rust ink. A piece of rust ribbon is tied around the image panel, dividing the two different paper panels and coordinating with the color of the sentiment.

After layering the image panel on an piece of orange cardstock, I set it on an aqua panel embossed with a canvas pattern. The piece is set on a blue card base that matches the little felt bird.

Materials Used:
Little Bitty Bird stamp set, Dark Chocolate and Terracotta Tile inks, Aqua Mist and Ocean Tides cardstock, Little Bitty Bird die, Linen and Canvas impression plate, Ocean Tides felt, Terracotta Tile satin ribbon (Papertrey Ink); Whisper White cardstock (Stampin' Up!); Sweet Mango cardstock (Gina K Designs); marker (Copic); Stella & Rose-Mabel 6x6 paper pad (My Mind's Eye); self-adhesive pearl (KaiserCraft)

Simply Spooky

Here's my card for this week's CAS-ual Fridays challenge to make a Halloween card without any orange. I turned to my Sweet Spooks set from Market Street Stamps for this fun and orange-free Halloween card.

I built a spooky night time scene on a gray cardstock panel. The bottom of the panel has two wavy edged strips of striped green paper as grass. I machine-stitched along the tops of the strips to add some definition to them. For the big yellow moon, I cut a circle from the panel using a circle die. A piece of dot embossed vellum is set behind the open circle, with a yellow panel placed behind that to give a yellow glow.

I stamped the bat from the Sweet Spooks set on white cardstock and colored it with Copic markers, then cut it out and set it on the scene with dimensional dots. A few self-adhesive pearls are scattered around as stars. The set's "spooky" sentiment is stamped just underneath the moon in a sparkly silver ink. Spooky, but not too spooky, right?

from i {heart} papers: Market Street Stamps Sweet Spooks stamp set, X-Press white Copic blending cardstock, Tsukineko Memento Tuxedo Black ink, Copic markers (V01, V04, V06, V09), My Mind's Eye Lime Twist-Life of the Party 6x6 paper pad, Spellbinders circle die, Lifestyle Crafts Polka Dots embossing folder, Zva Creative self-adhesive pearls, Sticky Thumb dimensional dots

other: Rich Razzleberry, Crushed Curry, and Basic Gray cardstock (Stampin' Up!); white vellum (The Paper Company) Encore Silver ink (Tsukineko); sewing machine

Saturday, October 15, 2011

You Color My World

I’m having a great time playing with the images and sentiments from Craft Room, this month’s crafty-themed stamp of the month from Clear and Simple Stamps. Here, I let one of the set's sentiments take center stage on this little gift.

I picked up a package of mini sized colored pencils in a dollar bin at the craft store, thinking that I could come up with a clever way to package them. As soon as I saw the “you color my world” sentiment in the Craft Room set, I knew what I’d do with them. Using blue cardstock, I made a simple slide top box to fit the pencils. Once I’d assembled the box base, I made a band to fit around the box and secure the pencils. I purposely made the band narrower than the box's base so that the pencils would be visible without needing to open the box. The band is covered with a multicolored striped paper to match the sentiment. I stamped the sentiment on a contrasting red strip and attached it to the box, using a button and some light blue satin ribbon as an accent.

If you're one of the many who got your new iPhone yesterday, don't forget about CSS's iPhone/iTouch app! Downloading the app gives you access to a new, exclusive CSS project each and every day. You can find all the details on the app here.

Materials Used:
Craft Room stamp set, Perfect Little Black Dress ink, My Favorite Blue Jeans cardstock, Trendsetter Blue satin ribbon, Trendsetter Blue button, Simple Adhesive (Clear and Simple Stamps); Corinne 6x6 paper pad (SEI); linen thread (The Cat's Pajamas); ScorPal

Pocket Hello

Here’s my card for this week’s My Favorite Things Wednesday Stamp Club sketch. It came together in no time at all with the fun pocket die cut taking center stage.

I cut the pocket shape from a piece of denim, then machine stitched around the edges. I stamped one of the detail stamps in the middle of the pocket using white ink, but probably should have gone over it with my sewing machine so it would stand out more.

The pocket’s set on a patterned paper panel. I used predominantly red pieces for the strips that run underneath the pocket for contrast. The pocket is attached with ScorTape and I added copper brad “studs” at the top of the pocket. An additional trio of copper brads is set at the right side of the cardfront. The little "hello" sentiment from the coordinating stamp set is stamped on a red tab and slipped under the pocket's edge to make a cheery, all purpose card.

Materials Used:
Pretty Pocket stamp set and die (My Favorite Things); Riding Hood Red and Night of Navy cardstock (Stampin’ Up!); Memento Tuxedo Black ink (Tsukineko); Vintage Travel-On Holiday designer paper (Girls’ Paperie); Homemade 6 Bean Soup-Red Beans designer paper (Jillibean Soup); red grosgrain ribbon (Michaels); copper brads (Making Memories); denim; sewing machine; ScorTape
 
Blogging tips