
Here’s another Sneaky Peek of a set soon to be released at
The Cat’s Pajamas. You may have seen an earlier peek of this adorable bunny on a bike in a recent SCS tutorial. As soon as I saw the biking bunny, I knew I wanted to make a card where the image could move—so I did!

I colored up the image using Copic markers and cut it out, then set it aside to build a little scene for it. I embossed a light blue panel with a dotted pattern, then attached a strip of clouds cut with the new CutUps Cloud Border die across the top. I added a sun, made from the flower base part of the new Sunflower Rosette CutUps die, spritzed with some shimmer spray, and an orange button tied with matching
baker’s twine.
My bunny’s bike is set on a track created similar to the kind you’d use for a spinner card that allows it to move back and forth across the card. I took a few photos of the process to show you.

To make the track, I cut two strips of green grass using the
CutUps grass die. I used a narrow oval-ish punch to make the track in one of the grass strips, being sure to leave some uncut space at the edges to use later to attach the strip to the cardfront. The uncut grass strip is set directly on the dotted blue panel to make the track’s opening just a little less obvious once the pieces are in place.

After coloring and cutting out the image, I attached a pair of pennies to the back, placing one penny on each of the wheels. I put one foam dot on the back of each of a second pair of pennies. These pennies will be what holds the bike on the track.

I put the pennies inside the cutout track in the green strip, adhesive side up. Next, I attached pennies on the back of the image to the sticky side of the foam dots, making a sandwich (penny, foam, penny). The cardstock strip shouldn’t be stuck between the foam and the pennies—if that happens, your image won’t be able to move.

This photo shows how this looks flipped over with one penny sandwich completed and the second ready to go.

After you have your bike secured to the track, flip the piece back over and add two more foam pieces to the ends of the track. This will secure it to the cardfront and keep the strip far enough from the base of the card so the piece can move smoothly from side to side. Now you're ready to ride!
Thanks for sticking with me all the way through this long post! Be sure to check out
Alma’s blog for the full list of Cat Packers and guests who’ll have their own Sneaky Peeks to share today. And, join us on our In It to Win It thread in the
TCP forum on SCS for your chance to win one of these new sets for yourself!


 Materials Used:
Wheel Love stamp set, Neenah Solar White cardstock, CutUps Cloud Border, Sunflower Rosette, and Grass dies, orange Divine Twine (The Cat’s Pajamas); Memento Tuxedo Black ink, Frost Shimmer Spritz (Tsukineko); Bashful Blue and Kiwi Kiss cardstock, word window punch (Stampin’ Up!); Harvest Gold cardstock, Orange Zest button (Papertrey Ink); Gold Pearl Liquid Pearls (Ranger); Polka Dots embossing folder (Cuttlebug); foam tape; pennies

 I used the whale image from the new Shout It Out set as my focal image. I colored the whale with Copic markers and sprayed it with some Shimmer Spritz for a subtle sparkle. It’s set on a wave-bottomed panel using dimensional dots. The set’s “hello!” sentiment is stamped next to the image in blue ink.

 On this one, I used the half rainbow die to make my rainbow. It’s set on a panel of cloud patterned paper. I used the cloud dies to cut a pair of felt clouds--love the perforations around the edges in these! The clouds are layered at the end of the rainbow. Like I always do when attaching felt to my projects, I used ScorTape to attach them to prevent the bumps or lumps that you might get with a liquid glue. The cloud panel and a striped patterned paper that includes the colors from the rainbow's bands are each matted on a coordinating cardstock panel and set on a yellow card base.
 I stamped the peeps and coffee cup on a white panel and colored the image in with Copic markers, adding a little glitter to the big heart for a fun touch. Once the image was colored, I cut it out and set it on the circle panel using foam tape.
 If you’re a regular reader here, you know I have a *slight* bunny obsession, so this release was a dream come true for me. I had a hard time picking just one to highlight with the sketch for this week’s TCP Tuesday challenge! In the end, I went with this sweet butterfly-chasing one from the
 I went with one of my favorite ways to make a sandy beach--tearing a piece of kraft cardstock and gently inking the piece with pigment ink. The two sandy pieces are set on a soft blue panel serving as either the water or sky--whichever your prefer! I colored the flip flop pair from the Chillaxin' set from


 I used the set’s bird cage image and little bird image here, stamping the open line bird image first, then filling it in with the solid image in a bold orange. So that the bird wasn’t floating in mid-air, I used the set’s tiny solid line image, curved just a bit, to stamp a little “seat” for my feathered friend. For a little more color, a single small music note is stamped near the bird in orange.


 It's absolutely adorable in person and was a huge hit when I brought it in to my office yesterday to show off. If I tried this again, I'd make sure that I picked a slightly wider and flat, foil-wrapped candy bar instead of the more narrow one in packaging with crimped ends. I think it would make measuring and wrapping easier and work better proportionately.
 After inking the guitar in Spring Rain ink, I rolled the stamp’s edges in Enchanted Evening ink for a nice contrast. I stamped the two-toned image on a white guitar die cut, then spritzed it with just a little shimmer spray.
 I stamped the set’s large open line bird images repeatedly on white cardstock in black ink and colored them with Copic markers, then cut them out.
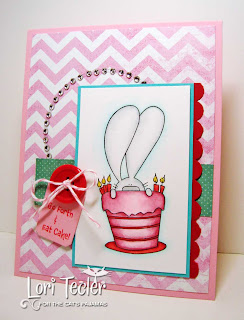 I stamped the bunny and cake on a white panel and colored the image with Copic markers, using a little pale blue to outline the bunny so its almost white ears stood out a bit from the panel. I added a little Yellow Stickles to the candle flames for some sparkle.


