Friday, December 31, 2010

Blogger Challenge: Week 184/Friends with Flair

This week's blogger challenge is to reuse or recycle something for your project. I've been using a piece of corrugated cardboard that came as an insert in a package I received recently on a bunch of projects this week, so since it seemed to be working for me, I stayed with that idea for this card.

Here, the corrugated cardboard makes an appearance as gift boxes. I cut two different sized "packages" from the cardboard and dressed them up with some baker's twine and buttons. The corrugated texture adds a lot of interest. I attached them to a Labels 4 die cut stamped with the birthday sentiment from Unity's Sweet Birthday Celebration kit.

For a festive look, I covered most of the cardfront with a star patterned paper from the My Mind's Eye Fine and Dandy True Blue paper pad. I used the star images from the kit to stamp stars on a gold strip that runs across the card. The sentiment panel is layered over the top of the stamped strip. I used some dimensional dots to hold the gift boxes securely in place.

For more projects using reused or recycled items, you can check out what the rest of the challenge players have created. Links to their blogs are in the sidebar on the right. And, be sure to visit the Unity Friends with Flair players, too. A list of links can be found on the Unity blog.

Materials Used:
from i {heart} papers: Unity Stamp Co. Sweet Birthday Celebration kit, Memento Rich Cocoa ink, Spellbinders Labels 4 die, My Mind's Eye Fine and Dandy True Blue designer paper, Jillibean Soup orange/yellow baker's twine, Zva Creative dimensional dots

other: Pumpkin Pie and Very Vanilla cardstock (Stampin' Up!); Hawaiian Shores and Harvest Gold cardstock, buttons (Papertrey Ink); Vivid Straw ink (Clearsnap); silver brads (Joann); corrugated cardboard

Keep Me in Your Heart

Here's a pretty simple card for this week's Mojo Monday sketch. I went with a Valentine's Day theme using Verve's Hundred Hearts set--love the quotes in this set!

I stamped the Winnie the Pooh quote in red ink on a cream panel for the focal image. Behind it, I layered four patterned paper panels, matted first on individual pink squares, then on a large red one. I've had this paper in my stash for a long time--I figured it was about time I cut in to it. The edges of the panel are stitched to pull all the layers together. Once that was done, I set the panel on a pink card base and added the sentiment. A bright red felt heart, dressed up with a small pink button, fit perfectly at the edge of the sentiment panel.

I'm off this morning to get an estimate on repairs to my car from a recent accident, then to get a haircut. Good way to end the year and start the new one!

Materials Used:
Hundred Hearts (Verve Stamps); Riding Hood Red Classic ink, Blushing Bride, Riding Hood Red, and Very Vanilla cardstock (Stampin' Up!); Cinnamon Stick designer paper (Chatterbox); heart die (Spellbinders); Sweet Blush button, twine (Papertrey Ink); sewing machine

Thursday, December 30, 2010

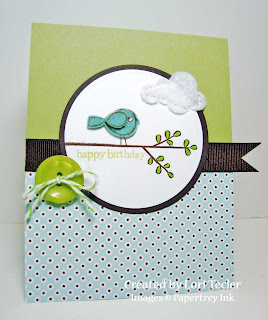
Little Bitty Bird Birthday

At my office, we celebrate birthdays by choosing a "birthday buddy" and bringing in a special treat on our buddy's birthday. My buddy's birthday is coming up next week, so I made a sweet card to go along with the sweet treat I'm bringing in to work--cinnamon buns (one of the few things I can make that generally turns out edible . . .).

I loved the color combination from this week's Curtain Call Color Challenge and I thought the colors would work perfectly with the images in Papertrey Ink's new Little Bitty Bird set. I stamped the branch in dark brown ink and colored the leaves in with green marker. I cut the largest bird from a piece of felt then stamped the outline image directly on the felt. To get some more dimension, I stamped the bird a second time on a felt scrap and cut out just the wing portion and attached that to the felt bird. The eye is a teeny tiny crystal. To fill in some of the white space at the top of the circle, I added a die cut felt cloud. It's machine stitched to add some texture. I stamped the "happy birthday" sentiment underneath the branch in green ink to finish the little scene.

The rest of the card is fairly simple. I used a piece of dotted paper at the bottom of the green card base. A strip of dark brown ribbon runs across the top of the patterned paper, extending slightly beyond the edge of the card. I attached the image panel to an Early Espresso mat to set it off, then attached it to the Pear Pizzazz cardfront, overlapping both the ribbon and the patterned paper. I finished the design with a green button with a matching green baker's twine bow.

Materials Used:
Little Bitty Bird stamp set, Spring Moss and Dark Chocolate ink, Happy Spots patterned paper, bird and cloud dies, Ocean Tides felt, Simply Chartreuse button (Papertrey Ink); white cardstock (Couture Cardstock); Pear Pizzazz and Early Espresso cardstock (Stampin' Up!); marker (Copic); circle dies (Spellbinders); brown grosgrain ribbon (Michaels); clear crystal (Imaginisce); baker's twine (Timeless Twine); white felt; sewing machine

Earthy Anniversary

My mom and dad celebrated their wedding anniversary this week. My sister and I got them a gift certificate to use on their trip to Las Vegas (en route to watch Wisconsin play in the Rose Bowl on Saturday) and I made this simple card to give them as well. It wasn't ready before they left town, so they'll have to wait until they get home to check it out in person. I figured I'd post it anyway and if my mom's checking in on my blog, she'll get a sneak peek.

I didn't want to do anything too girly colored and frilly detailed--that's totally not my dad--so I went more earth toned and subdued with lots of fun texture. I used a Spring Moss card base and added a kraft panel embossed with subtle woodgrain pattern over the base. I cut a piece of Happy Dots patterned paper with both green and brown in it and added that to the mix.

A corrugated cardboard heart (the second I cut out, thanks to Chloe the cutie and chewy puppy's nosy ways) is set on the patterned paper. I stamped the "happy anniversary" sentiment from Round & Round, Papertrey Ink's anniversary set--how appropriate--in Dark Chocolate ink on a Spring Moss banner strip and attached that to the card with the end slipped under the heart. I love the font here--not too formal or elegant, just a nice mix. I don't usually do really formal cards, so lots of the fonts you find for anniversary sentiments don't work for me. A green button, dressed up with some baker's twine, finishes the card.

Materials Used:
Round & Round stamp set, Dark Chocolate ink, Spring Moss and Kraft cardstock, Happy Dots patterned paper, Double-Ended Banner and Heart Prints dies, Woodgrain impression plate, Simply Chartreuse button (Papertrey Ink); baker's twine (Martha Stewart); corrugated cardboard

Wednesday, December 29, 2010

Warm and Toasty

Here's my card for today's SCS sketch challenge. It's funny that I'm making a cold weather card when things are finally warming up to somewhat seasonal today. It was so nice this afternoon (comparatively to the rest of the month) that Chloe the cutie puppy and I took a super long walk around our neighborhood. It's been a while since I haven't cut our walks short because of either the cold or the wind, so I know Chloe enjoyed the extra time outside.

I used the Sheepish set from The Cat's Pajamas for my card. The sheep is colored with Copic markers and carefully cut out using the out of the box technique. The "warm and toasty" sentiment is stamped on the long strip at the bottom of the card. I dressed up the empty space at the end of the panel with a felt heart accented with a brown button and some baker's twine.

The image is set on a brown cardfront covered with paper from Echo Park's Merry Christmas Collection Kit. I cut a panel of paper, then cut it in sections so I could show off both of the pretty patterns.

Materials Used:
Sheepish stamp set (The Cat's Pajamas); white cardstock (Couture Cardstock); markers (Copic); Early Espresso cardstock (Stampin' Up!); Happy Holidays designer paper (Merry Christmas Collection Kit-Echo Park); heart die (My Favorite Things); button (Clear and Simple Stamps); baker's twine (The Twinery)

Forever and Always

Here's my card for Mercy's last sketch challenge. I'm sad to see her challenges end--I always enjoyed playing along and was so honored to be asked to join her team as a Guest Muse for September.

I used one of the new Juniper and Jupiter images from Starving Artistamps called Forever & Always. I stamped the happy couple on white cardstock and colored them with Copic markers, then carefully cut them out. They're layered on a white doily using foam tape.

The rest of the card's pretty simple. I used a pale pink card base to coordinate with Juniper's dress and added a patterned paper panel over most of it to add some interest. A brushed silver scallop edged strip runs across the card, but is mostly covered by the doily. I added a strip of rose ribbon along the top of the silver scalloped panel for a little more color. The "forever & always" sentiment is stamped beneath the image in black ink. The final touch was some White Opal Liquid Pearls dotted on to Juniper's jewelry. I saved that for last, hoping that it would help me to not smear the stuff--LOL!

Materials Used:
Juniper and Jupiter Forever & Always (Starving Artistamps); white cardstock (Couture Cardstock); Tuxedo Black ink (Memento); markers (Copic); Pink Pirouette and Brushed Silver cardstock, Pink Pirouette Patterns DSP, Regal Rose grosgrain ribbon (Stampin' Up!); large scallop die (Papertrey Ink); White Opal Liquid Pearls (Ranger); doily; foam tape

Tuesday, December 28, 2010

Thanks for Your Support

Here's my card for this week's Hip Hop sketch challenge. It's kind of busy and bright, but I think it's okay for a cheerful, fun thank you card.

I used Unity's Sexy, Silly, and Sassy December Stampin' Store Kit for my focal image. The fancy bra is both colored with Copic markers and paper pieced (with some Jillibean Soup paper) to get the solid and dotted look. It's "hung" on a twine clothesline that stretches across the panel. I used my airbrush tool to make a soft sky background for behind the image. More Jillibean Soup is stitched along the bottom of the panel as grass. The sentiment is stamped directly on the patterned paper grass in black ink.

I used a combination of papers and ribbons to cover the cardfront. Most of the cardfront is covered with a striped pattern from October Afternoon's Modern Homemaker pad. For the strips across the card, I used both ribbons and cardstock to add a little texture. Once everything was layered on, I machine stitched around the edge of the card. The final touch was a green twill bow, made with my Bow Easy.

I'm off to watch some hockey on TV with my Chloe the cutie puppy. Now that she's getting a little older, she's becoming much more cuddly, which is nice. She'll actually sit with you for a while now instead of running and tumbling all over the place. It makes it much easier to watch TV when I'm not worrying about where Chloe will hop to next.

Materials Used:
from
i {heart} papers: Unity Stamp Co. December 2010 Stampin' Store Kit-Sexy, Silly, and Sassy, Memento Tuxedo Black ink, Spellbinders rectangle and scalloped rectangle dies, Copic markers (RV11, RV13, RV14, B21), Jillibean Soup Soup Staples designer paper, October Afternoon Modern Homemaker pad, Alexx Kesh green herringbone twill, May Arts ivory and pink checked ribbon, Creative Impressions natural twine string thread, Bow Easy, Zva Creative dimensional dots

other: white cardstock (Couture Cardstock); Tempting Turquoise cardstock (Stampin' Up!); sewing machine

Let It Snow

Here's my card for this week's Our Craft Lounge sketch challenge. As soon as I saw the sketch, I knew just what I wanted to do.

I used the mitten pair and wintery hat from the Penguin Fun set for the three elements on the scalloped panel. They're not exactly "hanging" down like the elements in the sketch, but the mittens are connected by some red baker's twine. Kate's just started carrying Divine Twine's baker's twine at i {heart} papers and it's just that--divine. Can't wait to get it in more colors! My mittens and hat are paper pieced with a dotted pattern from Cosmo Cricket's Mitten Weather mini deck and edged with a little Sugar Sparkly Fluff.

The rest of the card is pretty simple. The winter wear is set on a scalloped rectangle panel that's made from a combination of Baja Breeze cardstock and a plaid pattern from the Mitten Weather mini deck. I stamped the "let it snow" sentiment directly on the Baja Breeze part, then attached the panel to a dotted aqua panel (again from the Mitten Weather mini deck) that's set on a white card base.

Materials Used:
from i {heart} papers: Our Craft Lounge Penguin Fun stamp set and Sugar Sparkly Fluff, Memento Tuxedo Black ink, Cosmo Cricket Mitten Weather Mini deck, Spellbinders big scalloped rectangle die, Zva Creative dimensional dots, Divine Twine Cherry Red baker's twine

other: Baja Breeze cardstock (Stampin' Up!); white cardstock (Georgia Pacific)

Monday, December 27, 2010

Many Thanks

Here's my card for today's SCS clean and simple challenge. This week's challenge was a color challenge using kraft, Chocolate Chip, white, and Wild Wasabi. Wild Wasabi's one of the few SU! colors I haven't invested in, so for my card, I switched it out for an avocado green shade. Still works, at least for me.

I used the tree image from Papertrey Ink's Falling Leaves set as my focal image. The tree is stamped in brown and green on a kraft panel--love the look of colored inks on kraft cardstock! I made some grass to ground the tree with a small scrap of Jillibean Soup designer paper.

The stamped panel is set on a Chocolate Chip mat. I added a ribbon tab to the left side of the panel and covered the end with big green button tied with some twine. It went nicely with the earthy feel of the card. After sifting through a bunch of sentiment options, I stamped the "many thanks" sentiment from Fillable Frames #1 along the side of the image panel to finish the card. The bold font and straight bottom of the sentiment (no g's or y's hanging down) made it a good choice for my design.

Materials Used:
Falling Leaves and Fillable Frames #1 stamp sets, Ripe Avocado and Dark Chocolate inks, Ripe Avocado grosgrain ribbon, Simply Chartreuse button, twine (Papertrey Ink); Chocolate Chip and Crumb Cake cardstock (Stampin' Up!); Soup Staples designer paper (Jillibean Soup); white cardstock (Georgia Pacific)

Sweet and Snowy

It's almost the end of the month and I've managed to get caught up on the final two Viva la Verve sketches for December. Here’s my card for last week’s sketch. I was inspired by candy canes and actually used a pipe cleaner candy cane on my card.

I used two papers from October Afternoon’s Good Cheer line on my cardfront. The one at the bottom of the card has a candy cane-like stripe in its pattern. They’re stitched to an Kiwi Kiss panel. A strip of red grosgrain ribbon stretches across the panels, hiding the seam between them.

I stamped the “you’re so sweet” sentiment from Verve's Thankful Accents set on a white circle and layered it on a red mat. After that was set on the card, I added the pipe cleaner candy cane, dressed up with a pair of buttons tied together with some red baker’s twine. Everything's set on a white card base that contrasts nicely with the colorful combination of papers. Truly so sweet!

Materials Used:
Thankful Accents stamp set (Verve Stamps); Kiwi Kiss, Riding Hood Red, and Whisper White cardstock (Stampin’ Up!); Good Cheer designer paper (October Afternoon); circle dies (Spellbinders); red grosgrain ribbon(Michaels); snowflake button (Blumenthal Lansing); Pure Poppy button (Papertrey Ink); baker’s twine (The Twinery); pipe cleaner candy cane (Joann); sewing machine

And, here's my card for this month's last sketch. It was inspired by the calm before the (snow) storm that I observed on Saturday morning while I was out walking with Chloe the cutie puppy. It was very quiet in our neighborhood--I guess everyone was recovering from their early morning Christmas celebrations. The sky was clear, but the weather forecast hinted that something was coming. It ended up being kind of a false alarm, but none the less, the forecast was my inspiration.

So, I went with it and made a snowy themed card. The "let it snow" sentiment from the Snow Wonderful set is the only stamped part of the card. It's stamped in navy ink on a shimmery white panel for lots of contrast and some sparkle, too.

I used two different patterned papers from a DCWV matstack for the cardfront. The navy strip is accented with a little blue grosgrain ribbon and a snowflake border. I tied a white satin ribbon around it before attaching it to the cardfront. Two snowflake buttons with clear crystals at their centers are the other big element on this card. I'm having a lot of fun finding ways--and spots--to use these buttons!

Materials Used:
Snow Wonderful stamp set (Verve Stamps); Bashful Blue and Shimmery White cardstock, Marina Mist grosgrain ribbon (Stampin' Up!); The Winter Combo matstack (DCWV); oval dies (Spellbinders); snowflake border punch (EK Success); white satin ribbon (Target); snowflake buttons (Blumenthal Lansing); clear crystals (Studio 18)

Sunday, December 26, 2010

Blue Baby Boy Boat

Here's my card for today's SCS featured stamper challenge. I thought this button-filled baby boy card was just adorable, so I created my own version of the card using images from Verve. I made a scaled down version with different papers, but I think it turned out just as cute as the original.

I used the little boat image from Verve's Text Objects set as the focal image. The boat is paper pieced using some thin corrugated cardboard as the bottom and a herringbone pattern for the sails.

I used a dotted paper for the sky portion of the scene and a striped pattern for the water. A line of blue and green buttons runs along the seam between the striped and dotted papers. They're held in place with a strip of ScorTape. Instead of threading and tying each button individually, I did a little "cheat" and drew in a faux thread with a white gel pen. Much faster! A pair of felt clouds fills in the rest of the sky.

I had a hard time deciding on where to place the sentiment. First, I stamped it directly on the striped paper in navy ink, but it looked lost. I ended up stamping the "welcome baby" sentiment from Practically Perfect in Marina Mist ink on a light blue notch-edged panel and setting that at the bottom of the card.

Materials Used:
Text Objects and Practically Perfect stamp sets (Verve Stamps); Marina Mist Classic ink, Pear Pizzazz and Bashful Blue cardstock (Stampin' Up!); Tuxedo Black ink (Memento); marker (Copic); white cardstock (Xerox); The Winter Combo matstack (DCWV); buttons (Michaels-dollar spot); cloud die (Papertrey Ink); white gel pen (Ranger); corrugated cardboard; white felt; foam tape; ScorTape

Papertrey Ink December Blog Hop-Holiday Leftovers


The challenge for this month's Papertrey Ink blog hop is to use your leftover holiday items as part of a paper crafting project. Since I don't celebrate Christmas and Hanukkah was over several weeks ago, I really didn't have the typical holiday leftovers like wrapping paper, ribbon, gift tags and such readily available, so I improvised. I used a corrugated cardboard insert that came in a package I got in the mail recently. It wasn't exactly a holiday leftover, but it was a leftover, so it will have to do.

Since I've been doing a lot of holiday and wintery cards, I went in a totally different direction for a change. For this card, I used the cardboard to create a wood-like ruler using the ruler image from It's Official stamped in black ink. I built the card around the ruler image. A fancy edged panel, cut from Dark Chocolate cardstock using one of the pieces from the Banner Borders die, is at the bottom of the ruler.

For the sentiment, I stuck with the school tools theme and stamped the notebook paper strip from It's Official a few times in Hawaiian Shores ink on a white panel cut with the Spiral Notebook Page die. One of the teacher sentiments from the Teacher's Apple set is stamped on my faux notebook paper in red ink. I used one of the star dies to cut a Harvest Gold felt star and added that to the end of the ruler. A red button, tied with some baker's twine, dresses it up a bit. Everything's arranged on a panel of red Distressed Dots paper with a stitched edge. The panel is attached to a kraft card base.

Materials Used:
It's Official and Teacher's Apple stamp sets, Hawaiian Shores and Pure Poppy ink, Dark Chocolate, Kraft, and White cardstock, Distressed Dots patterned paper, Banner Borders, Spiral Notebook Page, and Seeing Stars Collection dies, Harvest Gold felt, Pure Poppy button, Pure Poppy baker's twine (Papertrey Ink); Tuxedo Black ink (Memento); sewing machine; cardboard


And, after I finished the card, I decided to see if I could cut the cardboard with one of PTI's dies. I found that it worked, so I went ahead and made a quick birthday tag featuring one of PTI's new releases.

I cut the Tag Sale 1 die from the cardboard for the tag's base. To dress it up, I attached several paper panels, including a little piece of pink Happy Spots paper, a strip cut with the Banner Borders die, and one cut with the Double-Ended Banner die. I let the notched end of the banner die strip extend a little beyond the edge of the tag to add some interest.

I stamped one of the presents and ribbons from the new Make a Wish Additions set in coordinating colors and set that on the tag. The ribbon/bow combo's dressed up with a big clear crystal. The "HB2U" sentiment from Birthday Bash Sentiments is stamped next to the gift. I added a button, tied with some pink baker's twine next to the gift to finish off the tag. So cute and really easy to make! It'll look great on a kraft gift bag.

Materials Used:
Make a Wish Additions and Birthday Bash Sentiments stamp sets, Sweet Blush and Dark Chocolate inks, Sweet Blush, Dark Chocolate, and White cardstock, Happy Spots patterned paper, Tag Sale 1, Banner Borders, Double-Ended Banners, and Make a Wish Collection dies, Dark Chocolate button (Papertrey Ink); pink baker's twine (Divine Twine); clear crystal (Imaginisce); foam tape

Saturday, December 25, 2010

Peace, Love, and Joy

On the day when many are celebrating the holiday season with family and friends, I thought it would be appropriate to share the card I made to send to my family and friends for the holidays. So that they were both easy to mass produce and easy to mail, I kept the card's design clean and simple.

I used a die cut felt dove as my focal image. The dove is cut from white felt and has a tiny blue crystal eye. I stamped the "peace love joy" sentiment from Papertrey Ink's Fillable Frames #8 set in blue ink on a pale blue grosgrain ribbon strip, then cut a notch at one end to add interest.

For the background behind the dove, I embossed a piece of shimmery silver paper with a snowflake pattern. Everything is set on a blue card base. I was able to complete about 60 of these in about 4 hours--not too bad!

Materials Used:
Fillable Frames #8 stamp set, Enchanted Evening ink, Blueberry Sky cardstock, dove die from Peace Be Still collection (Papertrey Ink); blue crystal, silver paper (Recollections); snowflake embossing folder (QuicKutz); ScorTape

Paper Craft Planet Saturday Sketch

Merry Christmas! I’m excited to be bringing you this week’s Paper Craft Planet sketch challenge. I bet lots of people got some new crafting goodies and can’t wait to try them out. So, here’s your chance!

Here’s this week’s sketch. It’s a pretty simple one that can have either a sentiment or an image as the focal point. Feel free to change the shape of the panel, especially if you got a new die cutting machine—or new shaped dies—for the holiday. You can also replace the circle element with any shape embellishment.

Here’s my sample to get you started using one of my favorite color schemes, aqua, brown, and red, with a little kraft thrown in, too. It features a small cup of coffee from Papertrey Ink's Warm Happiness Too set as the focal image with the coordinating sentiment stamped underneath. The coffee cup is set on a Labels 9 panel.

I attached a fun, dotted paper in the same color scheme to the kraft card base, then added on the image panel. A small red felt heart with an aqua button finishes the design.

And, in case you need a little more inspiration, here’s another sample that I posted to my blog earlier this week using the same sketch.

Be sure to add the link to your creation using this sketch to the Linky Tools widget found here on the Paper Craft Planet blog so we can all check them out. You can also add your project to the Paper Craft Planet gallery using the keyword sk122510. If you use that tag, I can add it to the album with the rest of this week's creations. Happy holidays and happy crafting!

Materials Used:
Warm Happiness Too stamp set, Aqua Mist and Dark Chocolate inks, Aqua Mist, Dark Chocolate, Kraft, and White cardstock, Happy Spots patterned paper, Aqua Mist button, Pure Poppy baker’s twine (Papertrey Ink); Labels 9 die (Spellbinders); heart die (My Favorite Things); red felt; foam tape

Friday, December 24, 2010

Cheers

Here's my card for this week's My Favorite Things Wednesday Stamp Club challenge to make a card using some of MFT's Die-Namics dies. I used the small pennant banner die and Mercy's Tuesday sketch challenge for this fun and festive card.

I used one of the new a la modes sets, Cheers, for my focal image. The girl is colored with Copic markers. Her champagne glass is coated with Glossy Accents and sprinkled with a touch of Dazzling Diamonds for a sparkly, bubbly look.

A piece of Crate Paper's Snow Days paper is set behind the colored image. I ran a strip of gold paper across that, dressed up with some red satin ribbon. The banner is cut from the same gold paper. I stamped "cheers" in black ink using the Mini Alphabet and attached it to the card, filling in some of the white space at the top of the image panel. For more sparkle, I added a clear crystal between each of the pieces of the pennant and at the ends, too, to anchor it.

Materials Used:
a la modes Cheers and Mini Alphabet stamp sets, Banner Strip Die-Namics die (My Favorite Things); white cardstock (Couture Cardstock); Tuxedo Black ink (Memento); markers (Copic); Riding Hood Red cardstock, Dazzling Diamonds (Stampin' Up!); Harvest Gold and Hawaiian Shores cardstock (Papertrey Ink); Snow Days designer paper (Crate Paper); red satin ribbon (Target); Glossy Accents (Ranger); clear crystals (Imaginisce)

Blogger Challenge: Week 183

This week’s blogger challenge theme is Christmas. I don’t celebrate the holiday, so I made a non-holiday specific, wintery themed mini gift bag for the challenge. The bag’s a perfect size for holding a gift card or another small treat.

I used the snowflake image from the Icons I set from Clear and Simple Stamps to stamp a trio of images on a white panel. Each flake has a clear crystal at the center for a little sparkle. I layered the panel on a True Blue Fan panel, then on a Trendsetter Blue panel. The “warm winter wishes” sentiment from the coordinating Icons Extra set is stamped at the bottom of the panel in True Blue Fan ink.

To dress up the bag a little more, I added a blue satin bow on the handle. A matching blue button is attached to the bow’s center.

For more Christmas ideas, you can check out what the rest of the challenge players have created. Links to their blogs are in the sidebar on the right.

Materials Used:
Icons I and Icons Extras stamp sets, True Blue Fan and Trendsetter Blue inks, True Blue Fan, Trendsetter Blue, and A Blanc Check cardstock, True Blue Fan satin ribbon, True Blue Fan button (Clear and Simple Stamps); twine (Papertrey Ink); clear crystals (Imaginisce); white gift bag

Thursday, December 23, 2010

Merry Wishes from Chloe the Cutie Puppy

With the holidays fast approaching, it’s time to thank to the people who help us out throughout the year. One person I’m saying a big thank you to is Chloe the cutie puppy’s dog walker. Her walker comes on a daily basis to take Chloe out for a nice stroll while I’m away at work. I come home to a little report card telling me how her walk was and what cute things she did. I love to hear about how she chases leaves or interacts with my neighbors. It’s good to know that Chloe’s getting outside and burning some energy and that she’s in good hands all at the same time.

I made this dog themed card to give to her walker along with a thank you gift. I used the sweet dog image from one of the My Favorite Things Pure Innocence Boy and Dog sets, minus the boy. The dog is colored with Copic markers and carefully cut out. I used foam tape to attach the dog to a cream Labels 4 die cut. I matted the cream die cut with a red one. I wanted a narrower edge for the mat than cutting the next largest die would have given me, so I simply traced the edge of the die on the back of my red paper and cut along the pencil line to get the size I wanted. The “merry wishes” sentiment from another PI set is stamped on a strip that I set underneath the dog image. I added a red button, tied with some twine, as a simple accent. The pieces are layered over a strip of patterned paper from Echo Park's Merry Christmas Collection Kit.

Materials Used:
Pure Innocence Boy and Dog-Dog Gone Cute and Presents for You sets (My Favorite Things); white cardstock (Stampin’ Up!); white cardstock (Couture Cardstock); Fine Linen cardstock, banner die, Pure Poppy button, twine (Papertrey Ink); Riding Hood Red cardstock (Stampin’ Up!); Happy Holidays designer paper (Merry Christmas Collection Kit-Echo Park); Labels 4 die (Spellbinders); foam tape

Winter Sunshine

Here’s my card for this week’s Our Craft Lounge sketch challenge. I went for a bright, sunny card—quite a contrast from the wintery chill we’ve been stuck in for most of December.

I stamped the sun and cloud images from the Sunshine Cheer set on white cardstock using black ink. The images are colored with Copic markers. I stamped the cloud a second time on a scrap of cardstock, colored it, cut it out, and attached it to the panel with a dimensional dot. I pulled out my airbrush to add a soft blue-green tint to the sky behind the sun and cloud.

Most of the cardfront is covered with a green on green dotted patterned paper from Echo Park’s A Walk in the Park Collection Kit. The edges are machine-stitched to add some interest. The patterned paper piece is layered on a turquoise mat. I ran a strip of turquoise twill across the panels before setting them on a green card base. It’s accented with a trio of clear crystals. The cheery sentiment is set at the bottom of the card on a pair of layered oval panels.

Materials Used:
from
i {heart} papers: Our Craft Lounge Sunshine Cheer stamp set, Memento Tuxedo Black ink, Copic markers (Y11, Y13, Y17, R21, B000, B0000, BG11, BG32), May Arts turquoise blue striped twill, Spellbinders circle, big scalloped circle, and petite oval dies, Ranger Crystal Stickles, Zva Creative clear crystals and dimensional dots

other: white Copic blending cardstock (Couture Cardstock); Hawaiian Shores and Simply Chartreuse cardstock (Papertrey Ink); sewing machine

Wednesday, December 22, 2010

Warm My Heart

Here's my card for today's SCS sketch challenge. I used the Like You a Latte set from The Cat's Pajamas--I just love these sweet images!

I colored the little boy with Copic markers to match the colors in the papers from Echo Park's Merry Christmas Collection Kit that I used for the panels on the card. I used two different patterns--a dotted green one that's set directly on the kraft base and a colorful patterned one that forms the panel that runs across the cardfront. I added a mat with a decorative edge under the panel across the cardfront and tied a piece of brown twill around the panel, too. Twill always works great on cards with more masculine (or boyish) images. The set's "you warm my heart" sentiment is stamped along the bottom edge of the dotted panel. It's kind of lost in the pattern, but I promise it's there.
Materials Used:
Like You a Latte stamp set, Apron Border CutUps die (The Cat's Pajamas); white cardstock (Couture Cardstock); Tuxedo Black ink (Memento); markers (Copic); Crumb Cake and Riding Hood Red cardstock (Stampin' Up!); Fine Linen cardstock, Dark Chocolate twill (Papertrey Ink); Merry Christmas Collection Kit designer papers (Echo Park)

Warmest Winter Wishes

Lynn is hosting this week’s Paper Craft Planet sketch challenge and I hoped I'd get to try it out before the end of the week--and I made it! Here’s my version of the sketch, flipped on its side, but otherwise, a pretty close interpretation of the sketch.

I used images from Papertrey Ink’s On Ice set for my girly winter card. I die cut two skate shapes from white cardstock then stamped the skate image on the die cut pieces. I highlighted the skates just a little with some very pale purple Copic markers to soften the white a little and colored the skate blades with a silver gel pen for a metallic shine, then set them aside to assemble the rest of the card.

I used a lavender card base with panels made from two patterns from Cosmo Cricket’s Mitten Weather mini deck. A strip of coordinating grosgrain ribbon, edged with a little cream lace, runs across the card. Once all that was in place, I added the skates to the mix, stringing them together with some baker's twine. The sentiment is stamped on the plaid paper, nestled next to the skates. I attached a coordinating button to the ribbon strip and laced it with baker's twine to bring in a little more of its fun texture.

If you get a chance to play along, be sure to add a link to your card using the Linky Tools widget found at the end of this post on the PCP blog. And, you can always add your card to the PCP gallery for everyone to admire.

Materials Used:
On Ice stamp set, Plum Pudding, Lavender Moon, and White cardstock, skate die, Plum Pudding grosgrain ribbon, Plum Pudding button (Papertrey Ink); Tuxedo Black ink (Memento); markers (Copic); Mitten Weather mini deck (Cosmo Cricket); silver gel pen (Pentel); lace (Wyla); baker's twine (The Twinery)

Tuesday, December 21, 2010

IHP DT Challenge-Fun with Fashion

This month’s i {heart} papers design team challenge is all about fashion and using it as inspiration. I took my inspiration not from something specific, but from my idea of what you’d see at a festive party during the holiday season—bright, bold colors, shiny fabrics and accents, and elegant jewels.

I incorporated these elements into my design for a table centerpiece crafted from an inexpensive wine glass I picked up at a craft store. My plan was to turn it in to an elegant candleholder that would look lovely as a decorative piece or even as a place card holder.

I started by attaching white pearl lines around the rim of the glass. Since these already have an adhesive backing, this was very easy to do. Under the pearls, I used redline tape to attach a piece of pleated red satin ribbon. To dress up the base, I used a scalloped oval die to cut a piece from a red foil sheet. This is set underneath the wine class for a pretty, shiny look.

I made a little tag to add to the stem of the glass. This could be used for a person’s name instead if you wanted to use this for a place card. Here, I stamped a snowflake from the Hero Arts Get Merry! set in silver ink and added a sentiment in red ink. A single pearl is at the snowflake's center to tie it in to the look of the glass. A piece of silver ribbon secures the tag to the stem.

Be sure to visit the rest of the IHP DT to see what they’ve created for this challenge. Here’s where to find them:


Materials Used:
from
i {heart} papers: Maya Road pleated red satin trim, Zva Creative self-adhesive white pearl lines, i {stick} papers redline tape, Hero Arts Get Merry! stamp set, Spellbinders circle and scalloped circle dies and red foil sheet, May Arts sheer metallic silver ribbon

other: Riding Hood Red Classic ink, Shimmery White cardstock (Stampin’ Up!); silver ink (Encore)

Monday, December 20, 2010

Damask Birthday

I'm not a big damask fan--in fact, it's something I almost never use in my designs. But, I managed to incorporate some damask for my prjoect for today's SCS clean and simple challenge to create a card based on an inspiration piece featuring tiered apron with a damask pattern.

I used one of the large icons from the Giga Guide Lines set from Papertrey Ink to fashion a simple medallion-style focal image. The image is stamped in white on a pale green panel and dressed up with a pearl at the center. I crimped an eyelet lace border punched strip and twisted and wrapped it around the image panel, securing it with lots of adhesive.

I found some damask patterned paper in a My Mind's Eye paper pad for the panel at the bottom half of the cardfront. The medallion piecer is attached at the top of the paper with a strip of ribbon extending from underneath it. While the style of the Giga Guide Lines sentiments looks great with the image and patterned paper, its scale was too much for my design. Instead, I stamped the "happy birthday" sentiment from Enjoy the Ride in white ink and heat embossed it to help it stand out against the pattern.

Materials Used:
Giga Guide Lines and Enjoy the Ride stamp sets, Fresh Snow ink, Spring Moss and Ocean Tides cardstock, Ocean Tides grosgrain ribbon (Papertrey Ink); Eyelet Lace border punch, Winter White embossing powder (Stampin' Up!); Bloom & Grow designer paper (My Mind's Eye); crimper (Fiskars); circle punch (EK Success); pearl (Queen & Co.)

A Star Is Born

Here’s a sweet baby card using Icons I, December’s Stamp of the Month from Clear and Simple Stamps. You still have a little more time to use this month’s discount code, CSS1210, for a $1 discount on your purchase of this versatile set.

This card uses the set’s star image as the focal point. I stamped it three times in yellow ink on a white panel. I stamped it again on scraps of white, this time cutting out the star part. The stars were put through my Big Shot to emboss them with a dotted pattern, then attached to the stamped images with foam tape.

I used dotted paper on the cardfront to match the dots on the stars. I went for a gender neutral theme on my card, using shades of greens and yellow. A strip of CSS’s Green with Envy satin ribbon is knotted around the patterned paper panel, secured with a button tied with some baker’s twine. I stamped the “a star is born” sentiment from the coordinating Icons Extras set to complete the card.

For more Clear and Simple Stamps inspiration on a daily basis, be sure to visit the CSS iPhone app. You can find all the info on the app right here. And, here’s a sneak peek at the project you’ll find there today—created by me!

Materials Used:
Icons I and Icons Extras stamp sets, Perfect Little Black Dress ink, Green with Envy and A Blanc Check cardstock, Green with Envy satin ribbon, button (Clear and Simple Stamps); Barely Banana Classic ink (Stampin’ Up!); Nana’s Nursery designer paper (DCWV); Swiss Dot embossing folder (Cuttlebug); baker’s twine (Timeless Twine); foam tape

Sunday, December 19, 2010

Happy Holidays

Here's my card for today's SCS featured stamper challenge. The big felt snowflake and blue and brown color scheme on this card caught my eye. I kept those elements in my own version, but made some changes to fit the supplies I had on hand.

Instead of a felt snowflake, I used a big, sparkly one made from a piece of blue glitter paper. I used a large snowflake punch to cut out my shape. I added a pearl to the center, but it seemed a little lost on the big flake, so I added a white snowflake-shaped button, then the pearl. Much better!

I kept with the original card's blue and brown color scheme, but switched up the patterned papers. For my version, I used two different patterns from Echo Park's Wintertime Collection Kit on the cardfront. The snowflake is attached to the upper left corner of a brown, blue, and white patterned piece. A dotted piece covers most of the cardfront. I stamped the "happy holidays" sentiment from the Hero Arts Get Merry! set in brown ink on an oval panel. The edges are inked with a little blue for some contrast.

Materials Used:

other: Baja Breeze and Early Espresso cardstock (Stampin' Up!); snowflake punch (Marvy Uchida); snowflake button (Blumenthal Lansing); Tumbled Glass distress ink (Ranger)

Merry Wishes

Here's my card for this week's My Favorite Things Wednesday Stamp Club challenge to make a holiday card featuring a Pure Innocence stamp. I created a simple holiday card in a warm, seasonal color scheme.

I started with the little girl from Presents for You as my focal image. The girl is colored with Copic markers in festive colors. I added some looped ribbon at the top of the image panel and extended the ribbon past the bottom edge, ending it with a notched edge for interest.

The image panel is layered over panels made from a piece of patterned paper from Echo Park's Merry Christmas line. I used both sides of the paper here, choosing the less busy snowflake print to cover most of the cardfront and the more colorful dots and snowflake pattern for the smaller panel beneath the image panel. I debated adding some small snowflake buttons to the right of the image as an accent, but in the end, decided to leave the card as is.

Materials Used:
Pure Innocence Presents for You stamp set (My Favorite Things); white cardstock (Couture Cardstock); markers (Copic); Fine Linen cardstock (Papertrey Ink); Cherry Cobbler cardstock (Stampin' Up!); Holly Jolly designer paper (Merry Christmas Collection Kit-Echo Park); red grosgrain ribbon (Michaels)

Saturday, December 18, 2010

Unity Duo

Here are two quick cards for a pair of Unity challenges. I used images from some of my recent Kits of the Month to pull these together.

This one is for this week's Unity Addicts challenge. It's super simple and inspired by a red mug with the word "merry" in a bold, white print.

I started with a deep red panel and stamped a holiday sentiment that includes the word "merry" near the bottom right side of the panel in white pigment ink. The words were covered with embossing powder and heat embossed for a bold pop.

I accented the words with a big snowflake button. I dressed up the button with another button at the center, tied with some red and white baker's twine. The red panel is layered on a white card base. It was hard, but I resisted adding anything else to the mix.

Materials Used:
November Kit of the Month (Unity Stamp Co.); Fresh Snow ink, Pure Poppy button (Papertrey Ink); Cherry Cobbler cardstock, Winter White embossing powder (Stampin' Up!); white cardstock (Xerox); snowflake button (Blumenthal Lansing); baker's twine (The Twinery)

And, this one is for this week's Hip Hop sketch challenge. I used the "love and kisses" sentiment pair from August's Kit of the Month for the focal panel. The words are stamped in red ink on a white panel. I added a red felt heart as an accent, along with a red button.

The stamped panel is layered on a big scalloped circle, then on a pink paper with a repeating open heart pattern. I layered the panel on a red mat, then wrapped a piece of red satin ribbon around the card, knotting it underneath the words. The assembled panel is layered on a white card base.

My December kit arrived in the mail this afternoon. Can't wait to ink it up!

Materials Used:
August Kit of the Month (Unity Stamp Co.); white cardstock (Xerox); Riding Hood Red Classic ink, Riding Hood Red cardstock (Stampin' Up!); Crush 6 x6 patterned paper pad (BoBunny); circle and big scalloped circle dies (Spellbinders); heart die (My Favorite Things); red satin ribbon (Target); Pure Poppy button, twine (Papertrey Ink); red felt

So Awesome

Here's a fun card for this week's Mojo Monday sketch. I combined designer papers from two older Cosmo Cricket lines to get a great masculine look and feel.

I stamped one of the sentiments from Verve's Happy Days set on a cream panel, then inked around the edges with light brown ink to dirty it up a bit. A trio of square copper brads runs under the sentiment--these are a great accent element on a masculine card! At the left end of the panel, I attached a pair of layered felt stars with a button at the center to balance out the panel.

I used a gold dotted panel underneath the left end of the sentiment panel. Two opposite corners of the panel are rounded for a different look. The pieces are assembled on a striped panel, then set on a brown card base. I machine stitched around the edges to break up the dark colors a little. After everything had been put together, I realized I'd forgotten the small notched ended element that extends out from the right edge of the sentiment panel. I was able to lift the edge and add a strip of brown grosgrain ribbon underneath it to finish the card.

Materials Used:
Happy Days stamp set (Verve Stamps); Creamy Caramel Classic ink, Creamy Caramel, Early Espresso, and Very Vanilla cardstock (Stampin' Up!); Harvest Gold cardstock, Harvest Gold and Dark Chocolate felt, star dies, Harvest Gold button (Papertrey Ink); baker's twine (Martha Stewart); Mr. Campy: Happy Trails and Wanted: Slim Jim designer papers (Cosmo Cricket); copper brads (Making Memories); brown grosgrain ribbon (Michaels); sewing machine; Corner Chomper

Friday, December 17, 2010

Blogger Challenge: Week 182/Friends with Flair

This week’s blogger challenge is a sketch with lots of circles. I used one of Unity’s new kits, Sunny Happy Skies, and some fun patterned papers for my interpretation of the sketch.

I paper pieced the kit’s hot air balloon image snowflake with some striped patterned paper from the My Mind’s Eye Fine and Dandy True Blue pad. I added it to a pale blue circle background with foam tape. The clouds represent the sketch’s trio of small circle elements. To add interest, I stamped two on blue cardstock and embossed them with a dotted pattern, then edged them with some Stickles and the third is stamped on shimmery white cardstock.

The cardfront is covered with some striped paper from Crate Paper’s Snow Day line. I stitched around the edges with my sewing machine to break up some of the blue. A strip of light blue faux suede ribbon, layered over coordinating cardstock panels, runs across the card. I stamped the “flying high” sentiment from one of Unity’s early Stampin’ Store Kits beneath the ribbon strip using black ink. If you’re looking for Stampin’ Store kits, be sure to check out i {heart} papers.

For more ideas based on this sketch, you can check out what the rest of the challenge players have created. Links to their blogs are in the sidebar on the right. And, for more Unity inspiration, stop by the Unity blog for the full list of Friends with Flair players.

Before you go, I have one last piece of news. Did you know that today (Friday) is National Free Shipping Friday? I didn’t know such a thing existed, but it really does. So, IHP is offering FREE SHIPPING ON ALL US orders (no minimums!) and 50% off on Canadian shipping. All other international customers will be invoiced for full shipping charges. Sorry! (Canadian customers PLEASE READ: When you enter the code it will zero out your shipping but Kate will invoice you for the 50% off. It’s a limitation of the shopping cart and it can’t place country restrictions on promotional codes.) Please use promo code: freeshipdt. So, if you still need to do some holiday shopping or want to do a little shopping for yourself, be sure to check it out.

Materials Used:
from
i {heart} papers: Unity Stamp Co. Sunny Happy Skies kit and July 2009 Stampin’ Store Kit, Memento Tuxedo Black ink, Copic markers (E25, E35, BG000, BG0000), My Mind’s Eye Fine and Dandy True Blue paper pad, Crate Paper Snow Day paper pad, Ranger Stardust Stickles, May Arts light blue faux suede ribbon, Spellbinders circle dies, QuicKutz Polka Dots embossing folder, Zva Creative dimensional dots

other: Bermuda Bay and Shimmery White cardstock (Stampin’ Up!); Wild Dandelion cardstock (Gina K Designs); sewing machine

Polka Dot Dream

Here’s my card for this week’s There She Goes challenge to use your stash. I combined the challenge with this week’s Crazy 4 Challenges sketch.

This sketch is the kind that really challenges me. The thought of having to figure out the right size and spacing for all of those small boxes make me want to run the other way—LOL! I stuck with it and, with the help of some scrap paper, figured out how to get the panels to work okay.

I used some dotted paper from DCWV’s Nana’s Nursery-Baby Boy paper pack that I’ve had in my collection for a very long time for all of those little panels. Each dotted piece is layered on a lavender mat, then attached to the plum card base. I attached a strip of pale purple seam binding to the long panel and dressed it up with a matching bow with a button center.

I used the cute little lamb image from TSG’s Polka Dot Pals set for the focal image. I stamped the outline in black, then filled it in with the dotted pattern in purple. The image is stamped first in plum, then stamped over in white to soften the color. I stamped the “dream” sentiment along the edge of the panel and added three clear crystals as an accent.

Materials Used:
Polka Dot Pals stamp set (There She Goes); Perfect Plum and Whisper White cardstock (Stampin’ Up!); Lovely Lavender cardstock (Gina K Designs); Plum Pudding and Fresh Snow inks, Plum Pudding button (Papertrey Ink); Tuxedo Black ink (Memento); Nana’s Nursery-Baby Boy designer paper (DCWV); purple seam binding (Martha Stewart); clear crystals (Imaginisce), baker’s twine (Timeless Twine)

Thursday, December 16, 2010

You Warm My Heart

Here’s my card for this week’s TCP Tuesday challenge. I used the sketch along with the Like You a Latte set for this sweet wintery card that I think would even work for Valentine’s Day.

I colored the little boy image with Copic markers, picking my colors to coordinate with the Echo Park paper I used on the cardfront. The little boy is attached to a kraft panel using foam tape. I stamped the sentiment in red ink, omitting the word “heart.” Instead, I added a red felt heart, accented with a wood button.

The rest of the card is pretty simple. I used the flip side of the patterned paper for the panel across the cardfront. The image panel is layered on a red circle and attached to the cardfront. Some natural twill runs from the top of the card to the image panel. I added a knotted piece of the same twill at the top of the image panel.

Materials Used:
Like You a Latte stamp set (The Cat’s Pajamas); white cardstock (Couture Cardstock); Tuxedo Black ink (Memento); markers (Copic); Riding Hood Red and Crumb Cake cardstock (Stampin’ Up!); Merry Christmas designer paper (Echo Park); circle dies (Spellbinders); heart die (My Favorite Things); button (Papertrey Ink); baker’s twine (The Twinery); twill (Wrights); foam tape

Jolly Good Fun

Here’s my card for Mercy’s latest sketch challenge. I went with a wintery theme using one of Unity’s new Jillibean Soup co-branded sets, Jolly Good Fun.

I stamped the mitten pair on an angle, leaving just enough room to stamp the “jolly good fun” sentiment in the upper corner of the panel. The mittens were stamped a second time on a cardstock scrap, colored with Copic markers, cut out, then attached to the image panel with dimensional dots. I scribbled over the little snowmen on the mittens with a clear Spica pen for a snow-like sparkle.

I used two different patterns from Cosmo Cricket’s Mitten Weather mini deck for the panel on the cardfront. A strip of red faux suede ribbon hides the seam between the two papers and a kraft scalloped strip dresses up the bottom edge. I machine stitched just above the top of the kraft strip. I selected a zig zag stitch, but somehow got a straight one. Guess I'm lucky it sewed anything if it's going to be temperamental--LOL! A trio of iridescent crystals along the right side adds just a little bit more sparkle and shimmer to this wintery design.

Materials Used:
from i {heart} papers:
Unity Stamp Co. Jolly Good Fun kit, Memento Tuxedo Black ink, Copic markers (BG000, BG01, BG02, BG05) and clear Spica pen, Cosmo Cricket Mitten Weather mini deck, May Arts red faux suede ribbon, Zva Creative dimensional dots and iridescent crystals

other: Baja Breeze and Crumb Cake cardstock (Stampin' Up!); sewing machine

Wednesday, December 15, 2010

Let's Eat Cake

I have time for just a quick post tonight before I run off to an evening meeting for work. Here’s my card for today’s SCS sketch challenge. I used one of the My Favorite Things a la mode sets with some pennant patterned paper for a festive birthday card.

I colored the a la mode with Copic markers. Her cake’s a yummy looking chocolate shade with pink icing. I dottedon some pink Liquid Pearls along the top of each layer for a decorative touch. The sentiment runs underneath her feet, accented with a pink button.

I paired her with pennant patterned paper from My Mind’s Eye. I thought it was the perfect paper for a celebration themed card. The pale pink panel is embossed with a dotted pattern, matching the dots in the pennants and the dots on the cake. Looks yummy!

Materials Used:
A la mode Time to Celebrate stamp set (My Favorite Things); white cardstock (Couture Cardstock); Tuxedo Black ink (Memento); markers (Copic); Pink Pirouette and Regal Rose cardstock (Stampin’ Up!); Ocean Mist cardstock (Gina K Designs); Fine and Dandy Tickled Pink designer paper (My Mind’s Eye); Polka Dots embossing folder (Cuttlebug); button (Papertrey Ink); baker's twine (The Twinery); Pink Petal Liquid Pearls (Ranger); sewing machine

Winter Wishes

Here’s my card for this week’s Viva la Verve challenge. I completed the sketch with wintery, snow-themed colors and elements to match the weather we’re having outside.

I used three papers from Echo Park’s Wintertime collection for my card. I picked a simple polka dot for the panel that covers most of the cardfront and used the smaller scaled snowflakes and white flourishes on a red background for the two panels on the cardfront. These are layered on Blue Bayou cardstock for a nice contrast.

There’s very little stamping on this card, just the “winter wishes” sentiment from Verve’s Snow Wonderful set. I accented the sentiment with a pair of layered buttons—a snowflake and a blue one—joined with some baker’s twine. Some pretty red seam binding is knotted beneath the sentiment panel for a bold finish.

Materials Used:
Snow Wonderful stamp set (Verve Stamps); Riding Hood Red Classic ink, Riding Hood Red, Blue Bayou, and Soft Sky cardstock (Stampin’ Up!); Wintertime Collection Kit (Echo Park); petite oval dies (Spellbinders); Ladybug seam binding (Martha Stewart); snowflake button (Blumenthal Lansing); blue button, baker’s twine (Papertrey Ink); clear crystals (Imaginisce)

Tuesday, December 14, 2010

Manly Warm Wishes

Here’s my card for this week’s Kraftin’ Kimmie challenge to use manly colors. I don’t have any masculine KK stamps other than Willard, so he’s making another appearance this week. I paired him with this week’s Sweet Sunday sketch challenge and some earthy colors.

Willard is colored with Copic markers to coordinate with the colors in the argyle print paper I used for the strip that runs down the length of the cardfront. I liked how the pattern kind of replicated the one on Willard’s sweater.

The patterned paper strip is dressed up with a piece of natural colored twill at the center and a fun pinked edge strip along the side. I machine stitched the edge to add some interest, then layered everything on a kraft card base. The “warm wishes” sentiment is added on using a small circle panel and a bit of foam tape.

Materials Used:
Moonlight Whispers Willard image (Kraftin’ Kimmie Stamps); white cardstock (Couture Cardstock), Tuxedo Black ink (Memento); markers (Copic); Pumpkin Pie Classic ink, Pumpkin Pie and Crumb Cake cardstock (Stampin’ Up!); Harvest Gold and Hawaiian Shores cardstock (Papertrey Ink); Fine and Dandy-True Blue paper pad (My Mind’s Eye); Inside Pinking border die (The Cat’s Pajamas); twill (Wrights); circle punches (EK Success); foam tape; sewing machine
 
Blogging tips